Showing posts with label Helpful hints. Show all posts

Thursday, February 4, 2021

PICKING UP MY NEEDLE

 Ahhhh, back to handwork again....well mostly until I realized that an arms length away, the contrast of the motifs against the background fabric was great, BUT not 4+ feet away. I resorted to a little trick I occasionally use......outline the shape using a higher contrast thread. You'll be amazed how it allows the motif to 'pop'.


Sunday, January 10, 2021

RAW EDGE APPLIQUE TIPS

It's been a number of years now since I retired from traveling the world on the quilting highway.  I don't miss the airline travel!  I do miss the energy I got from the workshop experience, sharing newly discovered techniques developed from projects made for my quilting cruises/tours, books, & competition quilts and garments.

This comment came from a follower in regard to a recent blog post.  AND that brought out the 'instructor' still in me:  

"Stunning!! I have to know what scissors you use to do all that fussy cutting of the cranes. The edges are perfect."

I'm happy to share my approach to raw edge applique.  But first I have to confess.......I used to turn my nose up at this technique.  I judged a lot of quilt shows in the day and often saw unintended frayed edges, sloppy applique, and distorted backgrounds. But I also saw beautifully executed pieces that elevated this art form.  I personally still favor handwork, but now through practice and trial and error, developed numerous methods to achieve the high quality standards I'm a bit obsessive about. Most importantly, it's given me an additional design path. Okay....enough of this intro....

#1.  Nope, no special brand of scissors.....I use quality small sharp to the point embroidery scissors.

#2.  Misting lightly with spray starch or fabric sizer and pressing before cutting is very helpful to help tame those cut edges.  This is especially true on more loosely woven fabrics which may require a bit more than a misting.  I don't find it necessary for most batiks.  SIDE NOTE:  Since my work focuses on art quilts that aren't washed, I don't over-do this process as there is a concern that starch attracks insects....whether true or not I'm not sure but I've never seen.

#3.  I'm old school and still recommend Pellon's Wonder Under.  I buy it by the bolt, and find it very dependable and economically priced.

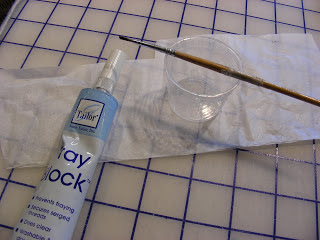
#4.  Once the motif is fused in place, coat the edges with June Tailor's Fray Block.  See details HERE. I learned this trick from applique expert Linda Cantrell.  The ONLY time this product has ever stained my fabrics was when I used silk dupioni.  It never hurts to test first though.  Batiks may not require this step, but if in doubt take the time to do it.


#5.  I always test stitch on scraps before committing to the stitch style,  width, length, & thread type. Do I want the applique to be as invisible as possible or to add to the design?  This is also where I discover whether extra 
stabilizing is necessary.  Very often just a piece of tissue paper beneath my project is enough to eliminate puckering.

Believe me, I still consider myself sort of new to this technique, but because I'm extremely fussy in regard to construction, all these steps are necessary to give me the results I'm proud of.

Perhaps you will find these methods helpful as well.


Tuesday, December 22, 2020

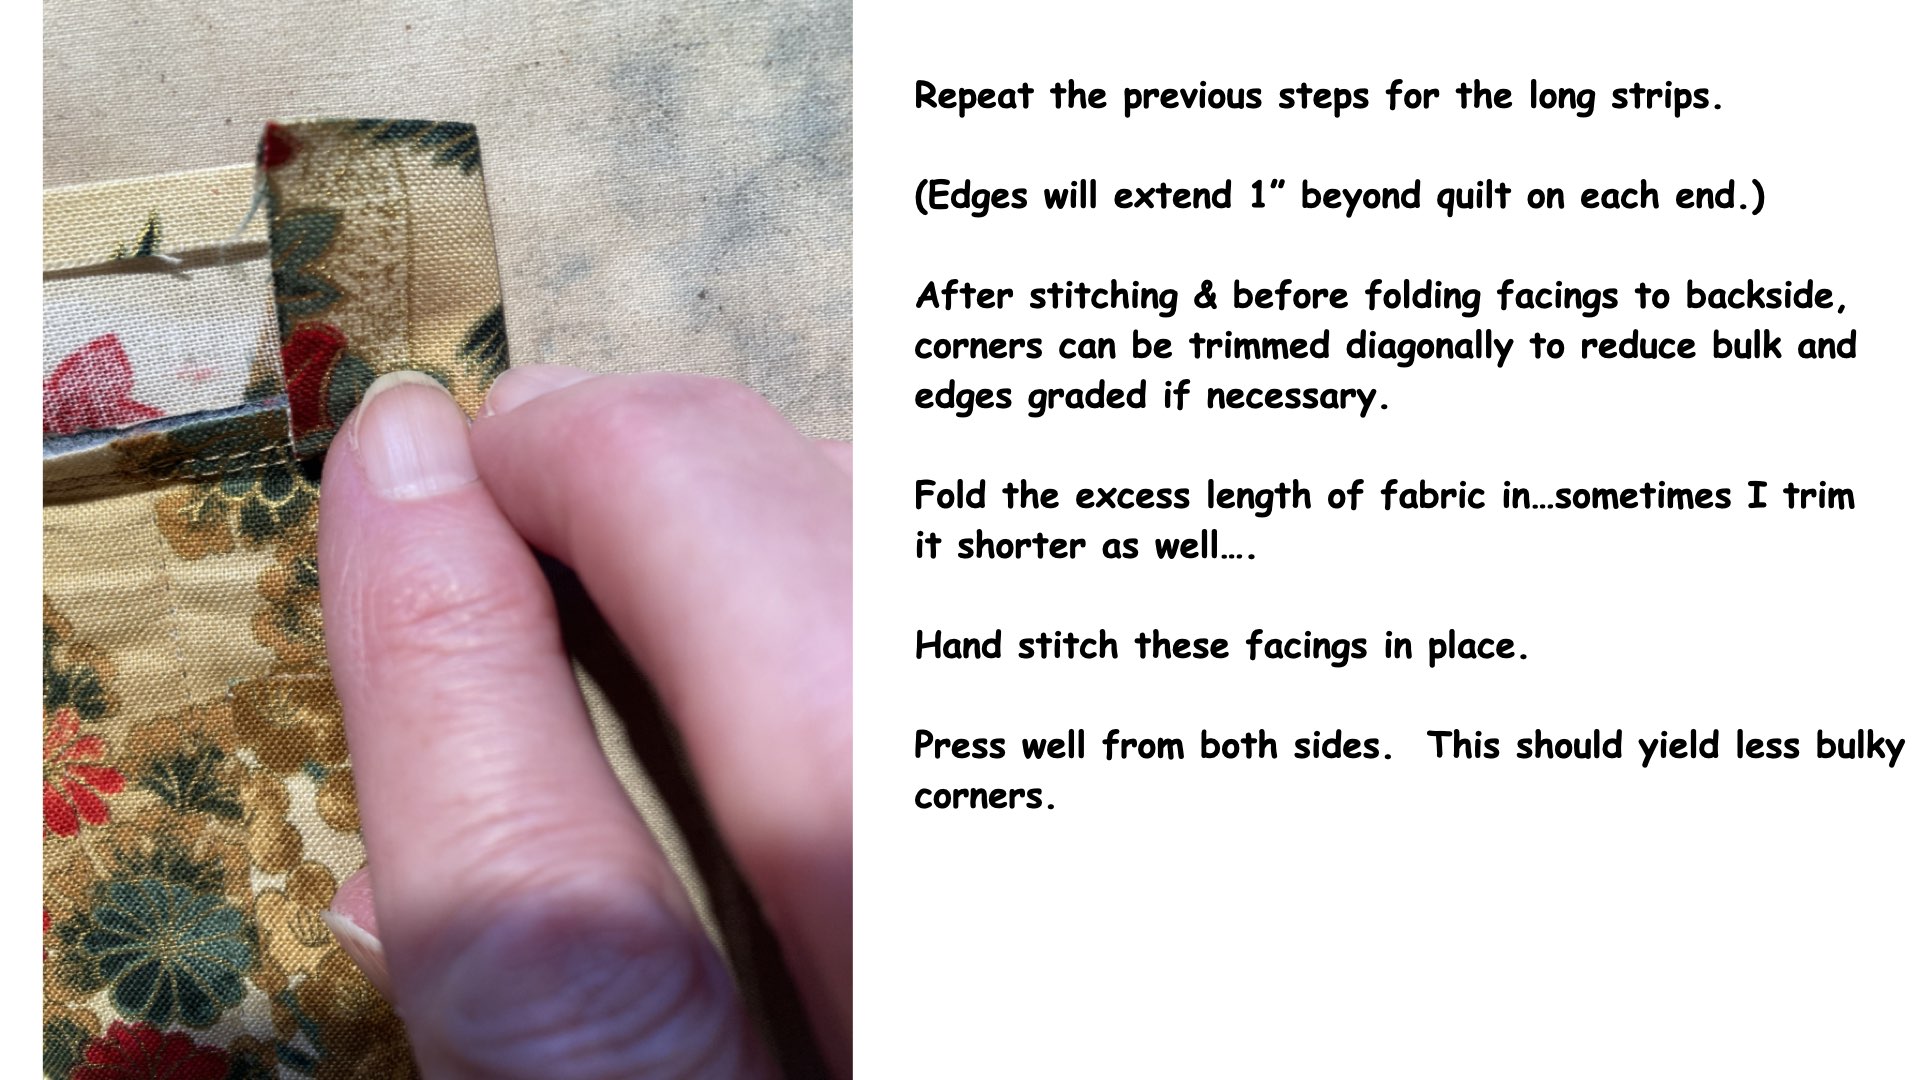
MY FACING TECHNIQUE

 Our small art group group has been meeting via Zoom.....not ideal but still very inspiring and wonderful to have this monthly connection.

Recently the subject of facings came up...several of us shared our methods.  Each has its merits and probably negatives as well.  

Since so many of us are 'home alone' for this holiday season and perhaps have spare time to play, I thought I'd share my facing method. It's a combination of several I've used over the years.....read on....

You should be able to enlarge the photos by clicking on them.


Monday, October 26, 2020

DETERMINED THIS TIME

 A project I abandoned twice before is now underway....determined to conquer this time. Came up with a way to transfer a (belated idea) design directly onto a motif without risking traditional marking pens/pencils. This little transfer wheel from my garment making days was used to perforate the outline of the design through tissue paper and onto the fabric. It was just visible enough to accurately add the additional motif.

HAPPY DANCE!!

Sunday, March 1, 2020

SWIMMING NOODLES ARE FOR MORE THAN ROLLING QUILTS

Here's our rather drugged looking Sooty after surgery.  She's barely able to stand up!  Her back legs kept splitting apart and down she'd go.  She had a small growth removed from her leg, a common issue with black labs.

The vet recommended purchasing one of the stiff plastic cones that you often see dogs wearing after surgery to prevent them from licking the wound.  Ages ago I saw a list of all kinds of uses for swimming noodles and amazingly I remembered this idea.  It took me only minutes to cut and string noodle sections for this homemade 'necklace'.
It worked great and I can only assume it was far more comfortable than the alternative.  She's such an agreeable sweet dog that she wasn't even bothered when we put it on her.  Within less than 24 hrs. she was up and acting normal.

Monday, June 17, 2019

CONTINUING - DESIGN PROCESS - hanging sleeve

Part 7 -  Creating a wall art quilt - from start to finish.....
The hanging sleeve is the final step in the making of this quilt. To accommodate the bulk of the dowel I prefer to add some 'give' to the width of the sleeve.  This allows room on the back of the quilt for the rod, preventing its bulk from being seen from the front as a visible bump when the quilt is hung. Here's how I do that.
*Note - if you've missed the other posts, scroll back to see the entire process.
 Cut a 6" wide strip of fabric, measuring the width of the finished wall quilt - minus 2".  Fold each short end 1/4" to wrong side, press and repeat. Machine stitch the hem to secure the neatly finished edges.
 Fold the strip in half the length of the fabric and press.
 Bring each lengthwise raw edge to meet at the center fold, wrong sides together.
 Press to hold shape.
 Reposition fabric with raw edges meeting and stitch a 1/4" seam. from end to end.  
 Press seam open.
 Using the pressed folded lines as a guide, center & pin sleeve to wrong side of quilt, 1/4" from top edge of the quilt. This step provides the 'give' in the sleeve for the hanging rod.
Hand stitch in position. Note how the built in fabric margin helps to accommodate the hanging rod.  

I hope you've enjoyed this step-by-step photo journey of the making of 
4 GREEN TREES.  As I said when it started about 10 days ago, anyone who has ever made a quilt already knows how time consuming, yet rewarding the task is.  Hopefully this has educated and inspired non-quilters to appreciate and perhaps own my work.....  The completed piece will be posted tomorrow.

Tuesday, March 21, 2017

IT'S ABOUT TIME

Yes, it is about time!!  This blog has been rather quiet lately.  My attention was absolutely and completely focused on a special project.....to be unveiled all in good time......

It's also about time that I can begin to adjust to the Janome 8900 QCP SE....after all it's only been about 18 months since it was purchased!!

Some of my biggest complaints were the crappy quality of the straight stitch, how it eats fabric, and the difficulty obtaining an accurate 1/4" seam....no matter what program or foot I used.
At a recent Fiber Junkies meeting, I cut loads of squares using a Sixxz machine...which by the way.....were not accurately cut.....see the explanation here.  After so much brain crunching on the latest project.....the simplistic looking pile of cut squares called.
 My machine has numerous settings for use with the straight stitch plate, several that promised a trouble free, perfect 1/4" seam.  However, none did....until now.
Thanks to the informed and helpful members of an online Janome owners list, I learned about the Professional Grade Foot.  It was back ordered from Sewing Parts Online, which took about a month. The cost was a mere $7.00 and it changed my life!

                                     
 Look closely, there are 3 holes for this single needle plate.....this foot uses the Ds4 setting and the LEFT needle hole.
 The edge of the foot is very straight, making it easy to line up with the edge of the fabric.  Just like my beloved old dead Pfaff.....sewing can begin at the top edge of the fabric without getting swallowed into the machine!
Look at this wonderful stitch....at 2.40 length.  Finally, and 'it's about time'!!

Here's another method I use to help me keep track of patch placement while stitching. (I KNOW some of you are shaking your heads and saying WHAT??  She can't even manage this simple layout?)  NO....age & a wandering mind is to blame.

Once I get the patchwork layout to my liking, a photo is snapped and downloaded to my nearby computer.  So, if remembering which end should be attached to which end while I'm stitching.......all I have to do is refer to the photo for clarification.  Like many other quilters, I label the top of each row with a reference number as well.

Wednesday, March 15, 2017

FUSING TIP

My attention to this blog has been lacking lately as I'm still hunkered down working on a special project that is SLOWLY coming together.  To say I'm focused is an understatement, in part that's due to the complicated process the design requires.
First let me say, I'm not generally a fuser....give me turned edges over raw ones any day of the week. But here's a tip that may come in handy for you someday when you are fusing.

This view of an area on the quilt doesn't appear complicated at all does it?  Yet exact placement of the motifs was vital. I came up with this idea a number of years ago while creating a quilt where much of the designing with fused motifs was done while it was on the design wall.

So....how to transfer a biggish piece to the pressing surface while keeping all the motifs exactly in place?
 'Fuse tack' them with a hot Clover mini iron.  It's easy to get into small areas to work around pins. (These strips are a scant 1/4" wide).  The pieces are fused just enough to hold in place before transferring the entire top from the design wall to the ironing board for final pressing.
Perhaps this method can be helpful to you someday too.

Instead of having to check whether or not I've posted here......consider following my blog by submitting your email address in the box on the right side bar, or subscribe to the RSS feed option.  Some computer software can be prickly about using RSS feeds.  If you have issues with your system, I recommend subscribing to Vienna.....using an app. that is readily available.  

Sunday, August 23, 2015

TONING DOWN THE COLOR

Work continues on the Oregon theme wedding wall quilt for my nephew.  He and his soon to be bride enjoy many outdoor activities in their Portland, OR surroundings.....hopefully, this quilt will bring a little of those memories into their new home.

Though I thought I was nearly finished.....I keep tweaking the design....trying to add interesting little details without detracting from the main elements.

So I found myself cutting and attaching tiny ferns along one side of the river.  After viewing them (without the pins holding each piece), it was apparent the color needed to be toned down a bit.  Dang....

What to do?!?  The pieces are already ON the quilt so whatever I do can't migrate to the background.  After a bit of pondering, out came a pad of Distress Ink. Using a Q-tip.....I carefully and very lightly went over the offending ferns.  Of course it would have been smarter of me to make that adjustment prior to attaching the pieces to the quilt.....however, sometimes you can't see the forest through the trees until you are right there!

I'll be somewhat absent again for a week+ as I head to CA to be Grandma!!  (Unless I can figure out how to blog from my older ipad........but then you'll be bombarded with pictures of the most adorable 3 year old ever!!!)  Back before you even can miss me!!

Friday, August 21, 2015

RAW EDGE APPLIQUÉ - HELPFUL PRODUCT TIP

I'm not a gadget gal.....of course I appreciate good tools but I def. don't try every new 'must have' product.  And, I'm not especially a fan of raw edge appliqué. Bascially, I'm old school but there are times when raw edge appliqué makes sense.
 This product certainly swayed my thinking and it's one you must have in your sewing room.  My friend Linda Cantrell introduced me to Fray Block, made by June Tailor.  (I purchased it online via JoAnne Fabrics).

This is FAR superior to Fray Check and the other products most of us are already familiar with.  It truly works, it's clear, DOES NOT stain your fabric or change its hand.  Amazing!!    
 Linda suggested squirting some into a small container and applying with a tiny brush because it comes out of the tube way too quickly.  The instructions call for placing the tube under hot running water for 3 mins. before using....Linda doesn't.
Though today was a bit chilly and I could see tiny particles in the liquid that normally aren't there. So I did as instructed, heating this product will assure it's clear when it's applied (and I assume also stain free!)  Look how clean the fabric edge is after machine appliqueing.


Friday, April 11, 2014

LED SEWING MACHINE LIGHT

I'm constantly fussing about the lack of adequate lighting in my studio.  Though there's a lot of space, it's located in a loft area with a vaulted tongue/grove ceiling (no reflective quality there!) and not very many windows.  

After much research the only lighting system we could find was a hanging track system. I have light....BUT....I also have a lot of shadows, no matter how I position the individual fixtures!  I have 13 lamps...the photo shows a portion of the track.  I think if I added more, I'd burn the house down!

 Recently I read about this LED light for sewing machines......it's a plastic ribbon,(with adhesive backing) fitted with lights.  
 Installation was easy.....the machine was turned over onto a towel.
After cleaning the surface, and following the manufacturer's instructions, the ribbon was pressed in place.....along with a on/off switch which was adhered to the back of the machine.....
And in less than 5 minutes....I had light. This new light source will be so helpful.  The cost with shipping ran just under $25.00.....a real bargain!

"The husband' found it on Amazon.com.  Its maker has his own cottage industry, (Summer House Products).  It was developed in response to a request from his quilter wife who was also in need of more light when sewing at her machine. Click here for the Amazon link.

I'm linking with Nina-Marie's Off The Wall Friday......head over to see what the talented folks there are up to this week.

Wednesday, September 25, 2013

STKR REPORT

 There's not much fiber art construction going on in my studio this week.....instead I've been concentrating on reconstruction of my body!  What do I mean?  Well.....it's a week of appointments to try to put my bone loss back on track, dental hygiene, and audiologist visits.  

Additionally, the Asheville Quilt Guild's Annual Show is this weekend, so starting with set up tomorrow....I'll be busy through Sunday.

However, I wanted to report back on my "Marketing" post where I introduced STKR.....a QR product that allows the viewer to hear the voice of the artist.  

My solo show at the NC Arboretum continues until Oct. 31, 2013 and I'm happy to report one of the larger quilts that featured a STKR has sold.  I'm choosing to believe the interaction between myself and the viewer aided in the sale. This piece was made for one of my Hawaii Quilt Tours....and this was the first time I've offered it for sale!

Hawaiian Moo Moo 

Saturday, March 23, 2013

MOTIF POSTIONING TIP

The project currently demanding my attention can't be revealed for awhile yet.....and don't you just hate when you read this type of disclaimer on a blog?  Ya gotta ask....'well then, why are you teasing us?'

Well...in this case it's not because the project itself is a big deal...it's more about the fact that it's an upcoming present.....so bear with me.

However, a trick I often use to maintain the postion of my design when the final layout is on my design wall might be helpful to you.  Fusing, especially raw edge fusing, is not a technique utilized very often in my work.  However, the ability to view and position applique motifs on a design wall before fusing does have a welcome appeal!

But....dang...once you have everything just how you want it.....it's difficult to move an entire quilt top to the pressing station.  If straight pins are used to 'tack' the motifs in place...half the time the pins end up getting secured to the flannel, the other half fall off.

So...here's what I do....  I use a 2" x 5" small, heavy flat iron to heat set the designs in place while they are still on the wall.  'The husband' recycled it to me ages ago after I had mentioned my little Clover one (about 1" in length) was too small & lightweight for this task.

It works like a champ.....the motifs are secured enough to transport the entire piece to my ironing board for a final pressing with losing any of the design elements in the process!

Saturday, December 1, 2012

STUDIO STORAGE IDEAS

Since I'm in the middle of three projects....and if possible I prefer to post them from start to finish with in-progress photos....let's pause and take a look at some storage ideas that have been helpful to me.

Maybe you can share some of your clever ideas too....

 I LOVE re-purposing antique furniture.  Here's a library card file now used for my threads.  Notice I haven't labeled the drawers....so it's always a surprise when I hunt for specific threads!
 We live in a log-sided home in the Blue Ridge mountains...about 3,200 ft. elevation.  This loft area was probably intended as a study or family room....it's long a narrow but works great for my studio/office space.
Old boxes are my weakness....I have quite a collection.  They are perfect for gathering and storing sewing items.
 This knife block works very well to safely and conveniently store my scissors.
 Ladders are another weakness of mine.....I've got five of them...all different sizes/styles spread throughout the house...most display quilts.  Here I've added baskets to the wide shelves to store and hide more tools of the trade.
 A larger view of my space....baskets and wood boxes are scattered everywhere!
 Lighting is my biggest problem.  Due to the high wood tongue and groove ceilings....I get a lot of shadowing on my work surfaces.  'The husband' researched and came up with this museum lighting system.....even with 13 halogen lights....it's still a problem.  What I need to do is have sky lights installed....but we are still hoping to sell our house (if the market EVER turns around) and build a home that is more functional for our life style, so I hestitate to take that step.
Just so you don't think I'm too neat.....here's a peek at my fabric closet....really a linen closet that is quite deep.  It's always a mess and stacks of fabrics continually fall off the shelves....  My goal is to start making more utility scrap quilts to reduce the stash.  My style of quilt making has veered away from cottons...it's time to move them out.

I'm sure the readers would love to know any clever tricks you might have developed for your sewing space......