Saturday, September 28, 2013

I REALLY GOOFED THIS TIME

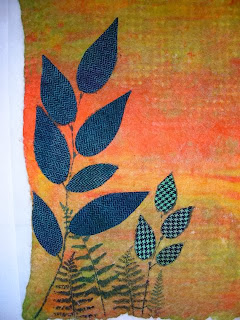
I got all excited about creating a sunset theme wall quilt using a piece of hand felted, dyed & sun printed wool.

 The idea was to print some foliage onto the felted wool.....the problem was....I didn't have a follow up to that idea.  Often I charge ahead...mess around and eventually find a way to pull a design together.

The leaves didn't print well due to the bumpy surface of the felted wool....and the scale was all wrong...and finding my way out of this mess seemed unlikely.
However, I tried.  But, why I thought fusing hand-dyed wool over the printed leaves was a good idea is still beyond me.  I've been super busy this week and really should not have jumped in with what little time I had w/o thinking it through better...... The motifs are simply overpowering....
 Well.....I figured I already hate it, so I hoped I will either like it by printing more foliage or decide to scrap it like I was going to do after step 2.  

I dislike it even more now......
Not being a person to give up easily.....I spent another hour plus fusing more wool over the newly printed leaves.  I still hate it......  Seriously, I RARELY give up on a project.....but this one is a definite candidate.  Another day or two of gazing at it will help me decide if this will be hitting the discard pile....

I actually do have some ideas for fixes....but not sure the end product will be worth the time.  I'll report back about this if a solution is found.....


Wednesday, September 25, 2013

STKR REPORT

 There's not much fiber art construction going on in my studio this week.....instead I've been concentrating on reconstruction of my body!  What do I mean?  Well.....it's a week of appointments to try to put my bone loss back on track, dental hygiene, and audiologist visits.  

Additionally, the Asheville Quilt Guild's Annual Show is this weekend, so starting with set up tomorrow....I'll be busy through Sunday.

However, I wanted to report back on my "Marketing" post where I introduced STKR.....a QR product that allows the viewer to hear the voice of the artist.  

My solo show at the NC Arboretum continues until Oct. 31, 2013 and I'm happy to report one of the larger quilts that featured a STKR has sold.  I'm choosing to believe the interaction between myself and the viewer aided in the sale. This piece was made for one of my Hawaii Quilt Tours....and this was the first time I've offered it for sale!

Hawaiian Moo Moo 

Tuesday, September 24, 2013

HAND WORK

I'm still licking my wounds after the heartbreaking loss of the Packers on Sunday afternoon.....sigh......  I'm puttering with another "use it up cotton" patchwork project underway but not yet ready for prime time..... 

 .....my evenings will be spent doing some hand embroidery on my indigo dyed linen piece. 
detail - still not sure where this is going......

Sunday, September 22, 2013

ADVENT CALENDAR 2013 PROJECT

A fall Sunday afternoon, when my favorite NFL team is not on TV here in the mountains.....seems like a good day to finish up a holiday project.  I am however listening to the game on the internet and actually wish I could be spared the bad news....but it's early in the game......  so....GO PACKERS!!!!!!  OH ME OF LITTLE FAITH......I TAKE IT ALL BACK..........PACKERS ARE KICKING BUTT NEARLY END OF THE 3RD QUARTER........  oh no.....I spoke too soon.....crying in my Wisconsin beer and brats at the moment!!!

Our DIL was wondering out loud last year about displaying an Advent calendar for 2013.  Well......what MIL couldn't resist raising her hand....waving it a bit....and saying......me, me....I'll make one for you!

 This isn't an original idea....I found the inspiration on a DIY site......but felt it was perfect for their family.  You see, our DIL is a 3rd generation Japanese American.  Their Asian heritage is embraced and acknowledged.....especially a time honored commitment to family.  Something so many of us have forgotten!

I ordered 1/2 pint Chinese carry out boxes on line....made a template and proceeded to cut and glue a variety of green print card stock to each side of the boxes.
 Next, I cut out 24 Christmas tree shapes from white card stock & colored the trunk brown.  I experimented with several methods to add numbers to the trees......and ended up stamping them. 
 Production line ready....
 Numbers stamped....
Tree glued in place and each handle will be fitted with a miniature closepin.  DIL will attach a string/ribbon between a large doorway or over their mantle...depending upon which is the most unreachable for the 1 1/2 year old grandson.

Small treasures of course will be added to each box for the family to enjoy as the countdown to Christmas begins Dec. 1st.

It may seem early to be thinking about such things......but in the old days I always had all my shopping finished and gifts wrapped (a new theme each year) by Thanksgiving.  That allowed me the freedom to sit back and enjoy the holidays!!

So......I'd love to hear if anyone else has gone off the organizational deep end??  If so, how.....

Thursday, September 19, 2013

CREATING WITH INDIGO DYED FABRIC

 Back in July, the Fiber Junkies spent a day Indigo dyeing.  I've been itching to create a piece ever since.  
It may not have been wise to have experimented with so many different fabrics; linen, wool,  silk, and some coarsely woven burlapy stuff....to name a few. The results were all so different and don't coordinate well, yielding only small amounts of any one kind.
 Being influenced by my darling DIL's love of lime green.....and with a hunk of ice dyed (on the left...overdyed what was once a country style yellow and white star fabric)....a palette is developing along with some possible embellishments.
After far more standing and gazing at the design wall than should have been necessary...shifting hunks of the linen around, I was able to piece them together for a background. 

Where is this going?  No clue yet........ The background will require lots of stitching as it's very flimsy (yes again.....but perhaps that's part of the challenge!).......   stay tuned.

Wednesday, September 18, 2013

QUILTING = LOVE....PASS IT ON.....

What a needle and thread has added to my life could never be measured....even in a 1,000 page book, never mind this blog.  In addition to having taught in all but 3 states in the US, plus so many unforgettable international locations, I count the friends I've made along the way as the most important benefits. 

 As a guest speaker, sitting at a guild meeting, I've heard glowing remarks from members who proudly display projects inspired by a workshop, book, or style of an instructor.  It's rewarding to know that even though often the path of the student/instructor is only fleeting.....it never-the-less can have a lasting impact.  And...that goes both ways.

I was gifted this beautiful glass cabochon from one such person.....thank you Janet.....I can't wait to incorporate it into an upcoming project.  It's very much appreciated!


Speaking of sharing....I blogged about this simple patchwork lap quilt here.  It took me a bit longer to finish it than expected.....so before it's sent off to its new owner, here's a final look.  No....this isn't a master piece in design with intricate patchwork or machine quilting....rather, it was made with love as a surprise gift. Isn't this why so many of us quilt??  

Monday, September 16, 2013

SUNFLOWERS

Recently I blogged about stenciling/printing some roadside foliage onto a few piecess of my hand felted/sun printed wool.  Read about it here.

So...now it was time to see what I could create with one of the designs.
My inspiration was a field of huge sunflowers which were at their peak of height and brilliance. Paper motifs are helpful for me to get a handle on the size, scale, shape for a composition.  I may or may not actually use them as templates....but the exercise of having a partial layout with paper is a good beginning. 
 So...with a plan.....I set about beading the centers of some sunflowers.  After I completed two it became apparent that no matter how closely I beaded, a bit of the lighther colored background was slightly visible.
 A Sharpie marker worked great to fill in the space where the beading would take place for the remainder of the flowers.  I could have used black wool or fabric as well....but this approach was far more immediate!

Stems, leafs and flower petals were cut and thread basted in position after the beading was completed.  To complete construction, each was hand embroidered in place.
 SUNFLOWERS  15" X 10"
Artist hand felted sun printed wool, stenciled with woodland foliage,
hand embroidered, and bead embellished.

**photos are clickable to get a better view......

 Detail - Sunflowers

Saturday, September 14, 2013

RELAX

The word RELAX, is fairly foreign to me. I'm pretty much a 'fast forward' kinda gal.  Today our PTA group gathering was smaller than usual which led to a relaxing outdoor picnic at the Pisgah Inn, along the Blue Ridge Parkway.


At elevation 5,000 feet the views are breathtaking...and of course even better than this photo when it's clearer.  NOTE to self..... take the time to relax more often!!

Friday, September 13, 2013

EARLY MORNING DAWN

Recently, along with two pals.....I did some ice dyeing.......
 Instead of using traditional woven cottons, I experimented with other fabrics. This piece is wool....good quality white wool left over from a garment project years ago. Not all wool will felt, even if it's 100% wool. This one didn't so I decided to see how it would take dye and then...what I could do with it.
Happily, the results were pleasing  Now...what to do??  It's quite flimsy so adding an agate slice as the design focal may not be smart.  But, what the heck...I like a challenge!

I stabilized the wool with Pellon's lightweight, non-fusible interfacing....before fusing a rectangle of hand dyed gauze, outlined with hand stitching.   
 To provide more stability, machine stitched lines about 1/4" apart where sewn.  Next, the agate was secured to the layers using a Peyote stitch. (If you are planning to attend the AQS show in Phoenix, Feb. 2014....this technique is the focus of one of my workshops.)  
  At this point, the design was a bit lacking/lonely, so some hand embroidery and a few more beads were added.


Despite my two stabilizing tricks, the weight of this rather large agate was still a concern. So instead of finishing with a facing as planned, I mounted it on a yellow batik covered canvas frame.  

Seriously, my fingers are still sore from hand tacking the layers together.  Quality construction is a high priority since my work is for sale! The process was necessary, otherwise the agate could have looked like one large Double DD saggie boobie!

Additionally, and it's unfortunate that I hadn't thought of it earlier....I decided to add more beads trailing from the top of the piece to the agate.  Believe me....this was no easy chore because of the wood framework. I'm glad I did though!
EARLY MORNING DAWN   8" X 10"
Artist ice dyed wool, bead embellished agate, hand embroidered,
mounted on a 3/4" deep frame.

Tuesday, September 10, 2013

PATCHWORKING AGAIN...

This Modern Quilting trend is onto something. 
Simple patches & big blocks, that's my kind of patchwork!  Yes, I did intricate patchwork years ago, but even then I didn't enjoy the process like I should.  Once I started creating my own funky, folk art embellished (often humorous) designs...I found my place.  Of course if you view my work now, except for the beadwork, you may not even see a glimmer of my once trademark quilts.  

I've found a new passion when I was working on my wool book and haven't stopped exploring since!

 But...what do you see here?  Yes, 100% cottons that have for the most part been lingering in my closet for well onto 25 years!  
 It's truly amazing how little one's stash is reduced even after piecing nearly all of a quilt!  BUT....gosh...I need a backing and since I don't have any one fabric with enough yardage, I'll have to piece one.  So, the stack of fabric should get even slightly smaller.
This may be the last view you'll see, it's a gift and when it's done, it will be on its way.....and I'm sure you can imagine the finished quilt w/o a photo anyway!

I plan to machine quilt it with vertical straight lines.  I won't kid you....really that's all I'm capable of.  I LOVE to hand quilt, and I have mastered that technique (if you are attending the Feb. 2014 AQS Phoenix show....look for my workshop on that subject), however this is a lap quilt, meant to be used and even abused so I'll save my hand quilting for another project.

Monday, September 9, 2013

DISAPPOINTED

Even Sooty is depressed after the Packer's hard fought loss yesterday (and might I add.....for the 2nd game in a row....a bad call by the officials). However, the Pack played so much better then they did the last time they met....SFO has a really good team and they got the W in their column.  Next time it will be our turn.

Sooty's actually not allowed on the furniture....so this surprise pose provided lots of laughs for us and a little bit of a scolding for her!

Sunday, September 8, 2013

THE PACK IS BACK!!!!

Well.....like any good Cheesehead.....we wait....hoping that this is our year again.  You can take the gal out of Wisconsin, but never her love of the Green Bay Packers......  Even our son, who now lives in the Bay area, will be cheering for the green and gold.

Soooooo........GO PACK, GOooooooooo!!!  


We are grateful for what we suspect is an intervention by "Saint Vincent" for getting the game on national TV so we can enjoy it at home.  Our flags will be flying high.

Saturday, September 7, 2013

BOTANICAL PRINTING

Oh my....there's a nip in the air already......our overnight temperatures are going down into the 50's already.  Boo hoo.....  Yet, it still warms up nicely to the high 70's in the daytime, plus the constant rain we've experienced all summer is now absent.

I've been spying the roadside foliage as I trudge along the mountain roads on our 'daily forced march'.  It won't be long before it dies back.....so today I gathered some for a little botanical printing.
 This isn't a difficult task....messy, yes....but quite easy with minimal equipment needs. That's good for me because I have no space for wet work.


Using acrylic fabric paint, several sizes of brushes....lots of paper towels and other barriers....I mixed some paints to obtain several shades of green.  From almost black to shamrock green (which never printed bright!)  

A larger brush works well for bigger leaves....just paint the wrong sides of the leaves/stem with as much paint as it will hold, carefully place it wrong side down where you want the design to appear on your fabric.  Cover with a piece of paper towel or fabric (I use something that will absorb the excess paint....rather than wax paper.)  Press down firmly to transfer the paint, then carefully remove the leaves.  Try to lift straight up to avoid excess paint smearing onto the fabric.

I was printing onto some of my very heavily felted wool that I had sun printed earlier this summer.  That meant I wouldn't get a very detailed, crisp print.  In some areas I had to go back with a tiny but stiff brush and fill in where dips in the felt didn't allow the paint to penetrate. 

Usually one print per leaf/fern works best...though if it's still quite firm you can do two.  After that, the foliage becomes flimsy, making it too difficult to control.
This was about a two hour process. Gathering the supplies, indecision about placement/design, plus picking over the foliage I gathered, probably took more time than the actually printing.  Some of the specimens I picked simply weren't suitable....too delicate to control once the paint was applied.  

The painted felt will now need to dry....and then heat set.  What will I do with them???  Hummm....I don't know, but I'll post the results as I have time to tackle each.
NOTE....in answer to Margaret's question:  I transfer the wet foliage directly to the fabric without any drying period.  I don't do much textile painting, therefore the little bit of paint I own is old and probably thicker than a new product might be.  If the paint one is using is super thin....there are such things as 'extenders' that thicken the paint which might help to avoid drips.  The thing is....the paint seems to be absorbed pretty quickly by the leaf anyway, so it really hasn't caused problems for me.  I suggest practicing on a scrap to test before printing to check your products.

Thursday, September 5, 2013

ROCKS IN MY HEAD!!

Well.....I've been having fun......big fun if the truth be told.  Kuddos to Lisa Sorensen @ kaizenjourney   I've been smitten with her embellished river rocks ever since I first laid eyes on them. 
So the other day, I kept my felted wool on the shelf and tried my hand at embellishing several small rocks instead.  Yikes, my respect for Lisa grew even greater if that was possible.  

I have a lot to learn and must find a source for small smooth flat rocks.  NC mountains has rocks....and we have rivers....but the two have not combined to cross my path.  I'm on a mission now.

Tuesday, September 3, 2013

NUNO FELTED MINI COMPLETED

Recently during its construction, I blogged about this mini Nuno felted piece. Click here to learn more. And....now it's complete.  I enjoy selecting a pile of threads and beads....and with needle in hand.....putter around with one eye on our evening TV programing and the other on my work.  

Believe me, one eye on the TV is enough.....'the husband' controls the remote so any program that features wheels and motors typically airs. However, now that the rest of the world has heard about 'Duck Dynasty', I can proclaim, we've been watching it since day one.  Oh....you don't think that's an accomplishment?? I'm not sure it is either, but I do know what all the buzz is about! Grinning......