Sunday, June 30, 2019

A GIFT OF LAKE SUPERIOR STONES

You know you have a good and thoughtful friend when she spends time on her vacation collecting smooth, interesting beach stones for me!  

 This lovely pile came all the way from the shores of Lake Superior....thank you Janet...I'm thrilled.
 For some they might only be rocks.....to me they are a blank canvas, waiting to be embellished and displayed as I've done here on my dining room farm table.
Close-up view....my fingers are itching to dig into my vast collection of beads & grab some of my hand dyed cordings. Often it's the simple things that can give so much pleasure!

Friday, June 28, 2019

SLOW GOING

Nearly a week has gone by and I don't have much to show for it except piles of rejected paint samples...do you know how many off white tints/shades there are?  Impossible to choose.

And then there's the carpet samples.....so many factors to weigh - color/weight/loft/no loft/durability/adaptable to stairs and concrete base....geesh!

Next comes the really overwhelming brain teaser.....replace or repair poorly constructed (14 year old deck that was well maintained).  We have 3 large decks that are unsightly and unsafe. Wish we could eliminate the largest open one but given the terrain it has to stay. One estimate for a direction that makes sense for us aging folks would be the less maintenance Trex brand.  Good grief......it's more than the cost of our first house back in 1970!!!

The positive/negative chart we have going to supposedly take the emotion out of the decision to move OR stay and freshen up this house, now leans in one direction.......still leaving the biggest issue of finding a suitable home.  Here in the mountains.....it seems the majority of homes are not one level living....rather 2 and so often 3 are the norm.  That's what we are trying to get away from.  So....enough of this....I'm sharing simply to let you know I'm still here, still creating, but a bit more slowly during this shift in our otherwise fairly predictable lives.

 My 
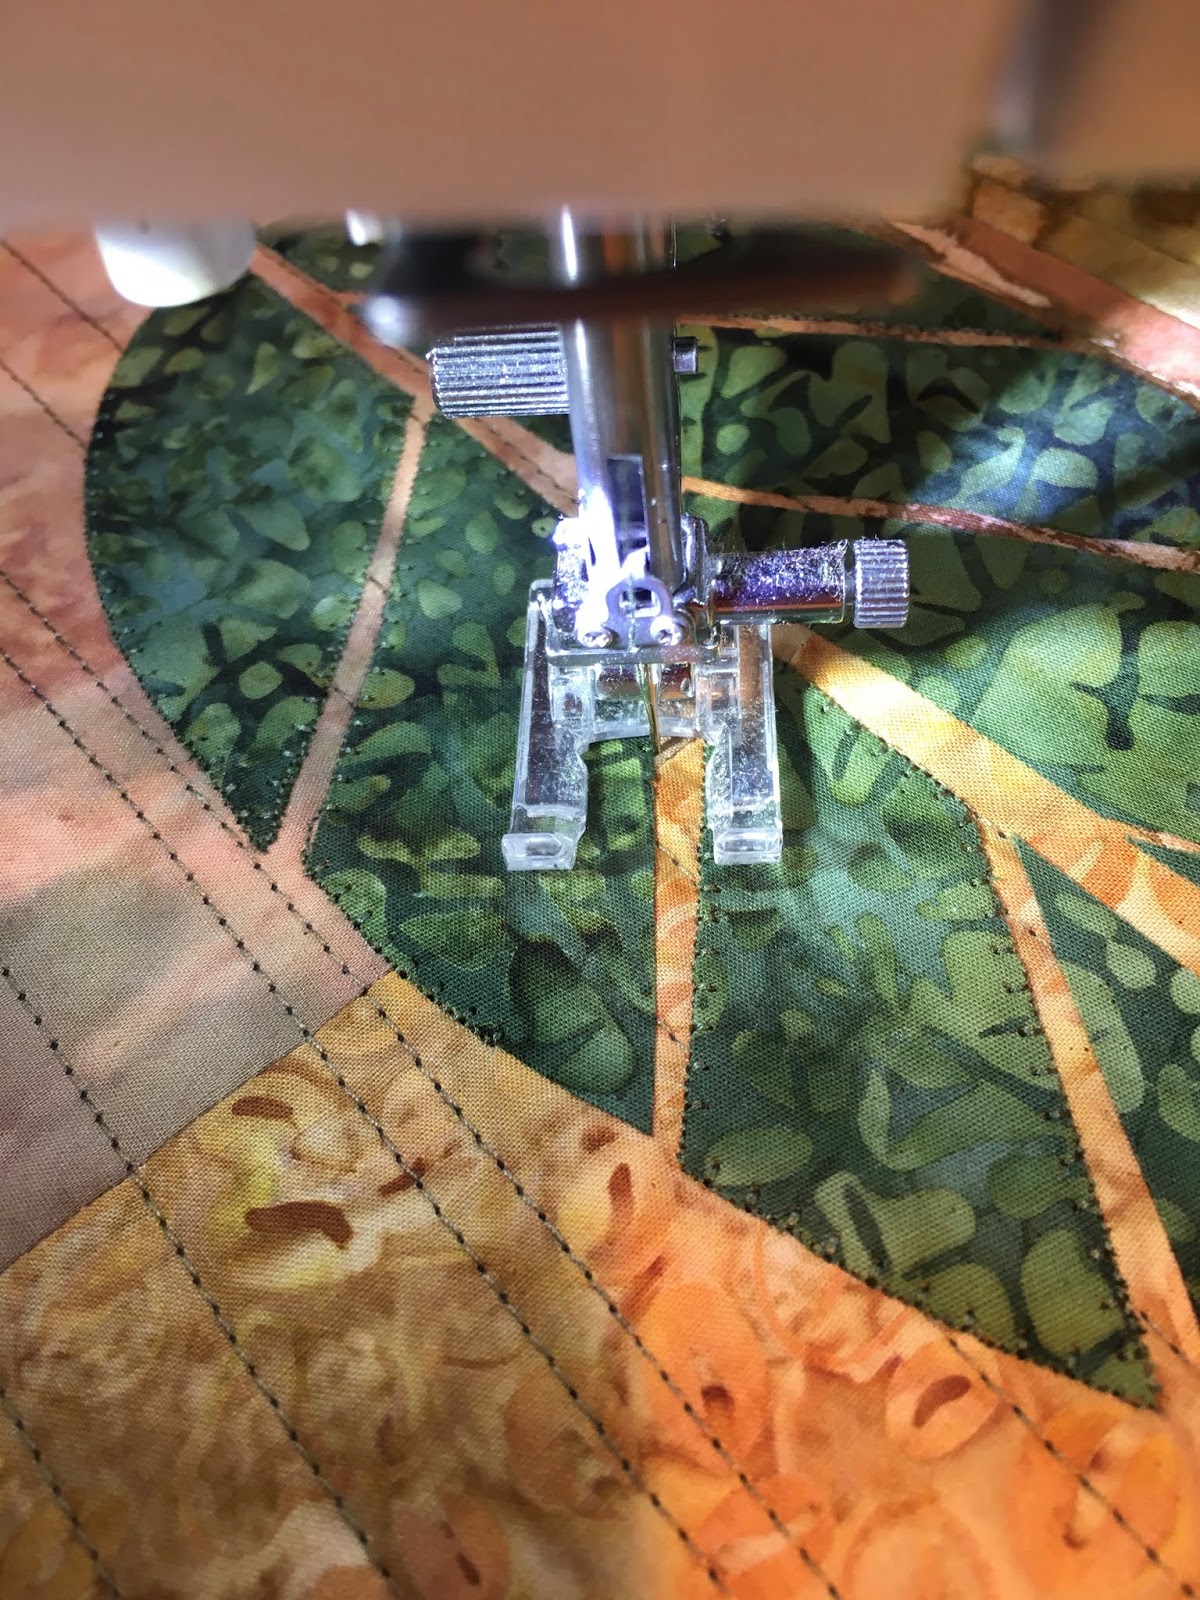
last post showed a dye painted - sort of landscape piece.  It was done on Liberty of London's Lawn cotton fabric.  LOVE the feel, but it's so thin and unstable that immediately I realize I'd have problems pursuing the design idea I had.  First things first.....wishing to use a programed stitch on my machine to add texture and lay down lots of thread quickly.....thankfully I tested it first.  The 'Lawn' fabric was spray starched to give it more body and further stabilized with a Pellon non-fusible lightweight interfacing on the back.  I tried every trick I know with machine settings and nothing prevented the tunneling of the fabric....even when I added a layer of batting beneath the Pellon.
Here I stabilized a piece of the fabric with Terial Magic.....a liquid fabric stabilizer that supposed to turn fabric into an almost paper like quality.  I know there are many who rave about this product, but yet again I'm a thumbs down.  It makes a MESS of the iron and one really needs a place to hang the sodden fabric to damp dry without dripping all over.  They say it doesn't mess the iron....oh please.....each time I've used it....my iron requires massive cleaning and this junk tends to get on the piece you are trying to press......even with the use of a  press cloth it's troublesome to use.  

In the end, I gave up my quest to use the programed stitched and went with a straight stitch using variegated thread which seemed to behave better.  Come back and see how this once flat piece is now looking....


Friday, June 21, 2019

NEW BEGINNING

We are again attending to home projects.....still deliberating whether to stay in this house or sell.  Back and forth thoughts how to ready this house to sell or  move forward with longer term needs to last another 10 years.  So much has depended upon finding a suitable house to purchase and so far there's not a single one that checks all or most of our boxes.

What's a girl to do?  Start another project of course and then grab bits of studio time here and there to keep my creative self sane.

I dye-painted this 'sort of' landscape piece during one of our Fiber Junkies dye days.  We used thickened dyes as well as thinned one which were used to over-spray the backgrounds.

An inkling of an idea has developed about how to use this piece.....I'll be reporting back as it develops. 

Be sure to visit these fine blogs to see what others have been up to this week: Nina-Marie's Off The Wall Friday & Sarah's Whoop Whoop Friday.

Tuesday, June 18, 2019

4 GREEN TREES - AVAILABLE FOR PURCHASE

After 10 days - averaging 6 hours each = 60 hours NOT including the hours spent printing the fabric nor the cost of materials.....the hourly rate I've earned is about $3.00, pretty pathetic!  However, the creative pleasure gained can't be measured.  Perhaps you'd like to give this piece a home?

4 GREEN TREES- 19" x 32.5"
$225
Artist deconstructed screen printed cottons, machine applique & quilted.
Prepared for hanging. Shipping included on this piece.

Monday, June 17, 2019

CONTINUING - DESIGN PROCESS - hanging sleeve

Part 7 -  Creating a wall art quilt - from start to finish.....
The hanging sleeve is the final step in the making of this quilt. To accommodate the bulk of the dowel I prefer to add some 'give' to the width of the sleeve.  This allows room on the back of the quilt for the rod, preventing its bulk from being seen from the front as a visible bump when the quilt is hung. Here's how I do that.
*Note - if you've missed the other posts, scroll back to see the entire process.
 Cut a 6" wide strip of fabric, measuring the width of the finished wall quilt - minus 2".  Fold each short end 1/4" to wrong side, press and repeat. Machine stitch the hem to secure the neatly finished edges.
 Fold the strip in half the length of the fabric and press.
 Bring each lengthwise raw edge to meet at the center fold, wrong sides together.
 Press to hold shape.
 Reposition fabric with raw edges meeting and stitch a 1/4" seam. from end to end.  
 Press seam open.
 Using the pressed folded lines as a guide, center & pin sleeve to wrong side of quilt, 1/4" from top edge of the quilt. This step provides the 'give' in the sleeve for the hanging rod.
Hand stitch in position. Note how the built in fabric margin helps to accommodate the hanging rod.  

I hope you've enjoyed this step-by-step photo journey of the making of 
4 GREEN TREES.  As I said when it started about 10 days ago, anyone who has ever made a quilt already knows how time consuming, yet rewarding the task is.  Hopefully this has educated and inspired non-quilters to appreciate and perhaps own my work.....  The completed piece will be posted tomorrow.

Sunday, June 16, 2019

CONTINUING - DESIGN PROCESS - Facing & label

Part 6 -  Creating a wall art quilt - from start to finish.....
I'm now in the finishing phase so today we will look at how I finished the edge and created the label for this piece.
*Note - if you've missed the other posts, scroll back to see the entire process.
Some quilts benefit from a clean finish edge, rather than the addition of a binding.  4 - 2" wide strips are needed.  2 strips are cut 2" shorter in length than the vertical measurement & 2 are cut 2" longer than the width of the piece.  I've pressed a 1/4" hem on each.  Starting with the sides: match raw edges, right sides together & sew with a 1/4" seam.  
Before attaching the horizontal strips, press each side strip to the outside and stay stitch 1/8" from the seam line as shown.  This will make it easier and tidier to turn the facing to the wrong side.
 Stay stitching is completed and it's ready to turn to the back side of the quilt.
(Viewed from wrong side)....only the thinnest amount of the quilt top will be visible after turning and pressing the facing to the back. 

 I find it easier to get sharp corners if I take the time to turn, press, and hand sew the side facings before the last two facing strips are sewn.  Once that's complete, repeat with the remaining strips.  When hand sewing these last two strips, turn in the excess fabric at the corners.

NOW....let's look at how I create my LABELS.
 My labels are printed onto fabric using an Espon printer fitted with Durabright ink.  I've created a master form in my word processing file which can be changed with each new quilt.  Though I'm not a big fan of spray adhesive, I find it a good tool for this task.  A rough cut piece of fabric is sprayed lightly on the wrong side and adhered to a piece of card stock.  In this case I used a piece shorter than the length of the paper, the edges have been trimmed to size. Painters tape is secured to the top edge to keep the fabric in place as it's grabbed by the printer's rollers. 
 I sign it before removing from the card stock.
 Next it's peeled away from the card stock, heat set, fused with a paper-back fusible to the wrong side, and rotary cut using a wavy edge blade.

Finally the paper backing is removed and the label is fused to the back of the quilt.

One last step is necessary before calling this piece complete.  Come back and check out my method of creating a fabric hanging sleeve.

Friday, June 14, 2019

CONTINUING - DESIGN PROCESS

Part 5 -  Creating a wall art quilt - from start to finish.....
*Note - if you've missed the other posts, scroll back to see the entire process.


As you can perhaps surmise, the applique has been completed and 3 other more subtle details have been added.  I purposely stayed away from a bright color for the birds, choosing instead a more blendable color to allow the viewer to 'discover' them upon closer inspection of the piece.

A backing has been added and the tree motifs have been outline quilted to better hold the layers together.  The final step will be to finish the edges with a facing and I'll show you the method I use in the next post.

Linking to:  Nina-Marie's Off The Wall Friday & Sarah's Whoop Whoop Friday.

Thursday, June 13, 2019

CONTINUING - DESIGN PROCESS

Part 4 -  Creating a wall art quilt - from start to finish.....

At last....I'm satisfied with the tree motifs which are pinned in position to the quilt top on my design wall.

I came up with a clever trick numerous years ago when working on a piece that required precision placement of its many small design elements.  Rather than trying to move work this size to a pressing surface and hoping nothing shifts (of course it will), I use a Clover mini-iron to tack each piece in place. Once the elements are temporarily secured, the entire piece is transferred to a large pressing surface and permanently fused together. 
Here's another trick to use when machine appliqueing to avoid those pesky frayed threads along the edge of a fused motif.  Before machine stitching, use a tiny paint brush to coat the edge of the applique with Fray Block - a June Tailor product. Batiks don't fray as easily, but being hyper fussy about high quality workmanship, it's my standard procedure no matter what fabric I'm working with. I learned about this product from my pal Linda Cantrell....well known for her detailed humorous 
appliqué quilts.  
With matching thread, I've machine appliqued each section.  The machine is equipped with an open toe embroidery foot and programed with  a narrow blanket stitch.
Again, being the control freak I am about tidy workmanship, I pull the beginning and ending thread ends on each and every section to the wrong side and tie off. Yes, it's very time consuming....and it's just another example of why it can take me so much time to create a quality wall art quilt.

It's almost finished.....stay tuned for the rest....

Wednesday, June 12, 2019

CONTINUING....DESIGN PROCESS

Part 3 - Creating a wall art quilt - from start to finish.....
 If you guessed this fabric, we agreed.....however, even after my 25+ years of quilting experience, teaching/speaking on the national quilt circuit.....I can still get it wrong! Most of my work now features simple motifs/uncluttered designs which is why I chose only 4 large tree motifs as the design elements for this busy background.
 However, since 4 tree blobs felt heavy and uninspiring, fracturing them seemed to fit the background style better.  Which is where I ran into problems....though this green batik fabric appears to stand out quite well in this close up....in person the pieces didn't have enough contrast.  I spent way too much time trying to make it work; outlining the edges with a brighter green, free motion stitching within the section, and even considering hand embroidering a blanket stitch around each one.  If I wanted to fracture the trees, I'd need to switch fabric.
So, I gave up and moved onto a darker batik fabric.  I'm days into this project already and this is what I have to show for all that time....a background, 1 tree blob, 1 dark fractured tree, and 1 lighter fractured tree failure.
 Okay.....moving on....I'm going with the darker fractured tree but another problem cropped up. Notice how the split between the top left two pieces nearly disappears?  The background in that section was too dark.....
 I tried moving the position of this tree but it needed to be where it was.....so I used an oil pastel to lighten the background of that area.
Here's the result....you'd never know the background fabric has been altered.  Next step......fusing and then appliqueing the trees in place.  Watch for part 4 soon.

Tuesday, June 11, 2019

DESIGN PROCESS CONTINUED.....

.......The collage background was a tad fussier to piece because the majority of the deconstructed screen printed fabrics were polished cotton.  That fabric printed with beautiful color and detail, but it's flimsy and difficult to work with. It wasn't long before I grabbed spray sizing to help to tame it somewhat.
 Top now pieced - about 33" x 20"
 The top is still more unstable then I'd like (that darn polished cotton!!), so I went ahead and added batting and straight line quilting to provide additional texture and strength.
 The vertical lines of quilting were stitched at varying widths from one another.
Now that the background is finished, more than an hour went into digging through my stash to find what I hope will be the right choice for main motif elements.  The plan is to use only 1....which one do you think I picked?

Monday, June 10, 2019

AHHHH, AN IDEA IS BORN

Are you curious about how a wall art quilt is made from beginning to end? Follow along as I begin a new piece. Sometimes, even before a design idea gets born, certain fabrics that I previously created start trying to get my attention. I know it sound silly but it's almost like they are yelling pick me, pick me....I've been waiting on the shelf too long.

 So I arranged several pieces of deconstructed screen printed polished cotton on my design wall. Still not knowing where this is going....I pulled some hand-dyed cottons in accent colors of greens and reds.
After several days of passively pondering over design options, I think an idea is finally born. The large pieces (plus more from my stash) are being cut apart, arranged and sewn back together collage fashion to create a background. 

Check back to see the next step.....

Friday, June 7, 2019

FIBER JUNKIES - JUNE MEETING

Our activity for this meeting was to be indigo dyeing.  However, the weather wasn't cooperating so at the last minute Kate suggested a somewhat similar nifty technique.  The idea is to use shibori type folding methods as we would have with the indigo but instead use paint/dye on the edges of the folds to create interesting patterns.
 Judy our host and hero of the day scrambled and got all the supplies ready for the fun day in her studio.
 Judy is well known for her surface design pieces which she taught for many years on the national quilting highway circuit and in her books.  We are grateful for her generosity......this is just part of the supplies she had organized for us to use.
 I had prepared this pink (I really, really, dislike pink) Liberty of London Lawn fabric scrunched on a PVC pipe to indigo dye.  But I brought it anyway to see what would happen if I painted it instead.
 So often I come home from our FJ play dates with hunks of fabric dyed/painted in all different colors, nothing coordinates and they end up lingering on the shelf.  So my new goal was to use the same paint colors to try to create a more useful collection by the end of the day.
 Here are a few more of my folded pieces.  NOTE......90% of what I was using were failed pieces from previous 'experiments'......worth trying to see if they could be rescued.
 Here's another small piece 'flag' folded, using Dye-na-Flow.
As you can see now that they are washed and pressed......there's nothing usable here. I should have used solid white fabric as Gen did....she her winners below.


And here are Sue's super results......

 But despite my disappointing results......it was such a fun day....with great pals and a technique I'm sure we will play with again.

Linking to:  Nina-Marie's Off The Wall Friday, Sarah's Whoop, whoop Friday.