Showing posts with label Felting. Show all posts

Friday, April 6, 2018

PLAYING WITH WOOL FIBERS

The tourist season is about to begin here in the mountains where the spring foliage is beginning to bloom.  The folks at Woolworth Walk just reminded all their artists to stock up on their products.

.....So, I've been felting.  It's been awhile so it's been fun getting my fingers all wrinkled again.  My stash of felting supplies contains quite a lot of merino cross- cut batts which are supposed to shorten the felting time over soley using wool roving.

I've avoided using the batts because they seemed more difficult to work with.  But on the positive side, I can achieve finished pieces that are thicker and stronger, like this embellished vessel and these shallow bowls.


This was a piece I reworked because it wasn't felled enough the first time....however I still don't like the shape or color.
This one is still a bit damp, meaning I need to wait before it's totally finished.  Sometimes 'curls' felt right in and other times they refuse to do so and needle felting those little buggers into the wool becomes necessary.

Check out these sites to see what other artists have worked on this week:  Nina-Marie's Off The Wall Friday, Sarah's Whoop Whoop Friday, and Crazy Mom Quilts.

Friday, May 5, 2017

TAMING DYED FELTED WOOL

This week I've been blogging about the various methods pals Kate & Judy and I played with during a dyeing marathon.

I addressed the two-step approach that finally helped me achieve color on the different fibers used to manufacture National Nonwoven's Woolfelt.
One other common issue that develops during the drying process is the wavy edges you see on this piece above.  Steam pressing often does not remove them.
So at home, working with dampened wool, I stretched the piece flat, pinning the edges to a piece of cardboard.  It was left to dry for 24 hrs....which solved the problem! Of course I could have done that after the fabric was rinsed, BEFORE it dried.....but given the environment where we worked, it wasn't practical.

Check out these links to see what others have been working on this week:  Nina-Marie's Off The Wall Friday, Sarah's Whoop Whoop Friday, and Crazy Mom Quilts.

Friday, November 11, 2016

MORE MINI BASKETS

In addition to yesterday's post, here are a couple more varieties of baskets, they are minis!
One layer consisted of this mono-printed National Nonwoven's Woolfelt.  The printing was done over a failed eco-dyed piece.
The second layer was the other half of that same failed eco-dyed piece, however this one was acid dyed, using binder clips as resists.
About 5" in diameter.
These two pieces are also National Nonwoven's Woolfelt.....I can't recall exactly what method I used that ended in disappointment, but happily over-dyeing provided a much better appearance.
About 5" in diameter.


Thursday, November 10, 2016

MORE WOOL FELT BASKETS

My work will be available at another gallery soon. This one is in downtown Asheville....details when the date is finalized.  So......in an effort to have items at a lower price point then my wall art quilts that will also be displayed, I've been making a variety of felted baskets and bowls.

The make up of each varies, many feature a layer of National Nonwoven Woolfelt, some feature layers of wet felted wool, some have been acid dyed, others have been ice-dyed, several have been needle felted.

 4.5" SQUARE
7" X 5.5"

Tuesday, November 8, 2016

WET FELTED BOWLS W/O RESIST

The method I'd been using to wet felt bowls involved using a resist. Basically, the size and shape of the plastic resist determined the look of your finished bowl/vessel.
This time I decided to forgo the resist, instead I eye-balled circular shapes as I felted. Once fulled, each was placed on a base to dry.  Here a glass flower vase and rubber band held the felted wool during the drying process.
Some 'circles' were not too even!  An upside down bowl and an embroidery hoop helped to shape this larger piece.  Below you'll find the results of my experiments.  Contact me if you are interested in any of these pieces.
5" x 1.5" tall -  Merino wool, curly dyed locks, & nepps
6" x 1" tall  - NZ Corriedale  & curly locks
11" x2.5" tall - Merino wool & Mohair curly locks

Friday, April 22, 2016

EMBELLISHED FELTED BOWLS

Yup, I can't leave well enough alone. Embellishing continues to be a trademark of my overall style...whether it's working with woven fabric or creating work from wool roving!

Here are 4 of my newest wet felted bowls.....available for purchase here.


Grab a cup of coffee and follow these links to see what inspiring work others have created this week:  Nina-Marie's Off The Wall Friday,  Sarah's Whoop Whoop Friday, and Crazy Mom Quilts

Tuesday, December 22, 2015

ONE LAST BOWL

I'm putting my felting supplies away until after the holidays. Here's the final embellished bowl, featuring ruffled beading.

All currently unsold bowls should be in my online shop shortly......but if you are interested now....email me using the link on the right side bar.


5.5" x 3" tall - wet felted/bead embellished
SOLD

Monday, December 21, 2015

EMBELLISHING FELTED BOWLS

There's no better reason to create wet felted bowls than to do some post project embellishing......which is my favorite part of any creative endeavor.  These items will be going into my gallery shop shortly.  First 4 bowls @ $22 each - pixie bowls @ $18 each - plus shipping.  Interested??  Email me using right side bar link. 
 4" wide x 2.5" tall  SOLD
 4.50" wide x 2.5" tall SOLD
 4.75" wide x 2.5" tall SOLD
 5.5" wide x 1.5" tall SOLD
Pixie wet-felted bowls - appx. 3" wide x 2.5" tall
*bowls on left and right are SOLD

Saturday, December 19, 2015

MORE BOWLS

It's surprisingly time consuming to create wet felted bowls.  Either I'm too wimpy with my agitation or that's just the way it is.  Even with all my supplies already out and ready to go, it took a good 6 hours to make these 3 bowls.
 Here you see them stuffed with old cloth napkins which help to retain their shape as they dry (on a wire rack...which was removed for this photo). 

I worked with colorful strips of roving for the red bowl.  Lesson learned:  the roving strips needed to be more consistent and perhaps pre-felted a bit to prevent them from shifting so unevenly.  The answer might be to use pencil roving (which I don't own) for a tidier presentation.

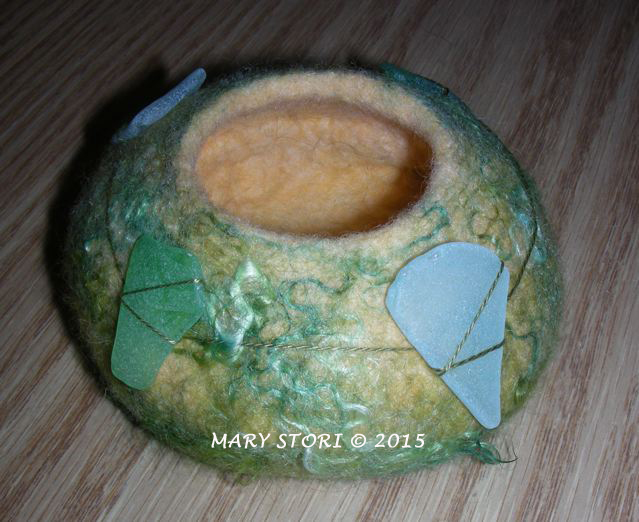
I'm happy with the results of the other bowl.....which will be embellished with the very last piece of root beer colored sea glass that my friend Jo shared with me.  The look and added texture of the wool curls is pleasing to me.    Hummmm....I wonder if one can buy sea glass?  Note to self:  check Amazon.....they sell EVERYTHING!
Lesson learned on this small 4" diameter white bowl:  the balls of wool embedded in the layers of roving needed to be larger and firmer in order to retain their shape during the felting process.  As you can see....only a few are visible.

I'm not discouraged...........

Friday, December 18, 2015

FELTING - SNAKES AND BOWLS

I'm looking forward to spending a bit of time with my two grandsons.  The three year old is ALL boy......and the 3 month old is of course in the perfect snuggling stage.
 My suitcase will be packed with some felting supplies....the goal.....to make some snakes.  This should be a project suitable for the hand/eye coordination of a 3 yr. old, and hopefully provide quick enough results before boredom sets in.  

To speed that up, I decided to make some felted 'cores'. So then all we have to do is wrap wool roving around the outside and do the final wet felting stage.  For the final touch on this sample, I needle felted the eyes.....which of course is not a step a child can or should try to do.
As long as the felting supplies were out......I made a couple of bowls.  I haven't played too much with locks, curls, or wool neeps that add another decorative dimension.  It was easier than I expected and I like the look!  

I'm guessing there will be lots of creative projects flowing from studios right about now....so check out these links:  Nina-Marie's Off The Wall Friday,  Richard and Tanya Quilts, Crazy Mom Sews, Whoop, Whoop Friday.

Tuesday, June 2, 2015

SIZES OF FETLED BOWLS

I received a question wondering about the sizes of my bowls.  They are smaller than you'd think considering all the time invested. I used 2 template resists, one for the larger & one for the smaller bowls.  Shrinkage during felting isn't always exact.....too many factors.....but the following will give you an overview.
 5" diameter - 3" tall
3" diameter - 2.5" tall

Monday, June 1, 2015

WEEK LONG WET FELTING BOWLS

After nearly a week spent wet felting bowls......here are the finished pieces. This may not seem like a lot, but the process is just plain time consuming.
 Some have been embellished, some waiting in line for their 'pretties', and others will be left as is.


Again, thank you to my friend Jo Timko who gifted me the fabulous pieces of sea glass used to embellish some of the bowls.

Thursday, May 28, 2015

FELTED LEAF - AN EXPERIMENT

I mentioned that I planned to spend as much of my free time this weekend playing with felt.  Our original plans were altered at the last minute....so??  What's a gal to do!?!
 I've seen mobiles featuring felted motifs and that got me to thinking..... Before tackling a project like that I decided to try to make one large textured object. Again, I'm fairly new to felting, but am dedicated enough to spend a lot of time learning.

Here you can see the beginning process of wet felting a large leaf.  I used an off white pre-felt batting and narrow cotton cording and began the initial forming on a plastic resist. After the first two front layers held together just enough, the resist was removed. (I already have ideas how to alter the process for the next one!)  
 Finally here's how it looked after a major amount of manipulation, throwing, rolling, and generally beating up on the fibers to get them to 'felt' together.
 Drying on a wire rack.
 After it dried, I felt the veins lost a lot of definition. It seemed to me that needle felting close to the cording would help the veins pop out.....so I spent quite a bit of time poking!  
It's mounted on a narrow rigid steel rod which I inserted into a piece of wood found on my daily 'forced' march.  
Back view

Wednesday, May 27, 2015

DOES IT GET BETTER THAN THIS??? - Felted Bowls

Part of the fun of creating felted bowls.....is figuring out unique embellishment treatments. For way too long I've been fondling some beautiful sea glass  treasures sent to me by a New Jersey quilt world friend. The right project that would do them justice just hadn't appeared....until now.

Today I assigned a total of 6 pieces of sea glass to just completed bowls. Here's the first......   Thank you Jo......