Wednesday, October 31, 2012

CLEAN/SIMPLE DESIGN

Isn't it great when family members express interest in your work??  I'm always eager to create a special piece for family/close friends.....but there's that hesitation....am I pushing them into having to hang a piece of art they may not actually care for?

Hopefully, that won't be the case with this new project being made especially for my niece who is moving into her own very first condo that has LOTS of wall space!

Like many young folks, she prefers simple & clean designs.....nature based....but not necessarily patchwork.

 I have almost no drawing skills so when I say I began by sketching two trees on lightweight tracing paper (the size of the desired finished piece)....I mean.....with pencil and eraser in hand!  

Due to a long lingering cold/flu, I've had a lot of down time.  So, hand applique seemed the most appealing construction choice for this project.  Nature isn't perfect, nor are these trees.....so it wasn't necessary to precisely transfer the motifs using many of the traditional methods.  Instead, with a Clover chalk marking tool...one fitted with a metal wheel at the tip, I retraced my pencil lines, pressing down firmly onto the paper which covered the piece of cotton fabric that I'd chosen for my trees.
 This procedure yielded a faint chalk mark where the paper tore as I traced, or a deep indentation (pressure traced).  Once all the lines were traced, I removed the paper and went over the marking again for better visibility.

In this photo, you can see where on the left side of the tree... it's been cut out, allowing a scant 1/4" seam allowance.  I'm not very fussy about this process because I trim the seam allowance as I needle turn applique if it's too wide or uneven.
 Remember this is going to be a simple/clean design....no parts have to fit into each other so precision is not vital here.
 Rather than using pins to secure the applique motifs to my background, I prefer to take the time to thread baste.  I find I have more control and less hassle using this time tested method.
 Once the applique has been complete, it's time to audition 'leaf' fabric.  My intent had been to use batiks in a variety of greens....  Yes, this looks sparse....it's supposed to!
However, now I'm leaning toward using this multi-color batik print instead.....follow along tomorrow to see what I decide......

Tuesday, October 30, 2012

SANDY BRINGS US SNOW!!

Despite the strong winds all night long and continuing snow fall as I type this.....we are still safe & warm....no power loss at all thankfully. What an amazing sight on Oct. 30th.....6" of snow with drifts in some places about a foot!!

I've relapsed and am in full whine mode now after being sick for nearly a week.  However, when I feel another rant coming on....I'm turning on TV where the non-stop pictures of folks who really have it difficult stops me in my tracks.....


Monday, October 29, 2012

MONDAY MORNING....

For anyone else who cares.....whew....the Packers won yesterday....but so did the Lions and Bears....boo hiss

I'm still fighting off the flu/cold so I've had lots of 'seat' time over the weekend to hand stitch.  I amused myself by watching reruns of old TV shows.....the original "Fugitive" and "The Loretta Young Show".  I always thought she was soooo glamorous as she twirled her way into the introductions of each episode.

So...that brings us to today...we are experiencing the affects of Hurricane Sandy....I know....we are hours away from the coast but still....  Cold weather from the North is combining with the the moisture from the storm.....

The wind is blowing about 50 mph, we have snow flurries, and cold temps. (which means black ice here in the mountains)  The trees in my photos don't appear as bent as they are with the wind...but trust me, it's a 'blowin' good up in these there hills!'

Hoping the impact to others along the coast is not as great as predicted....me...I'm hunkering down and fighting the crud for one more day!


Sunday, October 28, 2012

AAQI HOUSTON SALE

The annual trek to Houston for Quilt Market and Festival is underway.....I won't be attending this year but two of my quilts will.  They are part of the 2,185 (YES you read that right......2,185!!!) quilts  that the Alzheimer's Art Quilt Initiative will be displaying this year for sale.  If you are going....be sure to visit Row S, (hard right as soon as you enter the exhibit area from the front of the George R Brown) October 31 to November 4th.

I believe my quilts will be available the first night.....so hopefully their sale will bring my contribution over the $2,000 mark raised in the priority quilt category alone!

Please consider supporting this worthy cause.....visit here to see each and every quilt up for sale...donated by quilters near and far!  If you can't purchase one in person, don't forget....each month from the 1st - 10th, priority quilts are posted for the monthly online auction.
 Long Needle Pine  by Mary Stori
Rose Quartz by Mary Stori

Saturday, October 27, 2012

57......

With a bit more beading here and a bit more embroidery there.....
this little piece is now complete and ready for a new home......

57.....    6"x6.5"

Friday, October 26, 2012

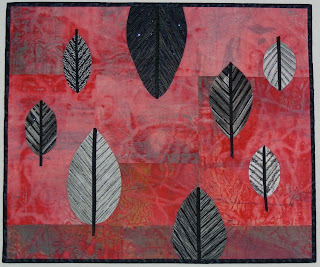
TEXTURED LEAVES

Due to a bad sore throat....my planned activity yesterday was postponed...instead I sat like a slug and did handwork most of the day.

 As you may recall from previous posts, I decided to bind this quilt instead of using a facing due to concerns about the unevenness of where the leaves met the edges.  The background fabric was my own deconstructed screen printing.....of which I used nearly every inch.  Nothing in my stash in that color range worked so I decided to use a muted gray/black print for the binding....thinking it'd 'frame' the design nicely.

TEXTURED LEAVES 19" X 16"
Artist deconstructed screen printed cotton, commercial black/white fabrics, hand appliqued, machine quilted, & bead embellished.

 Actually, once it was in place, I felt the look was a little too strong. So, although I hadn't planned to bead the edge, (yet that thought is never far from my mind)....soon the beads were back out and my afternoon disappeared between sniffling and beading.

I think the addition of diagonally placed graphite beads worked to tie the entire piece together.  Click on photo to enlarge.
Detail

Thursday, October 25, 2012

NUMBER 57

 Robbie asked the other day, if the numbers 57 had a specific meaning.....oh I wish I could share a really interesting story behind this design...but alas....these are the numbers that fit and were available when I was resist dyeing some wool I had felted.  I wasn't satisfied with my first attempt of surface.....esp. with the blueish beads.....which in person just don't work.


BEFORE


AFTER

 So, I took them off....what else is new....that seems to be my pattern when working with these tiny pieces.....I add and subtract until I'm satisfied!  There's a minimum contrast to the dye which adds to the embellishment difficulty.  It's better now and I'll probably play around a little bit more before adding a backing and perhaps incorporating threads or beads along the edging.  Will keep you posted.

I just hope someone else is drawn to these numbers so it will have a happy new home when I'm finished! 

Wednesday, October 24, 2012

EXHIBIT NOTICE: HA-HA....MADE YOU LAUGH

Seven members of PTA (Professional Textile Artists), of which I'm a member, have a fun exhibit opening tomorrow. If you are in the Waynesville, NC area anytime through Nov. 10th, consider visiting Gallery 86 on Main Street to enjoy our work.

Here's a preview as Dort, Connie and myself hung the quilts today.  We filled every square inch of the space available with 32 quilts, all featuring a humorous theme. Luckily Connie is tall....our go to girl who was in charge of the ladder & hammer as we hung the quilts AND positioned the lighting.  She and Dort put up the pressure sensitive signage, while I was in charge of 'housekeeping'.


Tuesday, October 23, 2012

NEW PROJECT

I've been feeling VERY scattered lately due to a hectic 'real life' schedule which hasn't allowed me enough time to sew.

Determined to get calm my nerves, I grabbed a pile of supplies that I'd organized last week and headed for the TV.  We are late to join the fan base of the TV show "Breaking Bad".....but are catching up thanks to Netflix.  So with one eye on the TV and one on my sewing.....I began a new project.

I meant to take a photo of the 'before' but was so anxious to start sewing.....well.....I just plain forgot.

This is another tiny resist dyed felted wool piece.....about 6" x 7" which doesn't allow much room for more surface design.  When I took this photo last night, I'd all but decided to remove the blueish beads - in person they feel too big - however, in the photo, the affect is positive.  Let's see what happens.....

I have a full day today hanging our PTA member exhibit: Ha Ha - Made You Laugh at Gallery 86, Waynesville, NC.  Hope to get some fun photos to share with you tomorrow.

Sunday, October 21, 2012

BEADED LEAF QUILT PROCESS

Fall is concentrated car racing season around here......so my time is not always my own since 'the husband' is passionate about the American LeMans series.  We spent the last couple of days at Road Atlanta where I spent time celebrity watching.  Dr. McDreamy (Patrick Dempsy) was one of the drivers....who unfortunately crashed his car about 2 hours before the end of the 10 hour race.  Happily, he wasn't hurt.  

Mr. Ashey Judd (Dario Franchitti, who won this year's Indianapolis 500 race) also drove a car.....

The recent get-aways explain my lack of progress on my leaf quilt.....

With little spurts of time, I managed some simple machine quilting.  From the start I expected to use a facing method to finish the edges, however now that I'm at that point, I'm dubious.

Why??  Because two of the appliqued leaves extend to the edge....meaning with a turned facing, there would be 7 layers in those sections.  That's looking for trouble.  So, instead I'll be using a very narrow traditional binding.  Hope to get at that tomorrow.....

Oh....here's a Sooty report for those of you who asked.....if you find conversations about other peoples pets boring....stop reading now.  (I would if I was reading someone's blog!)

First......she seems to have escaped any and all problems that could have developed from her snack of my felted faux rocks.  Impossible as that may seem!

But, her bad behavior resume continues......when we picked her up from the doggie boarding facility, they reported her behavior was good & bad.  Bad??  Not our Sooty!!  Oh ya......she is now an escape artist besides being a chow hound!  In her defensive, any dog that can get out of a kennel space that is tiled on 3 sides and fitted with a chain link fence door is actually brilliant....and perhaps they need to rethink the way it's set up.  And....though she wasn't harmed she certainly could have hurt herself......  We are very limited here with dog sitting options.....the search will go on.... and I'm sure Sooty's adventures will continue!

Thursday, October 18, 2012

FALL IN THE MOUNTAINS

For the last 5 days, I've taken a photo from the same spot on our front porch.....documenting the change of our valley/mountain view...  Lovely, isn't it??


Wednesday, October 17, 2012

1 BAD DOG

WANTED.....1 good home for 1 bad dog......

Or perhaps this post should read......

 ....NOW YOU SEE IT......
....NOW YOU DON'T!!!!

After spending DAYS making these felted wool faux rocks.....of which the above bowl was totally filled (well over a quart for sure).  They are now gone......and all that is left is one lone rock which was inside one of the faux stones (the rest contained wool or cotton batting).

I KNOW labs love to eat....Sooty has proven that to be true with several mis-adventures....BUT THIS.......  I'm soooo peeved and what makes it worse is that yelling at her will do no good, neither will punishing her.  We were gone when she apparently helped herself to the bowl that was decoratively sitting on a bench in our greatroom.  Sure it was at her height.....but who'd have thought? NO....I refuse to take responsibility (well maybe a little).

After she recently ate 4+ cups of cooling Chex Mix off the kitchen counter, 'the husband' had a talk with her and he said she promised to behave.  NOT......
So, I'm fuming and she doesn't understand why I'm giving her the cold shoulder.....worse yet......none of this wool has yet passed through her system.  If we end up with huge vet bills.....she truly will be looking for a new home....or else I will be.  THE END.....

Tuesday, October 16, 2012

SO LITTLE TO SHOW FOR

Does this happen to you too?  You've got lots of ideas for the next project....so with great enthusiasm you dig in.  Hours later you still find yourself shuffling from one direction to the next, from one pile of fabric to the next?  

That's how I spent most of my day yesterday.  I not only had indecision about the direction of the project.....but WHICH idea I was going to follow up on!  This is surely a sign of too many ideas flying about in my head like a virtual pinball machine!

Yes, this is so little to show for the amount of time and brain power exerted.....but ya gotta start somewhere.  Now of course, I'm anxious to really get started.  However, this happens to be another very busy week in my personal life, so I'll need to dig deep and find some patience while I await more time in the studio. 

Monday, October 15, 2012

42-24

NOW....This is a way to begin a week.......Packers 42 - Texans 24.....

Whew.....we were getting worried........


I've been enjoying our beautiful fall weather so much this weekend, that my sewing has suffered......but you know what they say......'get out and smell the roses'......or should I say 'the woodsmoke in the air from all the area outdoor fire pits as the locals are cooking up sorghum!

Saturday, October 13, 2012

THAT LITTLE VOICE

Though my newest passion is working with felted wool and of course beading.....occasionally I'll go to my stacks of cottons and make a lap quilt.

I blogged about this recently, but here's part 2.  This was made with hand-dyed cottons from a company no longer in business, but one that always pleased me with their selections.  Rarely did I concern myself with the issues of unstable dyes when I worked with their products.  However.....some did bleed.  AND...as I began this piece....that little voice kept saying....  "Hey, I'm a lap quilt.  I'm going to need to be washed".  But...I ignored it.

Just prior to making the quilt sandwich that little voice got louder and I decided to test the black fabric......yup....you guessed it.  It bled like crazy.  What a pain...having to treat a quilt top already pieced....but thankfully BEFORE it was made into a finished quilt.

The results were = a top with uneven seams.....no matter how I tried to block it during the drying process.  Well...it was made to be used, so it is what it is......  NOTE to self.......always take the time to pre-wash these types of fabrics!  I used to do that religiously.....but now that  95% of what I do are wall quilts which will never be washed because they are also beaded.....I got out of that habit.
Okay, lesson learned.....  Here's what I wanted to show you.  I'm a novice at machine quilting and can admit I don't much like it.  WHY??  Well.....I don't like the results of what I can do....and I don't like sitting at the machine since my back hurts and I can't see well enough (yes I have glasses in every strength!).  But there are those quilts that machine quilting, even if fairly uninspired....is the answer.

To tame the quilt....rolling and using bicycle clips etc. never work for me after 5 mins.  But, what I've found helps is to have a large surface behind & to the left of my machine to support the weight of the quilt. My ironing board fills that role on the left.

I prefer to thread baste, but again.....time management is important so for this task I used safety pins..... 
Because the blocks/seams are not evenly pieced and worse after the bath it took to remove all the excess dyes.....I marked the lines using a ruler and a chalk wheel, avoiding following any pieced seam line too closely.  

The vertical lines are about finished.....and I'll either add more unevenly spaced  lines vertically or horizontally.  

Moral of this post.....listen to your inner voice!!  

Friday, October 12, 2012

BEADING TIP

At the beginning of the month, this small leaf project was begun....which is still under progress....   As work continued last night, I came to a 'teachable moment' that may be of interest to those of who who add beadwork to your pieces. (Guess that means I really do miss teaching workshops!!)  You can see the start of this quilt here and on posts dated Oct. 2 & 3rd. 

 As mentioned numerous times on this blog, when beading (except for bindings and some edging stitches) I always secure my work in a Q-Snap frame, generally supported by a stablizer of some kind.  In this case it's batting....but the backing is not layered yet. This frame measures 11" x 11".  

Notice the straight pins??  Three sides of the quilt are attached to the frame using the Q-Snap clips, however clips can not be placed over an already beaded area.  The left one in the photo above extends beyond the framework...slightly bothersome when beading but still doable.

Where the fabric doesn't quite reach the frame (lower edge), it's pinned it to a muslin sleeve which is attached to the tube framework.

Got is so far??

Now.....all those preparations above should keep the layers smooth and distortion free when beading.  There's one more trick I utilize that allows for trouble-free finishing of the edges.

Beading is stopped about 1" short of the edge of the fabric, backstitching through the last bead.  The thread end remains.....once the edge of the quilt is finished, whether with traditional binding or a facing, it's easy to rethread and complete each line or motif.  In those cases, I do not travel through all three layers, rather the top two only to avoid visible stitches on the backing.

Wednesday, October 10, 2012

BASTING TIPS

It's seems crazy that a few days away can put me so far behind......yet I've been scrambling to catch up.

However, today there was a little time to get into the studio and begin the basting process for this quilt.

 I've been teaching hand quilting for years and always pay particular attention to describing the method I use for sandwiching quilts.  It always surprises me that this part of the quilting process isn't better understood.

Here's how to prevent distortion or pleating on the back during quilting.  Although I'm not a fan of tearing fabric, in this case I do as it will give me the true straight of grain for the backing. (Measure it 3"-4" larger than the quilt top.)

After pressing well, I place it on my large cutting table which is covered with a gridded cutting mat, using the lines to keep the backing evenly distributed.
 If there is a seam, it is positioned along a marked line....again, to keep the backing straight and even.
 Where the backing is larger than the table, I use bookbinder clips to attach the backing to the edge of the table.
Edges that meet the end of the table can either be held with clips or taped with painters tape.  Be sure the backing is smooth but not pulled too taught.

The next step will be to add the batting. I like to unfold it and allow it to rest on the table to relax/remove the wrinkles. Once that's done, the quilt top is positioned over the batting.

Here's the important part......Always be sure the quilt top and the backing are placed on the straight of grain to each other before basting begins. I use WHITE thread when I hand baste. If the project sits for a long time in humidity, the dyes of some dark threads can migrate and stain the quilt top. 

Baste thoroughly.....do not skimp!  It's your last chance to maintain flat smooth layers. This will eliminate the problem of tucks, wrinkles, & distortion during the quilting process.  Remember if the grain of the backing and quilt top are not lined up properly, the quilting process may be adversely affected.

Monday, October 8, 2012

GARDEN ART

After months of blogging about the quilt I made as a memorial to my brother for Bookworm Gardens, it was time to make a trip to Wisconsin and with my family, turn it over to its new home.

The garden is organized around various book themes.  Each 'station' has physical books which can be read on the spot.  Most areas are set up for interactive play as well as a feast for the adult eye.  Fabulous, creative art is everywhere.

This playhouse was the inspiration for a similar one my brother made for his granddaughter Taylor (first row, far right).  It became the focal point of my quilt.
 Is this great or what?
 Parents/children can sit in the bus (or the area around it) and enjoy the a variety of books that relate to this subject.
 Look closely......notice the spools...complete with thread!!
 Some areas have stone pillars where books are stored.....


 Think how educational it is for children to explore books about the settling of the West.
 And the whimsy of Goldilocks and the Three Bears.  All the seating throughout the gardens have been donated.....memorial or donor plaques provide recognition.
 Here's another example of the clever methods utilized to engage kids.
 ......with the props for them to act out their imaginations.
 Farmer Brown and his cow....how could they not feature a Holstein cow in Wisconsin??  Taylor, my great niece says this is one of her favorite places in the gardens.
 ....Open the gate, then open the door......and there are the books!

Jack in the Beanstalk metal sculpture.......charming!  One could spend hours exploring this mind expanding place.  There are similar children's literacy gardens throughout the  country....perhaps you can locate one near you to enjoy.