Wednesday, May 15, 2013

NUNO FELTING - 2ND ROUND

Last month, our small group, the Fiber Junkies, spent a day Nuno felting.

 Here we are....three members made scarves, Kate (2nd row) and myself (front row) worked on a larger scale.  My intention was to make a piece to cut into smaller sections which I'd embellish....  (Like what else is new?)

After examining the section I brought home, I knew it required more felting to marry the fibers better, and to achieve better control of the composition.
 So, I wet my 'fabric' with hot water,  covered it with a sheer fabric, and began to work it with soap and a small scrunchy.
 It may not be apparent in these photos but the only piece of sheer fabric I had covered only half of the section.....which didn't have much of an impact for this first manipulation process, I just had shift it.  Normally, my next step to sufficiently bond the new fibers to the existing wool would be to layer it with bubble wrap and roll onto a swimming noodle.  It would then be rolled back and forth on a hard surface until all the fibers bonded.  

Well, I DID follow that process but got really tired of this step.  Gosh, it's so much more much fun when one is doing it while chatting with friends!
 So, I took the more drastic step and gathered the whole piece into a nice 'hunk' and started slapping it onto my work surface.  (Humm...that did get a tad messy as soap and water flew everywhere.  

 However, this aggressive treatment really shortened the felting time.  One MUST be careful with this approach as areas that you may not want to bond begin to felt together. (As show on the back side of my piece here.)
After some tugging, I was able to pull those pleats apart...and quite honestly, I love the look of the backside too.  Our felting foundations were provided by Judy Simmons; gorgeous hand-dyed silk (scarf like) material.

Here's my completed piece....which is now more than half the size of what I started with.  I wish I would have measured the original scarf material, then after the 1st felting, to the final result.  The shrinkage is understandable and quite stunning.

My next step will be to cut it into sections....refelt the edges so each one has a nice finish to it and finally.....embellish it.  

Years ago I taught at the famous Siever's School of Fiber Art on Washington Island, WI.  I got such a kick out of the weaver's.  They'd arrive on the island....go out and sheer sheep, clean (carding I think it's called), spin, dye, then prepare their looms and finally begin to weave. If I don't have this process in the correct order....I'm sorry...it's out of my realm.  Anyway, I thought they were certifiable!  Now, I'm not too sure.....grinning...

Tuesday, May 14, 2013

WHY MORE THAN A 4 PATCH IS BEYOND ME!

Seriously, I've been feeling dumber than a rock these last few days.  Our son asked if I would make a cover to protect his pinball machine....shades of his father who also owned a pinball machine which 'decorated' several of the homes we lived in.  Well.....this project sure isn't easy or fun.

Look at this thing......all angles varying widths, heights....geesh....  AND it lives in San Francisco so the cut and fit approach, much like upholsters do, isn't possible.

During a trip to CA in Jan. I measured the monster....then had my son measure again since I couldn't understand some of my own notes!! I sent him this photo I found online, marking areas where I needed more info.  

I brought my 'mock' cover with me on my visit there two weeks ago. My sample wasn't too off but the whole creation process has now gotten far more complicated because he'd like one made out of thick material and in one piece.  YIKES!!!    It looks so simple in this photo above....however because the bottom of the scoreboard area is wider than the playing area, it's NOT!!!!!!!
 Really, and I probably shouldn't admit this....but it took over an hour TWICE for 'the husband' (an engineering type) to help me 'see' how to make it all fit together as he drew illustrations over and over.  For the life of me.....I was just looking at Greek.....it DID not make sense. There were moments when I just began to get a glimmer of understanding....then whoosh....it was gone and I was back to staring at a blank piece of paper.  

By now, those of you who have math, drawing, or engineering gifts.....your jaw has probably dropped and you are rolling your eyes.  'The husband' got VERY impatient because I truly could not see how 'making a hole' in the box shape for the scoreboard was going to make the bottom section fit correctly.  Even the engineer son mentioned this 'hole' approach to me within a nano second when we fitted my mock cover.  I'm probably not even explaining it right here because, well......it makes NO sense!!!

So I'm venting at my inability to comprehend mysteries such these.  I'm VERY directionally challenged, can't do math, and often transpose letters and numbers especially if hand writing. I'm comfortable with 4 patch and 9 patch compositions....and have even made numerous quilts using triangles....ye gad!  Yet long ago, I knew those avenues of quiltmaking were not well suited for me.

However, I can look at a pile of beads, embellishments, and fabric and within a short period of time, 'see' a plan (even if it's just fuzzy) and know how to execute it.  Sure sometimes there are hurtles along the way, but I rarely, rarely, rarely not finish something I started because I truly do 'see' it in my brain.  

The same thing is true for a countertop or refrigerator filled with food options.  I always know what to do, no recipe is needed....no problem.  But this.....well....I'm more than humbled I can tell you.
If this photo makes no sense to you.....then you can only slightly know how I've been feeling.  It probably didn't make life easier for me by using some of my vast stash of 'bovine print' fabrics to make the mock cover.  The scoreboard portion (top) is made using the right side, and the lower playing area the reverse.  Of course for the photo I had nothing to fit it on....so I'm only holding it up.....but perhaps some of you will understand.

How all this can be done in one piece - using thick fabric - well....I'm not promising successful results.  For now this new mock up is winging its way to CA for another fitting.  Perhaps our son will decide to do without one....and I can quit feeling so bad about myself!   grinning......  

Monday, May 13, 2013

SUCCESSFUL STUDENT!

As an instructor, it's always so heartwarming to hear back from someone who took your class and went on to embrace the methods taught!

And embrace so successfully she did.  This piece was constructed on wool....bead appliqued using what looks like hand dyed silks. I LOVE how she incorporated an agate slice into her design.  Learning to attach this type of stone was the subject of a workshop I taught at Hampton Roads in February.

Thank you Laura for sharing!!!

Made by Laura Gilmartin

Sunday, May 12, 2013

CELEBRATIONS

HAPPY MOTHER'S DAY TO ALL YOU MOM'S OUT THERE......


 As we spend the day paying tribute to Mom's.....I also want to mention another celebration that took place yesterday.

One of my dearest colleagues, Pat Campbell passed away on March 13, 2013. I blogged about it at the time as did others here and more here.
 Yesterday, John, the love of her life hosted a celebration at their home of Pat's contributions. For many quilters, Pat was such an inspiration so I hope you'll indulge me as I share these photos.  I'll never forget the kindness she showed me when I was a newbie on the quilting circuit, not to mention how deep our friendship grew.
 Her home was decorated with her quilts, books she wrote, patterns she created, fabric she designed and most of all....friends that she made were there to remember her.  A collection of Pat's most important quilts has been donated to the National Quilt Museum in Paducah, KY.  AQS will also be exhibiting them at two upcoming shows, hopefully sometime in 2013.
Pat loved flowers and featured them in her work almost exclusively.  Her patio garden was in full bloom and her home filled with her favorite flower....tulips....

So....today.....be sure to tell the Mom in your life how much she means to you....and take a moment one day in the coming week to do the same for the special girlfriends in your world.

Saturday, May 11, 2013

STARTS AND STOPS

It was so relaxing to have my needle in hand again.....yet I felt unnecessarily pushed to make quick progress.  NOT a good idea! 

 After treating the designs as if they were tree trunks by adding some hand embroidered branches, I ended up ripping them all out.  In fact, I was so annoyed at myself for not doing a better job with my 'mental designing' that I did the un-stitching in haste....and never documented my foolishness.

 So, I began again...this time with a better idea of the direction I plan to take.
With numerous thread choices and some wonderful black walnut slices that my friend Lynn gave me.....I see many evenings of happy stitching ahead.  I'll keep you posted.

Does this happen to you too??  Enthusiasm takes over too quickly??

Friday, May 10, 2013

YEAH...BACK IN THE STUDIO

After a week of quality family time.....my fingers are itchin' for some stitchin'.

...So, out came some hand-dyed and felted wool.
...Then, inspired by a shibori article by Holly McLean in Quilting Arts in April/May 2013, I wondered if this dyeing/painting method could translate to felted wool.

Due to the thickness of the wool, I decided to pleat the material, securing with string. Textile paint was applied to the folds, allowed to dry and the process was repeated twice more altering some of the paint color.
Here's what that process yielded.....so...what to do next??  Well, I have some ideas....stay tuned.

I'm posting this to Nina-Marie's Off The Wall Friday.  Check it out.

Thursday, May 9, 2013

PART B - SAN FRANCISCO

....Here's a final look at the Bay Kids Museum......oh...everything there was enticing for both kid and parent!


AND....here's the birthday boy and his Mom Kelly.......
After seeing his photo yesterday, someone emailed me that he looked like he must be at least two.  Nope, only ONE....he had a good head start, weighing in at nearly 9 pounds when he was born!

Now that my reporting is over, I'll get busy stitching so I have fiber related posts to share real soon.  Thanks for hanging in here with me....

Wednesday, May 8, 2013

NEXT STOP SAN FRANCISCO

I truly left my heart in San Francisco, where our family celebrated our grandson's first birthday.
 We visited the amazing Bay Kids Museum.....even the location of the parking lot in view of the famous Golden Gate Bridge was breathtaking. For blogger readers who have kids or grand kids.....do take a minute to look at their website....there are lots of ideas that can be translated into your own backyard or playroom.

Kids large and small loved this 'stream'....filled with plastic fish, frogs and other 'chewable' delights.
 Faux rocks that are soft and climbable were a favorite hangout for the little tots.  (As enjoyed by our DIL and 1 year old Raiden.)
 This is just one of dozens of creative play stations featuring bridges, underground crawling areas, and slides.  There was also a pond like section that had  water bed style areas where the kids could walk/jump from 'puddle' to 'puddle'.
 A storytelling area is another popular feature.
 Another building was reserved as an art/craft studio.  Each month a different artist is featured.  Roy Lichtenstein's pop art was their current inspiration. This work was actually created on canvas by children. 
 Some of the children were playing with this interesting product.  Bubber is from Sweden.....learn about this crazy modeling 'stuff' here.

 In a corner of one of the craft rooms I noticed this art on the wall......
...and was amazed to see it was inspired by Faith Ringgold.  

This post may bore some of you.....but indulge me....I had so much fun spending time with our little one as he explored this very special place.

Tuesday, May 7, 2013

BEAUTIFUL OREGON

How great to have family living in such beautiful parts of our country!  I just enjoyed a week on the West coast....my first stop being Eugene, OR. where the weather was superb.  Spring hasn't sprung here in the mountains of North Carolina, so sunny warm weather was very much appreciated.

 We visited Hendricks Park, Eugene's oldest city park.  Its 80 acres includes a world-renowned rhododendron garden and a native plant garden which was in full bloom.
 Stunning, no??
 One could leisurely stroll groomed paths or take a hardy hike.
 The fragrance in the air should be bottled!
Another activity one can enjoy in this area is to take a drive about 15 miles from Eugene where there are dozens of wineries.  With the vines just starting their growth, the fields reminded me of a patchwork quilt.

Alas, I have no sewing projects to share......bear with me for a few days as I share what one quilter did on her mini vacation.

Saturday, May 4, 2013

GROWTH CHART

It seems impossible to think that our darling little grandson is turning ONE already!  What a thrill it's been for me to join our son and DIL, plus extended family in CA to celebrate this occasion.

Living such a distance from them requires extra thoughtfulness regarding gift ideas.  Do they have it?  Do they want it? .......you know what I mean.  
 After much pondering, I decided to make Raiden a growth chart.  (Or should I say...I made a growth chart for his parents?!?) grinning.... He's too young to care!

His bedroom theme is rocket ships, so my starting point was to draw one the length of a tape measure. 

 Then the design was recreated with fabric and arranged on a wholecloth background.
 Eventually I realized it wouldn't be necessary to make a wall hanging the length of the tape measure.   So instead, I cut it down and begin at the 2 foot measurement.  When hung, the 2' foot mark will be used as a guide to hang it from the floor.
I blogged about this nifty trick some time ago...without revealing what the project was.  Here's a reminder of the process.  The motifs were prepared with fusible web and arranged on the background which was pinned to my design wall.  Well....we all know how difficult it is to relocate our designs to a pressing surface without altering placement.  

So, I used a small iron 'the husband' had passed onto me....I'm not sure what he used it for but whatever it was, he didn't plan on doing it again so it's now in my studio.  Happy dance time.....it was the perfect tool to 'heat tack' each of the motifs in place before moving it to my ironing board to permanently secure them.
Raiden's Growth Chart  16.5" x 43" -  © 2013 Mary Stori

Here's the finished piece.  I allowed plenty of space to the left of the tape measure to document height & dates.  A permanent marker & hanging device was included with the chart.  


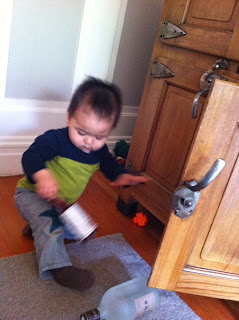
Raiden Hayashi Stori is a typical active 1 year old little boy...who decided he was going to start his birthday celebration early....as you can see in this action shot.  He got into the parent's liquor cabinet. Oh my, yet again another item that will require 'kid proofing'!!!  This photo was not staged....funny how we forget just how fast these little ones can be.

I like being a grandma!!!!!!!