Thursday, June 10, 2010

SILK PAPER

After we got introduced to making paper.......Nancy Bruce had more in store for our Fiber Junkies lesson last week.

Next she led us through the process of making silk paper.....the depth of Nancy's knowledge is nothing short of amazing.

Again, she began by sharing some resources....here's one....


Here's another......

This is an example of Nancy's art, featuring silk paper, fibers, and other embellishments. It's beautifully framed.........no detail is too insignificant for her to overlook......her work is very professionally presented.


Detail (piece created by Nancy Bruce)

To begin we layered a plastic bag on our lipped tray. Nancy likes to recycle empty cereal packages for this task. It's covered with a larger piece of nylon netting, (lightweight window screening is inexpensive and sturdy). Half of the screen is fitted over the plastic, the other half is folded back for now and will cover the fibers when they are in place.


We were able to choose from these silk fibers which Nancy had dyed.....the piece in the lower front are fibers that have been pulled from the ropes of silk.


Here's my tray......I pulled long wisps. The design on the left was arranged in straight but overlapping lines, on the right, I used heavier sections of the silk fibers, crisscrossing some of the sections.
Now it's covered with the rest of the netting and sprayed with soapy water till wet. This step helps to control the fibers as they are quite fly away otherwise.

Now, using a glue like mixture and a stencil brush, we thickly painted the fibers through the netting. Nancy had pre-made this mixture using a product similar to Sulky's Solvy (a clear stabilizer that dissolves completely in water.) It acts like a clear glue which stiffens and holds the fibers together.

Once our fibers were soaked with the dissolved stabilizer.....we used our fingers to work the fibers together....similar to felting wool roving. When the fibers began to migrate up through the netting, it was time to carefully peel away the netting and continue shaping our pieces. Additional 'glue' can be added as you work......it must be wet to shape.

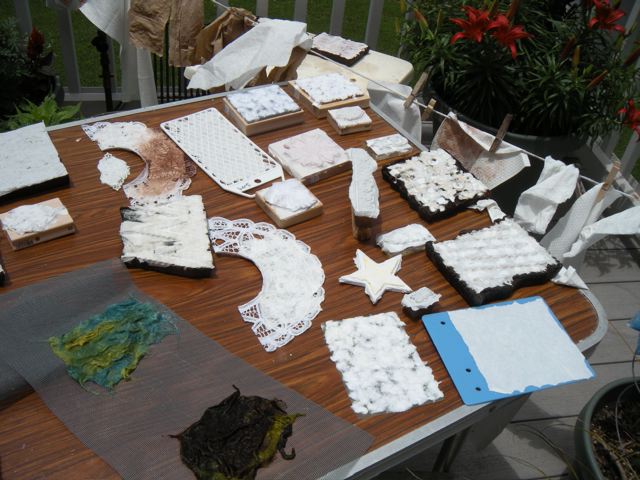
My two completed pieces are leaf like, now drying in the sun on the right side of the table....above the sponges.

Here's a piece of silk paper that Nancy made......note how stiff it is. She can use it as a single piece or perhaps cut it into sections to incorporate into other designs.

Each member in our Fiber Junkies group has mastered more than one technique....the purpose of our group is to share them with each other. I think my retirement plans need to be pushed up.....how will I ever have time to explore all these fascinating avenues when I'm away travel teaching so much??? But.....it won't be long......

But wait......we weren't finished for the day.......stay tuned.......next I'll share the wool felt/bamboo rayon embellished flowers we felted!! Thank you Nancy....


Wednesday, June 9, 2010

PaPER MAKING PART 2

......continuing the paper making process.....

Fiskars manufacturers these helpful texture plates.....look for those that have fairly deep indentions at your favorite craft store.


Option #1. Here Nancy cuts a sheet of 'Rinse Away', the size of one of her textured plates. (Note the plastic doilies in the background....which make wonderful paper molds.)

The 'Rinse Away' is sprayed with water until wet. Work on a tray with a lip to catch the excess water.

A firm stencil brush is a good tool to press the wet stabilizer into the textured surface.

Now the water needs to be removed....Nancy suggested beginning by pressing lightly with a paper towel and then a sponge. You'll want to remove as much moisture as possible to shorten the drying time. We put our projects outside in the sun where they finished drying in no time.

Instead of retaining straight cut edges, Nancy suggests pulling the fibers away (use your fingers, a spork, or the handle of an old tooth brush) to deckle the edges.


Here's two of the stamps I brought to use as molds.

A small brayer roller is another good tool that can be used to press the wet stabilizer into the grooves of one's base.


Option #2. Tear the Rinse Away into small pieces and arrange on a mold. Overlapping will provide firmer results while leaving small spaces between some pieces will create interesting lace like holes.

Spray with water to wet. It isn't necessary to utilize the entire design.....choose just parts of it if you prefer. Use firm pressure to press the wet stabilizer into the grooves.

Begin removing the excess water by lightly dabbing with a paper towel, followed by a sponge and then let dry completely.


Option #3. Prior to our gathering, Nancy had us cut a section of Rinse Away into small pieces (a rotary cutter worked efficiently) and place in a jar, filled with HOT water to cover. Mine sat for 24 hours before our meeting.....shaking from time to time, the stabilizer dissolved into mushy pulp.

Using a plastic 'spork' (a cross between a fork and spoon), the pulp is scooped out of the jar and positioned onto a mold. Any excess water/pulp that spills onto the tray can be poured back into the jar and reused. This pulp has a long shelf life....just keep adding hot water and small pieces of Rinse Away to keep the fun going!

The pulp can be arranged in a thick or thin layer....the more you put on, the sturdier the paper will become. After pressing the pulp into the design, remove the excess water as before, taking care that the pulp isn't picked up during this process.

Here's a wood cut block......look at this wonderful design!

Our paper is drying in the sun.....note....we used a clothes line to dry the paper towels which were reused as each of us churned out more paper. After the paper is totally dry, we used the tip of a scissors or pin to loosen an edge of the paper from it's form, then carefully peeled it off....taking great care not to tear it. The fun continued as we painted our designs....

Each of us were like giddy kids as Nancy guided us through the 3 options she uses to make embossed paper...... You might want to give it a try yourself!

Tuesday, June 8, 2010

PAPER MAKING PART 1

My head is still spinning from the very productive Fiber Junkies recent gathering. Our own Nancy Bruce, master felter and dyer of anything that stands still, outdid herself leading this meeting's lesson.....Paper Making (and more......I took over 100 photos of the various methods we learned so stay tuned)

Nancy was so well organized.....first introducing us to this book filled with instructions and inspiration.

And this book with lots of visual treats and methods to experiment.


Nancy led us through three different methods of making paper using Rinse Away, a water soluble stabilizer that can be purchased by the yard (18" wide) for about $2.20. I'll go over each method with you......but here are some designs that have been created by forming the 'pulp' over various raised surfaces (such as rubber stamps, wood blocks).


Now the eye candy really begins.......this high relief stamp yielded wonderful texture which then was painted.

And another......

More...

Ta-Da.....

to be continued....

Monday, June 7, 2010

8:50 PM

Both 'the husband' and I noticed this startling sky over the mountains after a big rain storm last night. Though I grabbed my camera and started snapping......it disappeared before I was able to adjust the speed to get a better shot....it's a tad grainy.....but hauntingly beautiful.....


Sunday, June 6, 2010

SUMMER IN THE CITY

The 'perfect daughter-in-law' sent this wonderful photo overlooking San Francisco she took while walking our grand dog Nali.

We LOVE this spirited black lab......can you find her romping??

Saturday, June 5, 2010

BEADING STUDENT GONE WILD!

I hope this trend will continue.......I've received more student photos.....these beauties come from Nancy Dornette from Ohio.

Here's what she said: Just wondering if you would like to see the beading quilts I have done since taking your class a few years ago...i just love beading!

Well....of course and I'm so pleased to share them with you all.......perhaps with a warning......beading is just like eating popcorn or M & M's.......one or two are not enough...they are addictive!


I found her work especially delightful since she successfully incorporated beadwork into a variety of construction and styles of quilting.

Thanks for sharing Nancy!!

Thursday, June 3, 2010

A TOUCH OF BRASS

Finally, I've been able to get some work completed.....a good thing since my teaching schedule this month will probably prevent me from working on my projects.....

Each August the Asheville Quilt Guild has their annual Quilt Show at the beautiful Western North Carolina Arboretum. It's one of the very special stops for the participants on my Great Smoky Mountain Quilting Tour...... Because the tour will keep me from volunteering at the show, I wanted to donate a small piece for their silent auction.....here it is:


I used National Nonwoven's Bamboo/Rayon felt.....which I LOVE! The black background piece is stabilized with Pellon's Lightweight non-fusible stabilizer. The layers have been hand basted together with white thread, the basting line measures the exact finished size I want the piece to be. This way I can audition my design motifs within that space.


Instead of featuring my trademark - beading - as the major design element, I decided to focus on some brass elements I uncovered during some recent reorganizing. I've done some simply straight stitching on the brown bamboo/rayon felt and using some fabulous hand dyed Perle cotton threads by Nancy Bruce, I attached several felt circles with hand embroidery. The background seemed to need texture so I machine stitched a few circles.....


.....which I hated.....and then removed...... I also didn't like the 'sun' motif and decided to replace it with a few more brass 'do dads' which were stitched in place later.

After much pondering, I dug out some Aurifil wool thread and using a big stitch, added texture the background had been lacking.


Now all the design elements are secured. I've squared my background piece and machine stitched it to a backing that is about 2" larger in all directions.


To cover the raw edge of the embellished center, I prepared 4 strips of fabric, each about 1" wide and 1" longer than the quilt (which includes the backing fabric which extends beyond the center rectangle.)

I did some simple machine straight stitching on these strips of fabric to add more interest and to add a bit more strength to the fabric. Next, one at a time, each was positioned so that the center of the strip was over the raw edge of the embellished rectangle. Because the backing is larger than that center section....it becomes the back of each of the strips.....any excess backing fabric is trimmed away once each strip is secured by machine stitching around all four edges.
A Touch of Brass - 11 1/2" x 9 1/2"
Copyright 2010 Mary Stori

Wednesday, June 2, 2010

TALENTED STUDENT

We teachers love to see how the methods we teach are embraced and translate to the work of students. Though I encourage photos to be sent my way.......it's not often enough that I receive them.

Today I'm bragging on a very talented and engaged student, Shawn Frazier....who took my workshop during my visit to the Bear Creek Quilters Guild.

Clearly this gal has gotten bitten by the 'bead bug'.......I love how she's enhanced her newly completed shell quilt with the addition of beadwork. I know you'll enjoy it too.......


Now if this isn't a reason to bead.....love the snail details!!

Thanks for sharing your work Shawn!