
It's been a number of years now since I retired from traveling the world on the quilting highway. I don't miss the airline travel! I do miss the energy I got from the workshop experience, sharing newly discovered techniques developed from projects made for my quilting cruises/tours, books, & competition quilts and garments.
This comment came from a follower in regard to a recent blog post. AND that brought out the 'instructor' still in me:
"Stunning!! I have to know what scissors you use to do all that fussy cutting of the cranes. The edges are perfect."


#1. Nope, no special brand of scissors.....I use quality small sharp to the point embroidery scissors.
#2. Misting lightly with spray starch or fabric sizer and pressing before cutting is very helpful to help tame those cut edges. This is especially true on more loosely woven fabrics which may require a bit more than a misting. I don't find it necessary for most batiks. SIDE NOTE: Since my work focuses on art quilts that aren't washed, I don't over-do this process as there is a concern that starch attracks insects....whether true or not I'm not sure but I've never seen.
#3. I'm old school and still recommend Pellon's Wonder Under. I buy it by the bolt, and find it very dependable and economically priced.
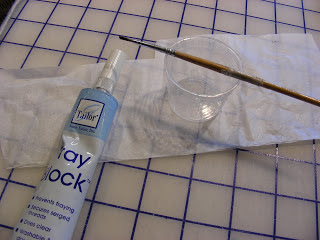
#4. Once the motif is fused in place, coat the edges with June Tailor's Fray Block. See details HERE. I learned this trick from applique expert Linda Cantrell. The ONLY time this product has ever stained my fabrics was when I used silk dupioni. It never hurts to test first though. Batiks may not require this step, but if in doubt take the time to do it.
Believe me, I still consider myself sort of new to this technique, but because I'm extremely fussy in regard to construction, all these steps are necessary to give me the results I'm proud of.
Perhaps you will find these methods helpful as well.
6 comments:
This is a blog post to bookmark for future use!!! I have used Fray Check but not always happy with it and never for my applique! But I will now...if I ever get back to quilting! HA Thanks again, Mary for sharing your expertise with us!!!
IMPORTANT - Just to be clear Robbie.....I use Fray BLOCK.....not Fray Check......
Glad you clarified--Fray Block and not Fray Check. I have tried using Fray Check a couple of times and hated everything about it. I will remember--if I ever change my style or need to tame those edge threads. Thanks for all the tips!
I think so many of us are familiar with Fray Check, it’s understandable the difference wasn’t immediately recognized. FRAY BLOCK friends!!!
Awesome, thank you for the tutorial!
Thanks for those tips!
Post a Comment