Friday, August 25, 2017

BACK TO WALL ART

The wet felting materials have been put away for now....but surely more would have been accomplished in the studio if I'd have spent the day making bowls!  I gazed, shuffled, and pondered the day away over fabric choices to begin my next wall art project.
 I dug out some altered silk noil fabrics. Some had been color discharged and others ice-dyed.  A typical problem that occurs after a play date with the Fiber Junkies is the creation of some really great pieces....BUT....too little of one kind.  I've been trying to focus more during our gatherings.....avoiding jumping from fabric to fabric which  ends up yielding a puny amount of each.  
See what I mean......great pieces, but a challenge to incorporate into one well designed piece!

I'm auditioning back ground fabrics....and seriously again I've pulled out over half of my stash trying to find something that works.  As pitiful as the above photos appear due to poor photo quality......one of these two may actually work.  The top is commercial Woolfelt, while the bottom is my carrier cloth from a recent eco-printing day.

My refusal to purchase any more fabric can definitely be a time waster.....but given where I live with no fabric stores.....digging through my fabric collection and determination in the end, will hopefully result in a pleasing finished piece.  Stay tuned...won't you??


Thursday, August 24, 2017

UP TO MY ELBOWS

The marathon wet felting continues...with vases and votive candle holders rolling out.  My fingers are wrinkled, my arms are sore, but there's a big smile on my face.....this is fun!


Monday, August 21, 2017

VOTIVE HOLDERS - FELTING FRENZY

My fingers have not be clicking away on my keyboard....yet, they aren't idle! My hands are vigorously manipulating wool fibers as I continue to replenish my inventory of felted votive candle holders.  
Here two (far left and far right) are glowing with battery operated votive candles that come with the purchase of each one.

I expect I'll continue to be quiet here for a bit as the marathon felting continues.  It's fun, but suprisingly time consuming in order to make them thin enough for the light source but hardy enough to hold their shape.

Friday, August 18, 2017

WET FELTING NEW SHAPES

My plate has become quite full right now.....not exactly over-committed, but getting there!  So rather than frustrate myself with big projects that require more studio time than I have, I'm enjoying experimenting with wet felting.  The goal is to develop some new shapes for my votive candle holder inventory.  

They are sold at Woolworth Walk, downtown Asheville, NC and in my online gallery.


Wednesday, August 16, 2017

FIBER JUNKIES ADVENTURES - AUG. MEETING

A day in each month that we all wait for.....yup...it's Fiber Junkie meeting day!  Here's an overview of our very busy and productive time together.  Like last month, we each kinda did our own thing....with encouragement and cheering as techniques either did or didn't work to our satisfaction.
 We always begin with show and tell, along with coffee and fattening goodies....hey a gal has to keep up her strength!  Denny awed us with this massive, intricately pieced quilt top.  I don't know how she didn't go blind working on that black fabric!
 Gen continues to be passionate about creating gift tags.  She utilizes many surface design techniques on each.....making them true works of art.
 She also came up with a very clever way to recycle those used tags (such as from Christmas gifts).  Here she's torn pages from an old dictionary to give the back a new life.  A brightly colored marker can be used to add a new greeting or name.
 Val blew us away with this screen printed sheer.  All of the patterns are Val originals....she has an amazing collection of silk screens of her own designs.
 She also screen printed these leaves onto some heavy weight handmade paper. This is only the first step....she may indigo dye or otherwise continue to alter the paper with additional techniques.
I'm in possession of several rings of hand-dyed wool fabric samples which I thought might be fun to see how they hold up to eco-printing.
They were stacked with other fabrics/leaves/metal objects and here are some of the results.  My efforts weren't very impressive this time.

 Several years ago, Gen gave me a stack of rit dyed cotton batting.  It's not very sturdy nor is it very colorfast.....but I decided to see if it would print anyway.  I didn't use any mordant.....simply rolled it onto a wood dowel and steamed it. I got zip, zero.....nothing.....  Back to the drawing board for other uses of this colorful collection!
The cotton batting was steamed in a turkey roaster in a vinegar/water solution for about 2 hours.
This was a coarse cotton......again it was steamed without using a mordant and it didn't print very well.  I knew I was taking a chance without pre-treating and I simply wanted to see what might happen.  I knew the leaves I used are prone to printing well.....so the importance of the mordant was a valuable lesson.
 While my eco-prints were steaming and simmering....I played with the indigo vat Val had all ready for us.  Knowing my love of wool, Kate brought me numerous big hunks of dress weight pieces to play with.  This one was a solid white.....and this is how it looks after the strings that held the pleating came off....it's just starting the amazing transformation from green to white as it hits oxygen.  
 It was dipped twice.....folding in horizontal and then vertical directions....and this is what it looked like after drying.
 I folded this white wool hunk on the bias.....and I should have had some help as I didn't get it tied tight enough....thus most of the white has disappeared.  I'm not terribly disappointed.....it's simply a different look. 
 Denny played with eco-printing, indigo, and dyeing with resists.....her little successes are fluttering away in the breeze.
 I'll bet you want to know what the heck this is all about???  Well.....Judy has a special way to test whether or not a piece of fabric has been soda ashed.....and is willing to help those of us who forget whether the piece was prepared for dyeing or not!  She tastes it!  Kate needed to know and Judy accommodated her......what a group!!!


Monday, August 14, 2017

APPALACHIAN HIDDEN TREASURES - New Work

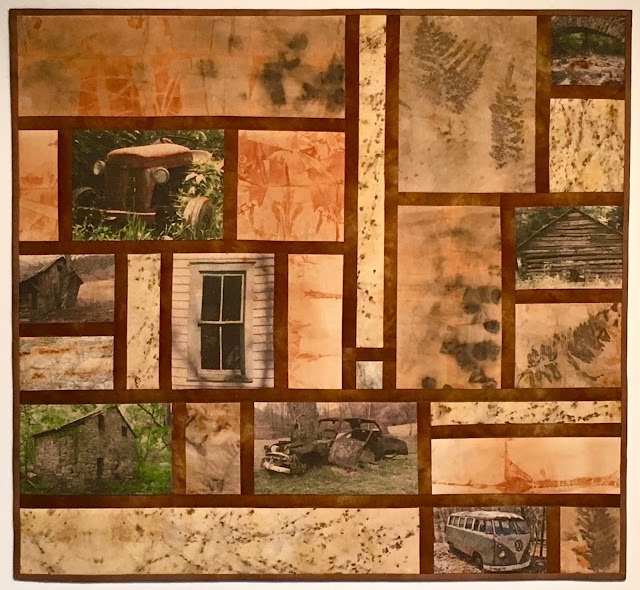
It's finally complete....see the back story here.  What a fun and rewarding piece this one turned out to be, providing just the right flavor of our mountain life.


APPALACHIAN HIDDEN TREASURES -  25" x 23"   © 2017
Eco-printed with iron water on cotton, image transfer to cotton, machine stitched.

Thursday, August 10, 2017

FLORAL FABRIC SALE

This quality fabric is still available with free shipping to US mainland.....need to destash!!!

Fabric Freedom Florals - London, England  - 8 - 1 yard cuts plus a 1/2 yd. piece (lilac/green/white -center botton of photo.)  New, never washed or frankly, barely unfolded, smoke free house.  $54.00 -  ship within 24 hrs. of payment....via  USPS.  email me direct:  mary.stori@gmail.com  Will bill via PayPal or can accept check but shipping will be delayed until check clears.  


Tuesday, August 8, 2017

SQUARE PEG IN ROUND HOLE

Life can get so in the way of our art, can't it?!?  I'm averaging one new project for every week to two weeks. I guess that shouldn't be such a surprise, given I make only original; one-of-a-kind work. And of course that time doesn't even factor in the making of the fabric!  But for me, figuring out every detail can't be rushed.
 My current project certainly seems like fitting a square peg into a round hole. The wall quilt features two styles of printing on fabric. First, are some hidden treasures I've photographed during years of hiking in our mountain backwoods.  They've been transferred to a lightly rusted, loosely woven cotton...not the best fabric option for printing but perfect for the feel of the piece.  The second grouping comes from some of the eco-printing I've done using iron water to process the fabric. 
Given that nearly all the images are already sized, it's taken A LOT of sewing and ripping, sewing and ripping to fit these pieces together.  I'll spare you the number of versions it's undergone so far.
 As you can see....it continues to change as I'm trying to eek out & stretch every bit of my dwindling stack of precious prints. I hope to be back with you soon with a look at the finished piece.

Friday, August 4, 2017

WOOL DRINK COASTERS

This is certainly not a subject to complain about.....so don't consider this whining, rather it's an observation about how fabrics multiply...they do don't they?!?
 I've been tripping over several bins and additional piles of felted wool for months.  To keep some semblance of order, smaller pieces and scraps are retained in separate bins.  This stuff is expensive so I'm not throwing it out!!  Yet, finding purposes that don't venture too far into 'craft' descriptions has not come easily. 

So, I set about creating drink coasters as a way to utilize both big and small pieces.  Naturally wading through all those bins took time, as did coordinating the pieces to attractively fit a 4.5" square without waste was time consuming as well. In the end, I'm pleased with my results.......


Check out these blogs to view the work other artists accomplished this week.  Nina-Marie's Off The Wall Friday, and Sarah's Whoop Whoop Friday
SaveSaveSaveSaveSaveSave

Thursday, August 3, 2017

PRINTED BY NATURE - WOOL WALL ART

.....Continued from previous post - piece now complete.
 PRINTED BY NATURE  - 14" x 28"
Eco-printed leaves on ice-dyed wool, machine quilted.
Prepared for hanging but can also be a table runner.
DETAIL


Tuesday, August 1, 2017

ECO-PRINTING ON WOOL

It's a magical time when a stack of eco-printed materials comes out of the processing pot....but then you are left to wonder, what the heck do you do with these little pieces?
 In this case, I printed leaves on small scraps of wool that had been previously ice-dyed.  Their measurements were in the vicinity of 5" x 7".  They started out originally as white, good quality dress-weight wool, and therefore didn't felt well.  That also meant they were flimsy, requiring a stabilizing method.  I chose to back them with Wonder-Under, which is still my go-to paper backed iron on adhesive.
 Once trimmed, they were carefully positioned onto a larger piece of National Nonwoven's Woolfelt and fused.
 A ridiculous amount of time was spent auditioning various colors, shapes, sizes of Woolfelt to outline the eco-printed pieces.  In the end I decided upon a very simple outline to avoid detracting from the 3 focus prints.

Once in place the narrow sashing was still bolder than I wished....so I dithered away even more time embroidering several different patterns using black thread to tone it down.  I 'thought' I liked the French Knots (top print) until I completed  that one entire area.  It got removed!  Instead a simple straight stitch was sewn through the center of each pinkish line....toning down their impact.

As frequent readers know, I'm not a free-motion quilter.....though it's a skill I really should conquer and would if I enjoyed machine work more than I do.  
Drawing is not in my toolbox either....but with enough time, pencil, eraser and tracing paper, I came up with a leaf/vine pattern to fill in the blank areas.  Fortunately, this piece was small enough that the constant turning during the stitching was easily done....it just takes more time!!

This is sounding like a "I can't do" confession....but I hope sharing the process I encountered on this and other projects will encourage others to find ways to accomplish their end goals, even if they don't currently have all the skills necessary. 

By clicking on the photo to enlarge, you will see white chalk lines indicating the outside edge.  The piece will be stay stitched right near that line, edges trimmed, and hand embroidery will finish the outside edge.

Please check back for my next post to view the finished piece.