Saturday, December 8, 2012

PTA WHITE ELEPHANT CHRISTMAS EXCHANGE

Each year our exchange gets sillier and sillier.....this isn't just an ordinary pull a number and take your gift exchange....oh no, not us.  Each of us brings a wrapped gift.  It can be a true 'white elephant' or something a bit more appealing if desired...that's what makes it fun....we all want to avoid taking the true 'white elephant' home!

Slips of paper with numbers equal to the attendees are put in a bag....we each draw one.  The person with the number 1 picks a gift from the stack....opens it and we all ouuuu and ahhhh.

Then it's number 2's turn.....she can either pick from the pile OR steal the open gift from #1.  So, let's say she decides to open another gift.  Then #3 can open a gift or steal the opened gift from # 1 or # 2.  So...if she decides to take #2's gift...then #2 can take #1's gift or open another from the pile.  Are you still following??  As more gifts get opened.....the higher numbers have the advantage of knowing what they might want to take home....so stealing becomes a frenzy.  To keep this little game from lasting 2 days...there are some rules.  No gift can be stolen more than 2 times in any round.  By 'round' I mean during a specific number's turn.  This of course means someone is supposed to be paying attention to how many times an item is moved from the start of one number to the start of the next.....it's hilarious.

I know there are probably many other versions of this game.  I first learned about it 30 years ago.  The gifts were to have a monetary limit of $20 but most were more better than that.  We played it not with numbers, but with playing cards.....and each participant got 2 cards....so it went on for a long time with lots of exchanging and laughter.   

 Here's part of our group....ready for the game to begin!
 Barbara was first....and surprisingly she chose a large package...usually we avoid the big ones....no one wants to end up with a silly BIG item.
 We all loved this one though....despite its size.  Georgia made this fabulous star using her Bonesteel hardware store wooden rulers.  (Georgia and her husband owned the Bonesteel Hardware store in Hendersonville, NC....the home of Georgia's quilt shop made famous via her PBS TV show, "Lap Quilting".
 Speaking of Georgia....she opened this hot ticket item...everyone wanted it.  It was a working (supposedly) vintage looking phone made using a wine bottle and metal wine glass handset.  
 When it was my turn, I stole this carafe with a glass....but it didn't stay with me for more than the next number.  A trick we often use is to kinda hide the item we want to keep under our feet so people forget about it.  This wasn't hidden....no point in that since it moved from person to person quickly.  See this is why nice items are important to have besides silly useless ones!
 Connie and Janice are laughing.....even though a 'steal' is in the works!
 Cathy finds a chicken calendar each year that our chicken raisers in the group can fight over!
Linda Cantrell is passionate about her 5 Boston Terriers (or is it 6 or 7...she owns now and fosters as well).  When this package was opened...there was no doubt Linda would be doing her best to take it home.

So, if you got this far in the post...you may be interested to know I'll have part two of our exchange tomorrow.......Sometimes though...these things are only interesting to those who were there......so hang with me.....I'll be back to sewing posts soon.

Friday, December 7, 2012

PTA DECEMBER SHOW & TELL

Holiday fun is full on here in the mountains with the various fiber groups I belong to.  PTA (Professional Textile Artists) consists of 14 talented and fun gals.  We all gathered yesterday for our annual Christmas party.
Because we are a very energetic group.... all talking at once.....someone needs to try to keep control of our activities.  Barbara was the keeper of 'the spoon'. We call that 'spoon speak'...supposedly if you want to speak to the entire group....you should be holding the spoon.  However, sometimes we need one moderator to control things.  We were even more out of control this time and it's a wonder she didn't break a glass as she had to bang and bang the spoon to get attention.
 We began with show and tell....and surprisingly for this time of the year we had a lot to share.

I especially loved Mary B's scrappy quilt.  It's the kind of old time comfy quilts I find so charming.
 Janice attended a water color class recently and created these two fabulous pieces.
 .....aren't they just great??
 Most of us are able to attend our annual PTA retreat....where apparently last year this piece began as a round robin.  Several of us...including me were dumbfounded when Leigh Anne showed it, because we hadn't known a thing about the quilt.  What did I say about this group all talking at once?  Perhaps that's why about half of us missed this whole thing!

 Member Connie Brown wears lots of hats....one is that of a bee keeper.  I think all of us are on the lookout for bee related items to pass along to Connie. This 'gift' of a Boo Boo bra for Connie had us all in hysterics.
 Georgia Bonesteel has been busy making (remaking) new items for her son's family to cherish.  They lost all their possessions (including their house) in a house fire....I can't imagine!!!  Georgia is now on a Mission to create new memories and treasures for them. 
 Georgia has also gotten the reputation locally for saving memories for family members by creating items from their loved one's ties.
 She also shared this pieced mountain scene which was a project for a retreat she holds out West every year.
 Linda Cantrell is on a real roll lately.....churning out stunning piece after stunning piece featuring vases.
 She claims she's just using up scraps and leftovers from previous quilts.....I wish my scraps would turn into something as eye catching as these!
Here's another piece Linda is starting....the figures have not been applied to the background yet....she's created the silhouettes and is in the process of deciding how best to use them.  The motion they depict is amazing.
Last, but not least....Connie is holding a quilt that our group will be donating to the retreat center where we hold our annual getaway.  I received the blocks at our Christmas White Elephant exchange last year.  (Mary B. had won them years ago at an Asheville Quilt Guild meeting.)  The group decided to make them into a quilt and this is how far we've gotten.  No...we don't work fast....if we'd put all our talking energy into the task....it'd be hanging at the retreat center by now!!

Tomorrow I'll share the silliness of this year's white elephant exchange....oh my.....


Thursday, December 6, 2012

BEADED FERN

My hands haven't been idle......my current project is moving along slowly with the often typical 'change of plans' along the way....

 National Nonwoven's has come out with numerous new 'heathered' Woolfelt colors....I LOVE them all.  The last photo in this post is closer to the true color of this material.

I gathered a sampling of bead colors for this project, but ended up narrowing them down to only bronze colorways, using several styles of beads (3-cuts, matte, and bronze iris).
 After drawing a simple fern to fit the desired 9" x 12" finished size, I traced a mirror image onto a piece of Pellon lightweight stabilizer which was thread basted to the wrong side of the woolfelt.
 From the wrong side, I machine stitched the fern motif....using a bronze metallic thread in the bobbin.  
 This approach not only transfers the design to the right side, was also intended to add a glimpse of sparkle to the fern's skeleton, and provide extra stabilizing for the beading.  
 The thread was to be slightly visible among the beaded foliage, however, after several attempts, none of the beading motifs I stitched worked.  Grrrr!!  That called for more experimenting before I came up with a technique which was pleasing and appropriate for fern fronds. Unfortunately, it totally covered the stems!  
As I reached the bottom of the foliage section it became apparent that I needed to continue the beading to the base of the fern, covering even the stem!  Oh well...original design visions don't always work....and I'm fairly pleased with the new look of the piece.

Yet, I've been staring at it for two days, unable to move forward on the finishing details because the design looks a bit skimpy. So, I think there will be more branches added or ??  I'll share my decision as the solution is found.  


Wednesday, December 5, 2012

LAMBEAU LEAP

Okay, okay....like all of us....the holiday festivities have begun which means less time in our studios.  I expect to have something to show tomorrow....even if it's not completely finished!!!

Until then....let me do a little side line cheering.  After the Packers dismal performance two weeks ago.....this Sunday's win against the Vikings is what we've all come to expect from our beloved Packers.  With eight starters out with injuries...they've been struggling....

Hopefully hunk Clay Mathews will be back next Sunday when the Pack play the Lions for the 2nd time this year.....

For those of you who aren't football fans.....you'll probably want to skip the following link...BUT if any of you want to know the origin of the now famous Lambeau Leap...check out this youtube.  This celebration is just one of the reasons fans are so supportive of the Packers!!


Saturday, December 1, 2012

STUDIO STORAGE IDEAS

Since I'm in the middle of three projects....and if possible I prefer to post them from start to finish with in-progress photos....let's pause and take a look at some storage ideas that have been helpful to me.

Maybe you can share some of your clever ideas too....

 I LOVE re-purposing antique furniture.  Here's a library card file now used for my threads.  Notice I haven't labeled the drawers....so it's always a surprise when I hunt for specific threads!
 We live in a log-sided home in the Blue Ridge mountains...about 3,200 ft. elevation.  This loft area was probably intended as a study or family room....it's long a narrow but works great for my studio/office space.
Old boxes are my weakness....I have quite a collection.  They are perfect for gathering and storing sewing items.
 This knife block works very well to safely and conveniently store my scissors.
 Ladders are another weakness of mine.....I've got five of them...all different sizes/styles spread throughout the house...most display quilts.  Here I've added baskets to the wide shelves to store and hide more tools of the trade.
 A larger view of my space....baskets and wood boxes are scattered everywhere!
 Lighting is my biggest problem.  Due to the high wood tongue and groove ceilings....I get a lot of shadowing on my work surfaces.  'The husband' researched and came up with this museum lighting system.....even with 13 halogen lights....it's still a problem.  What I need to do is have sky lights installed....but we are still hoping to sell our house (if the market EVER turns around) and build a home that is more functional for our life style, so I hestitate to take that step.
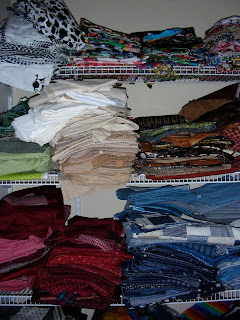
Just so you don't think I'm too neat.....here's a peek at my fabric closet....really a linen closet that is quite deep.  It's always a mess and stacks of fabrics continually fall off the shelves....  My goal is to start making more utility scrap quilts to reduce the stash.  My style of quilt making has veered away from cottons...it's time to move them out.

I'm sure the readers would love to know any clever tricks you might have developed for your sewing space......

Thursday, November 29, 2012

LINES

.....and the fun continues, at least for me!  I'm sure there are lots of you out there that get antsy too without doing some sort of 'busy' work in the evening.   For me....it's handwork, usually beading and lately embroidery too as I've been adding it a lot more to my wool pieces.

Yesterday I posted the start of this project....today you'll see the end product.  But please don't jump to the conclusion that this was completed in two days....NOT!  The handwork alone took about 5 hours of stitching each evening for about 8 days I think.

 One reason it was so time consuming is because I decided to couch strands of Lana thread over the strips.  Seriously, I could have accomplished it much faster with a stem stitch.  However, I liked the extra texture the couching threads provided and after all, this isn't a race!
 Here's a detail...click for a larger view.  The 'dots' are French knots....another time consuming tasks.....but again....super texture.  So.....I'll be you are wondering...why in the heck didn't this bead crazy artist use beads?  Actually, I  planned to instead of the French Knots, however the only tiny beads I had were very shiny....I felt this piece needed matte ones.

Did I mention I live pretty much in a shopper's void?  Of course I could have mail ordered them and waited a week.....nah....
 The piece developed nicely....for a time I wondered whether the orientation should be horizontal....but given that wall space is at a premium for many folks, the hanging sleeve is located for a vertical view.

LINES  11.5" x 17"
Woolfelt, artist hand-dyed & felted wool, machine stitched & hand embroidered.

This piece is ready to hang as is....OR it would look fabulous on a white mat and framed!  For ease of shipping and to keep the price more reasonable a hanging sleeve is attached.


Wednesday, November 28, 2012

NEW WORK

So....while I've been stitching patchwork blocks in the daytime.....evenings are always reserved for handwork.....and this is the project I've been working on.
 Like always....we quilters tend to gather our supplies before we dig in and start getting creative.  I don't always use everything.....but for me, being thoughtful as I begin is helpful.  Narrowing down choices makes for faster decisions as the work goes on.
 My background is National NonWoven's 80/20 Woolfelt, straight off the bolt...no further felting was done.  I've thread basted a stabilizer to the wrong side. Outlining the desired finished size of the piece also helps with motif placement.

 Using a chalk wheel, lines were marked which I followed with a simple straight stitch.  Construction-wise.....this provides a bit more support for the embellishing and also adds some interesting texture to the background.
Try as I might, I can't quite get the correct color of the yellow Woolfelt pieces to translate to my photo.  It appears yellow but is a bit more limey-yellow.

Please visit tomorrow for more process photos along with the finished piece.

Tuesday, November 27, 2012

"SQUARES" - DIRECTIONS

For lack of any other project to show you today.....I'm revisiting the "Squares" quilt I talked about yesterday. The colors here are not as true as yesterday's post....but you'll get the idea....

All the blocks are now stitched....I think this will be the final layout.....

Karen and Patty emailed me directly asking if this was a specific pattern they might be able to use for themselves. The idea for this quilt came directly from a pattern at MaryQuilts.  A FABULOUS blog, by a very generous and talented quilter who lives in Minneapolis.  

I prefer smaller size blocks than Mary's quilt, so here's the cutting instructions for what I did....  Just make a bunch of each for the size quilt you wish!  

Large square block:   4" center, 2 strips - 2 1/2" x 4", & 2 strips - 2 1/2" x 8"

Small square block:  2.5" center, 2 strips - 1 1/2" x 2 1/2", 2 strips 1 1/2" x 
4 1/2", final row 2 strips - 2 1/4" x 4 1/2" & 2 strips - 2 1/4" x 8"

Monday, November 26, 2012

SQUARES

Besides stuffing myself with food over the long Thanksgiving weekend.....I managed to spend more than a couple of hours each day stitching squares.....

 I'll admit to being kinda a type "A" personality......when I start a project, it's onward.....at a high rate of speed if at all possible.  I try my best to allow scrap quilts to be SCRAP quilts....rather than coordinating the fabric too much.  Naturally, that's a losing battle. Really, I could just have easily selected each and every piece of fabric for each and every block....one block and one position at a time as I sewed.  

However, during one sewing session I chain pieced a whole bunch of center square blocks. Knowing I needed a variety allowed me to try to just pick up cut strips without agonizing over each one!!


But now.....I have only 7 more to go....these will be the small square variety....  At this point I am now going to be more thoughtful about fabric choices for each remaining position.  Hopefully I'll be pleased with the layout and won't find repetitive fabrics/colors next to each other before I begin to sew the rows together.

This may or may not be the last peek you see of the quilt.  You all know what it will look like now.....and the quilting will be simple straight lines....  Even though this of course used a great deal of fabric.....as I look in my closet I don't even see a dent in the stacks.  

I guess there will be more patchwork stitching ahead for me....however not real soon as I'm now concentrating on two projects, neither of which are beaded and my fingers itch!!

Saturday, November 24, 2012

THE END OF AN ERA

If you know the significance of the following photo.....then this totally off subject post may tug a bit at your heartstrings too.

 Jay Jones / May 3, 2011)


This is Southfork.....the Ewing family's (TV home).  Where week after week from 1978-1991, viewers world wide tuned in to see J.R. Ewing's latest bad behavior.  The show was revived by TNT in June 2012.  Many critics panned it....but I'll admit, I got sucked in again!! 


Frederick M. Brown / Getty Images / April 12, 2012 )

 Yesterday, Larry Hagman passed away at the age of 81........