Showing posts with label Embellished quilts. Show all posts

Friday, March 3, 2017

RAIN DROPS

Many happy hours were spent beading the rain drops on this project that I'd recently blogged about. Finishing the edges was tricky, given that 2 were already hemmed and one contained a lace trim, but with persistence I worked out the construction details to provide a tidy finish. 
RAIN DROPS  23" x 32"
Vintage table linen ice-dyed by the artist, machine stitched, hand beaded.


Visit these websites to check out what other artists have been working on this week:  Nina-Marie's Off The Wall Friday, Sarah's Whoop, whoop Friday, Crazy Mom Quilts.


SaveSave

Tuesday, December 20, 2016

FURROWS

Here's my last piece of 2016.  It was inspired by a small dyed piece of wool felt.....using hair clips as the resist.

It was paired with National Nonwoven's Woolfelt...detail above. 

 FURROWS  13" X 11.5"  © 2016
Resist dyed felted wool, wool felt, hand embroidered,
machine quilted & beaded.

NOTE FROM MARY:  Kathy inquired about how I prep my pieces for hanging.  A long ago post addresses my method for wool pieces....with an extra step if for some reason I feel the piece offers two hanging orientations.  Click here to learn more.  
Traditional fabric sleeves are still my preference for cottons/most woven fiber projects.


Friday, September 23, 2016

LUNARIA ANNUA

Last Friday I blogged about the start of this project.  Since then I've been putting hours and hours and hours hand stitching this half of an ice-dyed linen table runner. 
The featured botanical motif is known by several different names; its Latin name: Lunaria Annua, or Silver Dollar, Honesty Plant, Money Plant.
The stems are hand-dyed cotton strips & machine stitched to the background. The discs have been created by combining  hand-dyed cottons, fusibles, and hand-dyed crinkled polyester. Each has been appliquéd with hand embroidery.
It was understandably time consuming, however after not being able to do much handwork for nearly 4 months due to eye surgery, it was pure pleasure.

The challenge now is to figure out how to finish it. The fabric has been stabilized with Pellon's lightweight non-fusible interfacing which allowed the flimsy fabric to remain remarkably flat.  The edges aren't quite as straight as I'd like, so along with finishing the top, I'll be addressing that issue. I'm considering dyeing some lace to add to those areas.  

Creating one-of-a-kind wall art pieces with repurposed fabrics can be challenging but so rewarding!

Follow these links to see how other artists are having fun with their work this week:  Nina-Marie's Off The Wall Friday, Crazy Mom Quilts, Sarah's Whoop, Whoop Friday.


Friday, October 30, 2015

MAPLE LEAF - NEW WOOL WORK

I always enjoy (require) handwork projects to pass away evenings while the TV blares 'guy' shows that have anything and everything to do with wheels and engines.

Here's what I've accomplished lately.....
MAPLE LEAF  9" x 12"
Artist hand-dyed, shibori printed, ice-microwave dyed, & mono printed wool that features bead embroidery.  It's mounted on a canvas covered frame, fabric backed with a hanging device. 
Here's another view.....I've been told for 25 years how difficult my work is to photograph.....the camera has such a difficult time translating shiny beads and fabric backgrounds.  So, after literally 2 hours of photographing this quilt....this is the best I can do.....it totally depends upon the lighting!  The detail photo below provides the best depiction.
Detail

Friday, October 16, 2015

CREATING MY OWN FALL COLOR

My project list has been stalled lately...but now I'm back on track.  Here's how I'm spending my evenings.

 This felted wool fabric has been dyed, shibori painted, ice-microwave dyed, and in a final attempt to turn it into a usable piece of fabric.....it was mono-printed and now I'm a happy camper.  (I used the other half of this piece here.)

It screamed fall to me.....so I've gathered beads and set out to create a maple leaf.
 Marking this type of fabric is very problematic....but I figured out a solution for projects like this a long time ago.  The design is sketched onto a piece of Pellon non-fusible interfacing which I always use anyway as a stablizer when beading.(it's white but looks tan in this photo...sorry about that)
 I'm not a fan of spray basting but do utilize it for this step.....by lightly spraying the wrong side of the fabric to secure the interfacing.  Next, using an open toe embroidery foot...and contrasting thread in the bobbin.....the design lines are stitched.
 ........Which are visible on the right side.  Not quite so much in this photo but well enough for me to see when I'm beading.
 I ALWAYS secure my work in a Q-snap frame for beading.....and use a portable cutting/pressing board to help support. My work station for evening stitching is a denim couch and all too often accompanied by a large black lab!!
The veins are finished and the tedious (yet enjoyable for me) task of securing seed beads onto the felted wool has begun. Getting the right angle of the lines has been a challenge, causing more removal than I would like but I think I'm now on the right track.

I'm linking to:  Nina-Marie's Off The Wall Friday, Sarah's Whoop, Whoop Friday, Crazy Mom Sews, and Richard and Tanya Quilts.  

Friday, September 25, 2015

'THE COLOR OF FALL' - FINISHED NEW WOOL PIECE

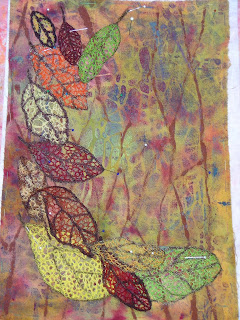
This is the final layout I selected to marry the needle lace leaves with the wool that had been reworked numerous times!
THE COLOR OF FALL  -  12" x 9"
SOLDAvailable Here  (and to view a larger photo)
 Artist shibori printed, ice-microwave dyed, & mono-printed wool, machine needle lace embroidered leaves. Mounted on a canvas covered frame, fabric backed & hanging device attached.

Visit these blogs to see what others have been up to this week.  Nina-Marie's Off The Wall Friday, Sarah's Whoop, Whoop Friday, Crazy Mom Sews.

Thursday, September 24, 2015

NEW WOOL WORK - PART 3

I expect most of you are familiar with the wonders of water soluble stabilizer....simply stitch on it.....cut the excess stabilizer away and dissolve the remaining in warm water.
The leaves are soaking in a sink that's filling with water.
With the stabilizer gone, the leaves are left to dry.
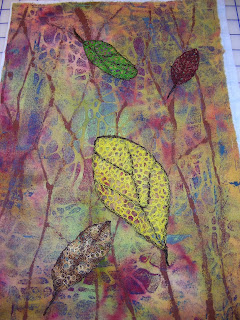
Though I made the leaves specifically following the design pattern I drew on the overlay.....it didn't translate into a pleasing piece.
I had a stack of leaves to work with so I began auditioning new placements.
Though I rejected this one layout, upon reflection, I rather like it now.  However I didn't then, so check back tomorrow and I'll show you what I did do!

Wednesday, September 23, 2015

NEW WOOL WORK - PART 2

….Continuing the saga of this new wool piece........
The colors and texture of the fabric gave the impression of fall.  So I set out to create leaves to enhance the design of the fabric.  A clear piece of plastic and a magic marker allowed me to preview the shape and placement.
Normally I use a dry erase marker when auditioning motifs, but because I wanted to transfer the design, a traditional marker worked better for this approach as it stays fairly wet.
I placed a piece of lightweight paper over the leaves drawn on the plastic to transfer their shapes.....they will now be my templates.  Sure they are rough shapes.....but for my purpose; to make needle lace leaves, that was fine.
I retraced the shapes onto a piece of water soluble stabilizer.
Okay, I know what you are thinking....Mary doesn't like to free motion stitch....and you'd be right.  But it had to be done.  So, the shapes were outlined and then filled in using rayon embroidery thread.
Well......that wasn't too bad.....I did it!  But, yikes.....it took a lot of time and I had how many more planned???

Come back tomorrow and see the progress........  

Tuesday, September 22, 2015

NEW WEEK - NEW WOOL PROJECT

This post should probably be titled - The 7th Time May Be The Charm......
Normally, my preference is to show the process and conclusion of a project in one post, assuming that doesn't get overwhelming. But, because of all the steps involved, I'm breaking up this 'story' into several posts.
It all began with a piece of garment quality white wool.  I love working with felted wool, but as is often the case with dress goods, it wouldn't felt.  I had a lot of this fabric so I decided to work with it anyway.

The first step was to ice dye it.....but as seen in this photo......it's rather dull. So when two friends and I were playing with acrylic paint, I wrapped it onto a large pvc pipe. 
And painted the folds using a foam brush. (My buddy Judy Simmons can be seen in the background painting one of her pieces.)
......Hummmm.....it's still ugly!
Several months later the Fiber Junkies spent a day experimenting with microwave ice-dyeing....so I overdyed it.  Good grief....it's still homely.
Time passed and the Fiber Junkies met again for a mono-printing day.  I was doing a happy dance after transforming the fabric by applying numerous layers of thinned acrylic paint with the aid of several really interesting stencils a member shared.

Trust me....it's so much better in person.  The challenges are that it is far darker than it appears in the photo and has a VERY BUSY appearance.  

With that said......after picking it up a dozen times and replacing it, I now have a plan that hopefully will be successful.   Check back....won't you?


Thursday, July 2, 2015

INDIGO BLUE - SMALL WORK IN PROGRESS

Busy, busy.....I've always heard how much busier folks seem to be when they retire.....though I was extremely busy before, now I wonder how on earth I did it all!

I'm in the middle of creating two large projects that will be gifts.  I'm holding off blogging about them right now and time hasn't allowed me to generate much else.  So, rather than disappear totally....here's a look at a small project in the works.
 This piece of coarsely woven linen fabric was indigo dyed during a Fiber Junkies play date some time ago.  I LOVE this color and could easily work with it on every project!
 During my reorganization post-teaching period, I came across several beaded agate slices that I'd used as workshop samples.  This one was paired with a small piece of felted wool that I'd marbleized.  A final row of beads stitched at the base of the agate holds it to the fabric.
 Because the work will be mounted on a canvas covered frame, a basted outline of the required size helps to keep my design within that boundary.
Isn't it always such a surprise when your initial 'design map' takes an off ramp? After several starts and stops adding beads to the background, I gave up and listened to the quilt.  Instead, leaves were gathered and printed onto the fabric using acrylic paint.  Next, I hand embroidered details.  What's next?? I'm not sure...perhaps I'll have some evening stitching time soon to explore that question.  Stay tuned.....

Friday, June 19, 2015

SUNFLOWER SILHOUETTE - NEW FELT WORK

This piece was created using fabric recently described here.
SUNFLOWER SILHOUETTE  10" X 11" 
Artist microwave ice-dyed felted wool, mono printed, 
hand appliqued & embroidered, bead embellished.

Friday, June 5, 2015

WILDFLOWER FANTASY - NEW WOOL WORK

After many happy hours stitching on this small piece....it's now complete!
Sometime ago I blogged about the process of altering a section of this peachy National Nonwoven's Woolfelt fabric.  I LOVE, LOVE, LOVE their products.  

First there was a rather unsuccessful attempt to micro-wave ice-dye it.  I believe the unsatisfactory result of that experiment was because the piece was too large and it 'cooked' too long.
On a re-do.....it was monoprinted using slightly thinned acrylic paint and a stencil.
I always stabilize felted works to keep them from distorting during the stitching process.  Often I'll sketch some basic design placement ideas on a piece of lightweight non-fusible Pellon interfacing. (I don't draw....so this is really rough.)
The interfacing is thread basted to the wrong side of the altered fabric and here ultra-suede stems are being added. (Sometimes following the sketch I've drawn on the wrong side, sometimes not!) 
Stitching with Burmilana #12 thread and beading using a variety of styles of seed beads is in progress. Next the interfacing will be trimmed to about 1/4" from the outside edge, a backing and edge finishing will be incorporated.  Finally, a hanging device and label will be added.
WILDFLOWER FANTASY  10" x 12" 
Artist microwave ice-dyed, monoprinted, hand embroidery,
bead embellished.


UPDATE:  I've had several inquires about how I finish the back of these pieces, plus inquiries about hanging devices.  I blogged about it here:  http://marystori.blogspot.com/2012/11/backingslabels-for-wool-quilts.html


See what other artists have been up to this week:  Nina-Marie Off The Wall Friday, Whoop, Whoop Friday

Friday, May 22, 2015

APPALACHIAN MOUNTAIN MEADOW - NEW WORK

 Well, this piece was a LONG time in the works.  It was one of those projects where an 'ahhhh' design just kept eluding me.  I had every intention of posting  photos of the entire process, but after seeing just how many there were and realizing how much whining and indecision would be exposed....I've opted to share only 3.
The project began in Nov. 2014, as a small piece of yellow silk noil. It was transformed using a soy wax resist and green, yellow, and orange/red dyes.
I'm inspired by the mountains that surround me.....so the idea was to hand embroider a mountain scene and frame it with hanging branches using two strands of floss.  (Which took a lonnnnng time!) Though I had not envisioned any other design elements....as often happens....the piece tells you to keep going....and so I did.  
APPALACHIAN MOUNTAIN MEADOW  18" X 16"
Artist soy wax resist/hand-dyed silk noil, cotton batik, hand embroidered.
Detail - Appalachian Mountain Meadow

Check out how what other artists have been up to this week:  Nina-Marie's Off The Wall Friday, Crazy Mom Quilts, Whoop, Whoop Friday, Richard and Tanya Quilts.