Showing posts with label Theme Quilts. Show all posts

Friday, October 27, 2017

LOOKING EAST - NEW WORK

After testing several approaches to add texture/interest to a Japanese theme fabric, a plan was formulated. (Refer to previous post.) The fabric was spliced vertically into sections, interspersed with black flanges that were manipulated/twisted. 

LOOKING EAST  32.5" x 23"
Commercial cottons, machine stitched.


Follow these links to view what other artists have worked on this week:  Nina-Marie's Off The Wall Friday, Sarah's Whoop Whoop Friday, Crazy Mom Quilts

Friday, June 3, 2016

GROWTH CHARTS

 After many years of wondering if we'd ever have grandchildren....we are now blessed with two darling boys.  Being a long distance grandma keeps me creative.
Raiden just turned 4 and as fast as he's growing, I wonder if his growth chart should have been taller!?!
Last fall we welcomed grandson #2 and I made this quilt for him.
Now it was time to create Elan's growth chart. I continued with the airplane theme.
Our two cuties....taken several months ago......

Visit these sites to see what other fiber artists have been up to this week:  Nina-Marie's Off The Wall Friday,  Sarah's Whoop Whoop Friday, Crazy Mom Sews.

Thursday, June 20, 2013

ORGANIZING FRENZY - NEW DIRECTION

These last two weeks have been one huge organizing frenzy around this household.  We are in a 'use it or lose it' mood!

So, when it comes to my fabric stash, I was quite appalled at just how much I've accumulated.  Years ago my dear friend Doreen Speckmann exclaimed after seeing my stash, " Mary, how do you make anything out of this puny amount of fabric?"  Doreen had an enormous stash.....me, not so much. 

However, over the years a big thank you continues to go out to my friend Helen who has sent me boxes and boxes of her unwanted fabric. The majority is fabulous batiks (fat quarters and half yard cuts for the most part) and I'm determined to see if I can mix them with some of the hand-dyed fabrics I've been hoarding.

The goal here is to use fabric.....so I'm making some BIG lap quilts.  Sometimes the ole' brain doesn't fire as well as it used to, but I recalled the last time I worked with this brand of hand-dyes....they all bled like crazy.  So before I could begin having any fun at all.......I treated it all in Retayne.  Here's the greens......  


Fortunately, all that color loss didn't affect the appearance of the fabric.
 This process literally took me all day, since I did all the blacks/darks separately.  My washer regulates the temperate, so for big loads I used the machine. Unfortunately, I had to stand there during the fill, turning it on and off and back on again so it only filled with hot water!  What a time killer.  

And speaking of time killers, the pressing.....yuck!!!  Though that time was quite useful in catching up with all the 'Housewives' on Bravo......

With a 'plan' in my mind..........I began.....notice I'm not showing you any stitched blocks?  Why is it that the vision in one's head is always awesome, but the reality may not meet that expectation?  

The problem is that I don't have enough of any of the hand-dyes, except the black, to make large enough blocks for my idea...it was looking too disjointed.  

Now...DO NOT laugh......but yes, I went to the computer and ordered more hand-dyed fabric in sufficient amounts for my original plan.  BUT......I'm setting out to search for more scrappy design ideas for the next 'use it or lose it' project!!!

I'll report back on this one when there's something less embarrassing to show. 

Wednesday, February 13, 2013

YARD ART

Theme quilts have been a favorite method of mine since I took the 'off ramp' away from making traditional patchwork quilts.  Humorous wall quilts were often the result.

One such subject that caught my attention was the silliness often found in 'yard art'.  There was a particular love of unusual objects displayed on property in Wisconsin.
 This one always cracked me up....at Christmas the owner put blinking lights on the tractor wheels.....really!
 And...ya gotta wonder about the effort that went into this display!
"The husband' brought this gargoyle home one day....and after I refused to allow it at our main house.....we moved it to our weekend cabin.  I'll never forget the day I got into our van to drive up on a Friday afternoon...only to see "Big Em"....as it was named....strapped into the back seat!  The looks we got from the toll takers along the way was priceless..
"Blossom" was my favorite....all 65 pounds of her concrete wonder lived in front of our house for years.  She had a Rubbermaid tub of costumes....even a cap and gown when our son graduated from college!  This great Green Bay Packers blow up helmet was actually 'russeled' by hooligans.
 So one day, YEARS ago, my "Spritzer Sister", Francie Ginocchio (co-founder of our two person quilt guild) and I decided to issue a 'guild' challenge.....the subject being yard art.  

I got to wondering what happened to those pink flamingos, bend-over ladies, and black bears clinging to trees when their owners tired of them.  Did they get stored in an attic, a garage, or heaven forbid....the dump??  My quilt became "Yard Art Memorial Park".....a final appropriate resting place for beloved yard art.  It was one of the first of my major show pieces as I began entering competitions.

This piece will now reside at my friend Nan's house in AZ.  Nan being a collector of my work!  Yeah....  That's me in the photo above....turning it over to Nan.
This may provide a better view of the piece - click on photo.....as well as the two details below.

If you find this style of quilt intriguing.....see more by scrolling down here.

Tuesday, January 29, 2013

GETTING THERE

I couldn't wait to pick up a needle last night after being away from home for several days....

While I was gone....magic happened......(don't we wish that was the way things worked??)  Anyway, the beading is now complete, and the piece has been basted to black fabric (featuring a tiny grayish print) that has been backed with batting.


Here's a close up....click on the photo to get a better view.  So.....what's next?? I think a little hand embroidery is necessary to support the weight of the beads, which will keep the fabric layers together.  Hope to show you more tomorrow....

Sunday, January 27, 2013

GETTING THERE

Oh my....working with this marbleized fabric in its whole cloth form is really making me work!  No matter what I seem to do, I end up taking it off several times before hitting on something that works.

Perhaps using it as patches would be a better choice, but now I'm even more determined to see what I can do with it in its current state.  Obviously, if I were a machine quilter....that alone would pop the pattern and be quite nice....  Ah hummm, that's another reason to conquer that technique....maybe some day!  

In the meantime.....I've now alternated small white bugle beads with seed beads around the pumpkin embroidery.  Then I filled a section in with more seed beads.  BLEEP.....bleep....

So, off they came and instead I started stacking and stitching clumps of seed beads.  This may be the answer, though a few won't cut it.....I see a lot of stitching ahead of me.

This sure doesn't seem like a lot to show for nearly a week's work...but then, the amount of time lately that I've had to devote to it is fairly slim.  Sometimes that's good.....it gives me a chance to do some 'virtual designing'......  


Friday, January 25, 2013

DETERMINATION

Well....I'm feeling better today....I stopped venting.....really, what's the point?


So, I've scatter stitched small black beads along the dyed lines which seems just right. I'm still pondering about the heavy pumpkin color embroidery lines.  They add another dimension/layer but they aren't really 'incorporated' into the design.  Something I preach about all the time to students......especially in regard to beading......don't just plunk beads down (in this case its embroidery) just to be adding something....it needs to be integrated into the design.

I'm going to try to save it for now because this marbleized fabric tends to show  needle holes....maybe I can still make this work...  Let's see what happens....


Thursday, January 24, 2013

FRUSTRATED!

I think I'm going to be venting a bit today......and have pretty much figured out the reason for my frustration.  We all experience it I know....too little time!

I just returned from the first of 4 trips that will take place in the next 30 days....now I am looking forward to them, but the lack of substantial studio time is making me itchy.  My projects have consisted of small pieces that can be accomplished within several days.  Really....there's nothing wrong with that and I enjoyed making every one....

Except....now I'm not.  I'm forcing myself to make something small for time's sake and this current one is nothing but a big fat failure.  Okay, sure it will probably get better and so what if it doesn't??

So, what I need is a big challenging project.....and time to get one started....I'm reminding myself....it will happen soon and then I'll be venting about that!!!
Cotton fabric that I marbleized at a Fiber Junkies mini retreat

 After cutting off a small hunk (Remember....I'm doing small pieces so I have a feeling of accomplishment??)  The edges have been frayed...not a look I often undertake.  Materials have been gathered....without a clue what to do when them.  I made a conscious decision to try to add one unexpected color...but then again...maybe not.

 Using a combination of seed and bugle beads, I started to follow the black lines.....this is all the further I got before I knew it wasn't the right path...so off they came.
Some hand embroidery has been added and ripped out and added again.  And there is sits for more inspiration.  I rarely have 'artist block'.....maybe I do need these trips?  

Tuesday, January 1, 2013

WELCOME 2013

On Christmas Day, 2007 my first blog post was published with the help of our son's SIL.  My babbling has continued and many blog friendships have developed over the years.

So....welcome to 2013!  Have you made resolutions/goals for your art this year?  Personally I feel another bovine quilt coming on.  Many of you may be familiar with my humorous bovine focused quilts which I've been producing for well over 20 years.  I can't help it....I'm so drawn to this subject.

 Here's Blossom....our 60 pound concrete calf....sporting her Packer helmet...followed by two wall quilts that were such fun to create!


Unlike what you'd expect though, it's not my Midwest upbringing that got me started on this subject.  Rather it's because 'the husband' has collected cow creamers for 30+ years.  That 'herd' has grown to around 250 creamers.  Currently they live in numerous large Rubbermaid bins since we have no place to display them in this house.  Actually, it's time to sell them, but how??  Yikes...taking a photo of each one and putting them on eBay....earning about 10 cents on every dollar we spent?  Nah.....we are looking for a way to relocate the entire collection!!!


May all good things come your way in this NEW YEAR.....thanks for hanging with me on this blog.  

Monday, November 26, 2012

SQUARES

Besides stuffing myself with food over the long Thanksgiving weekend.....I managed to spend more than a couple of hours each day stitching squares.....

 I'll admit to being kinda a type "A" personality......when I start a project, it's onward.....at a high rate of speed if at all possible.  I try my best to allow scrap quilts to be SCRAP quilts....rather than coordinating the fabric too much.  Naturally, that's a losing battle. Really, I could just have easily selected each and every piece of fabric for each and every block....one block and one position at a time as I sewed.  

However, during one sewing session I chain pieced a whole bunch of center square blocks. Knowing I needed a variety allowed me to try to just pick up cut strips without agonizing over each one!!


But now.....I have only 7 more to go....these will be the small square variety....  At this point I am now going to be more thoughtful about fabric choices for each remaining position.  Hopefully I'll be pleased with the layout and won't find repetitive fabrics/colors next to each other before I begin to sew the rows together.

This may or may not be the last peek you see of the quilt.  You all know what it will look like now.....and the quilting will be simple straight lines....  Even though this of course used a great deal of fabric.....as I look in my closet I don't even see a dent in the stacks.  

I guess there will be more patchwork stitching ahead for me....however not real soon as I'm now concentrating on two projects, neither of which are beaded and my fingers itch!!

Wednesday, November 21, 2012

PATCHWORKING AGAIN

My neat pile of fabrics posted yesterday has turned into this mess....

 I decided to grab a few minutes to test a block or two for a small lap quilt.....so rather than taking the time to cut a bunch of strips...... I simply did the 'cut as you go' method.  The results yielded heaps of fabric.....
.....and a few blocks on my design wall.  This 'utility' quilt is not intended to be high energy or even brightly colored....yup, I think I achieved that!!  

Since we are flying solo for Thanksgiving....I'll have to begin the cooking process today so I don't expect much time for stitching in the next two days.....  
I've always said that one of the best rewards of quilting is that your in-progress projects don't have to be cleaned or cooked....the fabrics will remain right where I left off...no starting over like the 'making meals' part of our lives!  

We are deep frying a turkey tomorrow.....hopefully I'll remember to take a few pictures.......   till then......  gobble, gobble.... 

Friday, November 2, 2012

NEW GROWTH

This post will be added to Nina-Marie Sayre's "Off the Wall Friday" feature...click here to see what other adventurous artists are doing.  

For those of you reading this post via Nina's blog....you may wish to backtrack to my 2 previous posts to see more process views of this piece....or enjoy the tail end of my efforts. 

 Once all the applique and machine embroidery was completed, batting was basted to the wrong side.....but NOT the backing yet.....
 Because....I have one more addition.  Dragon flies have a very special meaning for my niece, therefore.....I'm going to add one.  

Again, digging deep into my stash of hand-dyed treasures (the results of fun dye days with one of my small groups, the Fiber Junkies.)  Here's a piece of poly. netting that I tried to marbleize.  The pattern is subtle, but I think it will work.
 Drawing is not a skill I have, so copyright free images are so helpful!!  After printing several sizes, this one was chosen for the wings.
 It's been retraced on freezer paper and pressed to a sandwich of the netting (two layers secured with Wonder-Under) and cut out. 
 Now I'm auditioning not only the wing shapes/sizes, but the placement and bead colors.
 Though my collection of the bronze beads were more suitable in shape, I felt they blended into the background too much.  Back to the bead bins and more auditioning....
 Adding and subtracting shapes and sizes of beads takes time but is worth the time spent to get it right!  The dragon fly was beaded through two layers...top and batting which helps to support the weight of the beads.  

Next, the backing was basted in place and....gulp.....I secured the embroidery foot, lowered the feed dogs and machine quilted the background.  This is NOT a skill I have conquered but it seemed like the right choice for the piece....and gosh...eventually I must learn and there's no time like the present!

NEW GROWTH
18.5" X 21.5"

My plan had been to face the quilt to provide a nice clean edge as my niece's wall are painted in a dark tan.....but now I'm having second thoughts...and would love to hear from any of you if you have strong feelings about this.  I'm thinking instead that perhaps a very narrow traditional paler brown binding might set the design off better......but then again...maybe not..... sigh....

Wednesday, October 31, 2012

CLEAN/SIMPLE DESIGN

Isn't it great when family members express interest in your work??  I'm always eager to create a special piece for family/close friends.....but there's that hesitation....am I pushing them into having to hang a piece of art they may not actually care for?

Hopefully, that won't be the case with this new project being made especially for my niece who is moving into her own very first condo that has LOTS of wall space!

Like many young folks, she prefers simple & clean designs.....nature based....but not necessarily patchwork.

 I have almost no drawing skills so when I say I began by sketching two trees on lightweight tracing paper (the size of the desired finished piece)....I mean.....with pencil and eraser in hand!  

Due to a long lingering cold/flu, I've had a lot of down time.  So, hand applique seemed the most appealing construction choice for this project.  Nature isn't perfect, nor are these trees.....so it wasn't necessary to precisely transfer the motifs using many of the traditional methods.  Instead, with a Clover chalk marking tool...one fitted with a metal wheel at the tip, I retraced my pencil lines, pressing down firmly onto the paper which covered the piece of cotton fabric that I'd chosen for my trees.
 This procedure yielded a faint chalk mark where the paper tore as I traced, or a deep indentation (pressure traced).  Once all the lines were traced, I removed the paper and went over the marking again for better visibility.

In this photo, you can see where on the left side of the tree... it's been cut out, allowing a scant 1/4" seam allowance.  I'm not very fussy about this process because I trim the seam allowance as I needle turn applique if it's too wide or uneven.
 Remember this is going to be a simple/clean design....no parts have to fit into each other so precision is not vital here.
 Rather than using pins to secure the applique motifs to my background, I prefer to take the time to thread baste.  I find I have more control and less hassle using this time tested method.
 Once the applique has been complete, it's time to audition 'leaf' fabric.  My intent had been to use batiks in a variety of greens....  Yes, this looks sparse....it's supposed to!
However, now I'm leaning toward using this multi-color batik print instead.....follow along tomorrow to see what I decide......

Friday, October 26, 2012

TEXTURED LEAVES

Due to a bad sore throat....my planned activity yesterday was postponed...instead I sat like a slug and did handwork most of the day.

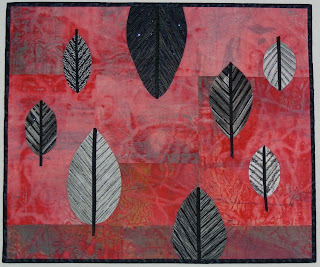
 As you may recall from previous posts, I decided to bind this quilt instead of using a facing due to concerns about the unevenness of where the leaves met the edges.  The background fabric was my own deconstructed screen printing.....of which I used nearly every inch.  Nothing in my stash in that color range worked so I decided to use a muted gray/black print for the binding....thinking it'd 'frame' the design nicely.

TEXTURED LEAVES 19" X 16"
Artist deconstructed screen printed cotton, commercial black/white fabrics, hand appliqued, machine quilted, & bead embellished.

 Actually, once it was in place, I felt the look was a little too strong. So, although I hadn't planned to bead the edge, (yet that thought is never far from my mind)....soon the beads were back out and my afternoon disappeared between sniffling and beading.

I think the addition of diagonally placed graphite beads worked to tie the entire piece together.  Click on photo to enlarge.
Detail