Showing posts with label mono-printing. Show all posts

Friday, March 1, 2019

ON A ROLL WITH NOTEBOOK COVERS

This wraps up the week of book cover making.....check out the previous posts to see more if you missed them.

Top two are indigo dyed wool.  Because this wool was high quality dress goods, it didn't felt....thus the edges unraveled easily.  Working with it in a larger format composition notebook allowed for adding a batik lining without becoming too bulky.

The three smaller ones are silk noil, mono-printed with acrylic paints and batik lined.

Each utilizes Ultra-suede scraps for the spines and closures......I knew I was saving them for something!

I've had numerous inquiries about purchasing these notebooks.....yes, they are for sale.  Email me using the link on the right side bar for details.


Tuesday, November 13, 2018

FUN MAKING FELTED BASKETS

With non-stop rain and foggy, foggy conditions, it's the perfect day to hunker down and create.  Before the holiday shopping begins in earnest, my Woolworth art gallery inventory of wool felted baskets needed to be expanded.
The Fiber Junkies have had a number of meetings lately working with acrylic paints. I took advantage of the work time to mono-print quite a lot of wool felt.  This piece was made using the edge of a hotel key card, dipped in paint.  
 The baskets are made by fusing two layers of felted wool, or in this case, the lining is ice-dyed bamboo rayon that I over-dyed with indigo using a shibori folding technique.
Some of my botanical printed wool felt was used for this basket.
 These last two small baskets are made using the same fabric combo as the first larger basket. 
It's more tedious than it looks because besides fusing, I've edge stitched the layers together and often times adding some dense stitching on the bottom.  

I have to admit....I didn't get all this done in one day.....some of the pieces were fused and cut out the day before....as I said, it's time consuming...but really enjoyable.

Friday, May 26, 2017

FIBER JUNKIES - MAY MEETING

We were all so looking forward to our first 2017 FJ gathering at Val's house....where we are treated with our own tables/space to work in her garage studio.  Val graciously hosts us from Spring to Fall, and we literally take over her house as well.....

Unfortunately, we've experienced a prolonged spell of rain and coolish weather, requiring us to nix our plans for deconstructive screen printing, fearing the screens wouldn't dry in a timely manner.
 But heavens.....that doesn't stop the FJ's from playing with thickened dyes.  We all kinda just did our own thing....mostly mono-printing, stamping, and fabric painting.  Denny had brought this textured roller that I FELL in love with....it gives the appearance of strings wrapped around the hard rubber cylinder.
Instead of beginning with soda ash treated white fabric, I brought a stack of previously dyed (in various manners) fabrics that I wasn't keen about.  Denny's adage of 'if you don't like it.....add more', was my motto for the day.
Instead of working with so many different dye colors....which often yields fabrics that may be wonderful, but don't seem to coordinate with anything else I own, I decided to work exclusively (we'll almost anyway) with Indigo dye.

Here's a scrap of felted wool that had gotten lightly stained so it was getting a do-over.  Roadside foliage was placed directly onto the wool.
 It was covered with a silk screen and the dye was pressed through. Unfortunately it didn't penetrate as evenly or well as it should have....look, the foliage hardly appears discolored.
Here is the result.....not wonderful. Which actually became my theme for the day......not wonderful results.
 The next attempt was a previously rejected dyed cotton piece.  Yee gads!
But here it is after batching and washing.....fairly usable.
Another mess that was worked using leaves and a fern stamp.  I didn't like the way the stamped fern looked, so in an attempt to 'fix' it....I got mud.
BUT...you never know....after batching and washing....I was surprised.  Both these pieces are similar in color....neither are good enough to work as whole pieces, but will most certainly get cut up and incorporated into future work.
 Lot's of stamping went on.....this nice piece is Judy's.
 Denny, always the innovator of our group.....smeared thickened dye onto plastic and then printed white fabric.  Great idea to generate textured backgrounds. 
 Kate was using some of our 'group collection' of resists....dabbing paints on and around them.
 Val used a rubber scrapper, applying paint in a landscape orientation.  She ALWAYS makes it look so easy.....and has developed her own unique signature to her designs.
 Judy had great success printing ferns.  She applied paint to a fern, placed it on the fabric and covered with Plexiglas.  The image transferred from the pressure of running a hard rubber roller over the surface.
 Denny, (as I said...the master of layering designs) used stencils, resists, and a polka dot roller for this piece.
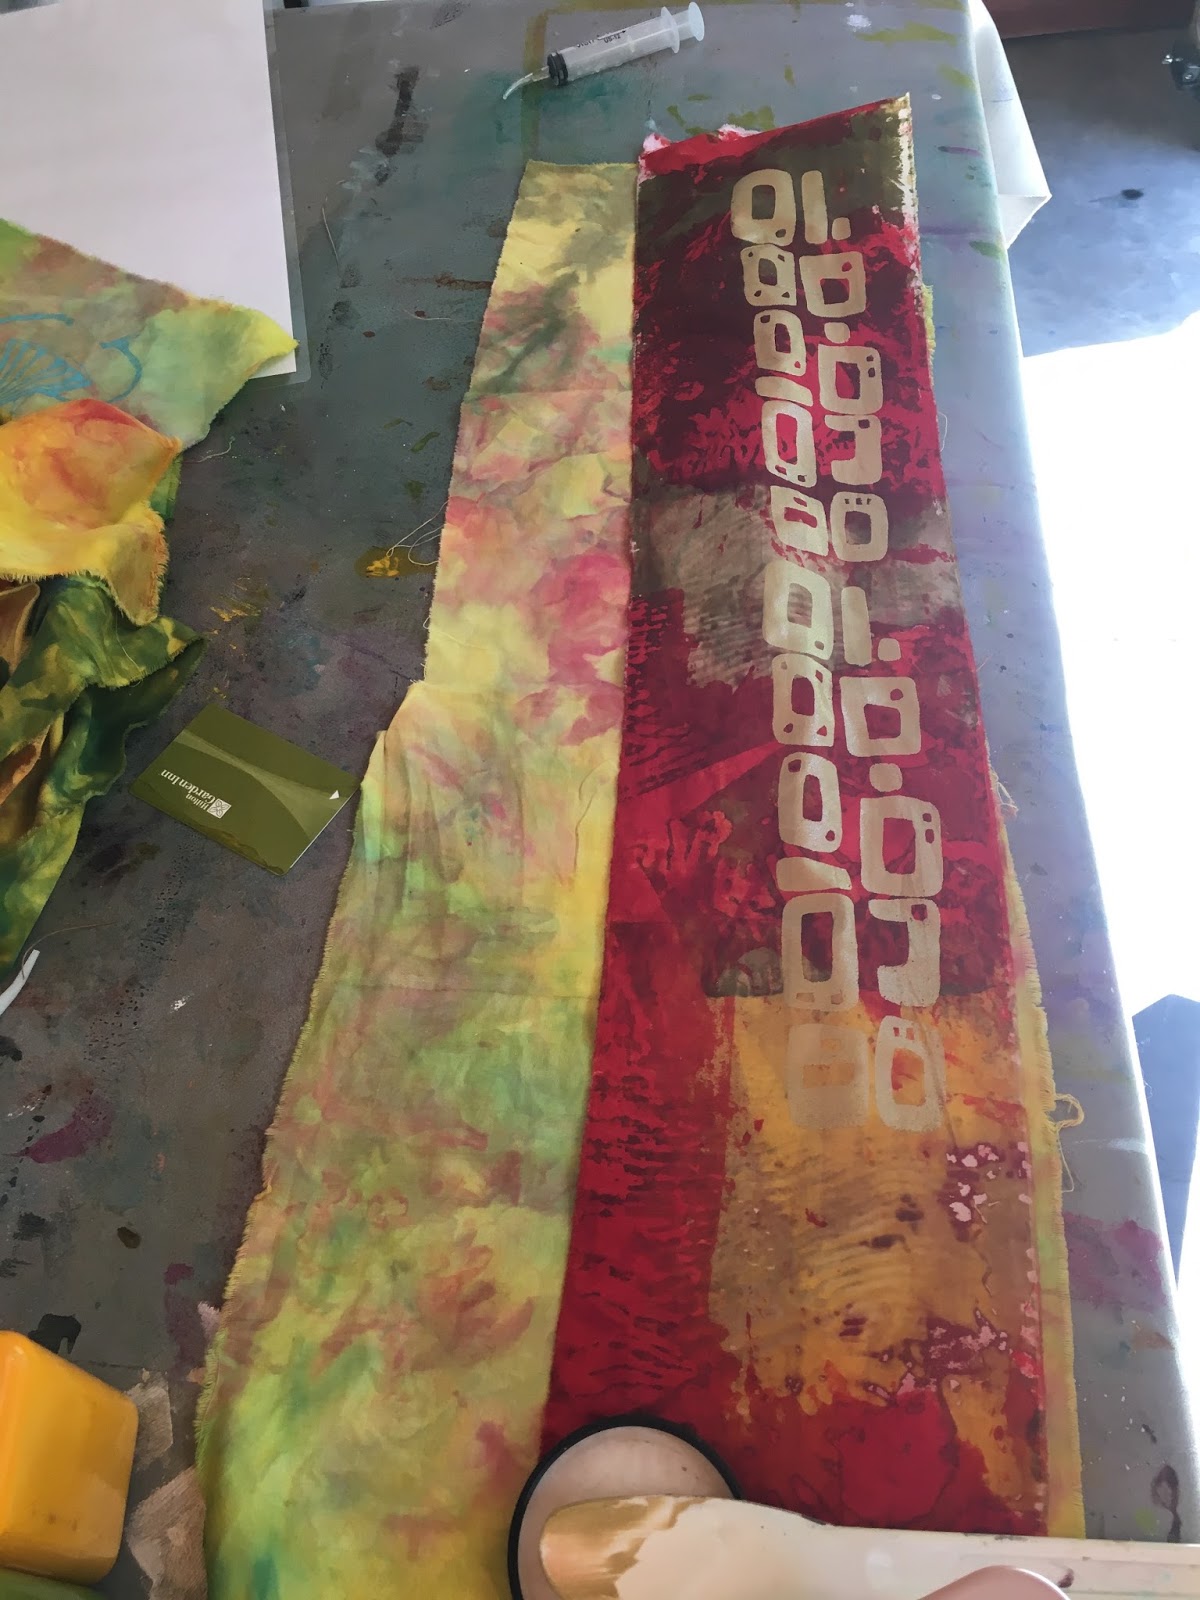
Kate too was using some of her 'failed' previously deconstructed screen printed fabric.  I love what she's done here; printing a fern and using the edge of a credit card to depict more foliage.

We all went home with transformed fabric....some real successes, others candidates for another 'do-over'.  Deconstructed screen printing is on our agenda for June....and we can't wait!!!


Friday, July 15, 2016

FLASH SALE

I need to update and revamp my online gallery shop to reflect the recent sales from the NC Arboretum exhibit.  So before beginning, I decided it was a great time to have a FLASH SALE!!!!  The Arboretum is a wonderful place to display quilts yet their hanging system makes it very difficult to hang mounted pieces.  An issue I'll keep in mind for our 2018 show and a happy one for any of you who've been eyeing one of my embellished mounted pieces.  All gallery wrapped pieces are finished on the back with cloth and fitted with hanging devices. Other specifics are posted below.  Click on the photo to enlarge your view.

All prices include free shipping in the US.  If interested, email me (link on right side bar).  I can bill you via Paypal or will accept a check. Don't hestitate to contact me if you have any questions.  This offer is good until July 18th - noon Est  
                                 
                         FOCUS ON NATURE 14" X 11"   © 2016
     $135
Deconstructed screen printed images on silk noil, bead embellished, hand embroidered. Mounted on canvas covered fabric backed frame with a hanging device.

*Note - the beads around the agate appear reddish, however the color more closely matches the pale orange dyed scrim. 


 MAPLE LEAF - 9 x 12" © 2015 
$125
 Artist hand-dyed, shibori printed, ice-microwave dyed, & mono printed wool featuring bead embroidery.  It's mounted on a canvas covered frame, fabric backed with a hanging device.

THE COLOR OF FALL - 12" X 9" © 2015
 $125
 Artist shibori printed, ice-microwave dyed, & mono-printed wool, machine needle lace embroidered leaves. Mounted on a canvas covered frame, fabric backed with hanging device.
INDIGO BLUE - 10" X 8" © 2015
 $125
 Artist indigo dyed linen, printed with natural foliage, bead embellished agate, and hand embroidered.  Mounted on a canvas covered frame, fabric backed with hanging device.

ELEMENTS #2 -  8" X 10" © 2015
 $125
Artist ice-dyed silk noil, hand embroidered, bead embellished. 
Gallery wrapped/cradled wood frame.  
                     
Back view.  All my framed pieces are finished on the back.
PURPLE AGATE  10" X 8" © 2014
 $125
Artist marbled cotton, hand embroidered, bead embellished, featuring a beautiful purple agate. Gallery wrapped on canvas frame, ready to hang.
AGATE INSPIRED  8" X 8" © 2014
 $125
Marbled cotton by the artist, hand embroidered, agate and bead embellished. Gallery wrapped canvas.
LIGHTNING AT SUN SET  8" X 8" © 2014
 $89
Artist deconstructed screen printed wool, hand embroidered, bead embellished, featuring a laser cut metal motif.  Gallery wrapped on cradled wood frame.
Though I work in many different styles, I'm especially drawn to simple, clean, minimal designs.....featuring a focal element which is quite visible. It draws the viewer in for a closer look where other details keep their interest. 
                     WAVELENGTH    10" w  X 8" h   ©2014
       $100 
Artist ice-dyed wool, machine stitched, hand embroidered, and bead embellished.  Gallery wrapped on wood frame.

Check out these sites to see what other artists have been creating this week: Nina-Marie's Off The Wall Friday, Sarah's Whoop Whoop Friday, Crazy Mom Sews.
SaveSave

Tuesday, July 12, 2016

GIFT TAGS

Given the cost of our fiber materials, it's always so satisfying to come up with ideas to utilize as much as possible.
The bits and pieces of the mono-printed Woolfelt that remained after making numerous covered boxes were like an itch that needed to be scratched. They needed attention!  So, they were cut into a variety of shapes, backed with card stock, and will be used as gift tags.  YEAH!!!

UPDATE:   I'm always surprised  at the interest you readers exhibit!  So because I've already had two questions about this little project let me explain further.  The small left-over pieces of painted felted wool were glued to cardstock with Scotch Super 77.  

It WAS MESSY due to the need to handle all the pre-cut small pieces. They were placed upside down in a shallow cardboard box, sprayed and then at first using my fingers but later I tried a tweezers which was too difficult to manage, turned them right side up onto cardstock.  I covered that with a piece of plastic (grocery store type) and pressed down firmly to provide a good bond.  It was allowed to sit for several hours before cutting away the excess cardstock.

I'm not a fan of spray adhesives for many reasons but my experience has taught me that neither Wonder-Under nor some of the liquid glues would bond well enough to stay secure for any length of time.  The porous nature of the woolfelt can be an issue when bonding.

Also, after spraying my first batch, I placed a sheet of tissue paper in the bottom of the cardboard box to cover the sticky residue before positioning more felt pieces.  Do that each time you spray otherwise glue will remain on the front of the mono-printed fabric. A box used help contain the overspray!
 
A large-eye sharp crewel needle worked well to attach strings to the gift tags.
Here's my pile of completed tags.....  Hope this provides you with the info necessary to create your own boxes or tags.

Friday, July 1, 2016

FIBER JUNKIES - LATE JUNE MEETING

Fiber Junkies meeting day is one we look forward to all month. During the summer we gather at Val's, who not only generously shares her studio......but we overrun her house as well.  Instead of a single theme this month, we each kinda did our own thing.
 This is a dream group.....talented and giving members who blend together so well.  We each have our own spacious table and supplies are freely shared between everyone.  Note the back wall.....it's FILLED with Val's silk screens....aren't we lucky to have access to them!?!
 Here's one of her border screen....sorry about the poor quality photo.
 And here's a piece Val just screened using one of the designs.
 Judy is tackling a major project, with a deadline closing in, so her goal was to create some fabric that appeared old, with crackling/peeling paint to be incorporated into her design.
Val, whose touch is always magic, is helping Judy with the paint layering process.
 Kate brought previously dyed/painted fabrics to enhance.  She's drawn to images of coastal South Carolina and this fun piece is going in that direction.
 Gen will be moving soon, hopefully nearby, and has decided to get a jump on organizing her fabrics by making kits from her scraps.  A really smart idea. 
We are all soooo very happy Denny has been able to join us again even though she continues to oversee some family health problems.  She can be counted on to get us interested in new directions for our work.  This 'transfer' image technique is one we will be exploring in an upcoming meeting.
 My quest was to mono print some National NonWoven's Woolfelt.  We came up with this (new for us) method during our last mono-printing session.  To obtain good prints when using stencils, one is positioned (or other flat item) beneath a blank silk screen.  Paint is then drawn through the screen....here I used an old gift card.  The screen is simply moved from place to place on the fabric one is printing.
This approach keeps the stencil flat and helps to keep the paint from migrating beneath the cut out areas of the stencil.  It's doubly important in this instance because of the wool's nap. 
 I borrowed stencil from Gen to mono-print dots on the other half.
Once dried, one of Judy's fabulous small screens was used as an over-lay and printed with black paint.
Next, I switched gears to try to give a face lift to this purple (though it may not look purple in the photo) silk noil.  It had been previously altered by bleaching with dry bleach.  The small discharged areas were simply not interesting enough.
This is better!!
 
More printed wool felt 
And a final one.....  I have no plans for their use right now....just happy to know they are there when inspiration hits me.  

Stay tuned for FJ show and tell next post....in the meantime....see what others have been up to this week:  Nina-Marie's Off The Wall Friday, Whoop Whoop Friday, Crazy Mom Sews.


SaveSaveSaveSave