Saturday, September 29, 2012

MADE MY DAY!!!

At the risk of sounding terribly self-indulging.....let me share several things that 'made my day' yesterday....

Before I do.....for anyone local who is reading this...don't forget the Asheville Quilt Show is ongoing now through Sunday at the WNC AG Center, across from the Asheville Airport.  It won't disappoint you!!  But of course you'll want to see the show early enough to allow you to get home and watch the Packers on national TV late Sunday afternoon!!!

 Besides the obvious opportunity for inspiration at a quilt show and of course shopping, the Asheville Guild offers several daily free lecture/demos presented by our members.  Yesterday afternoon I presented one.  At the end of my chat...Janet Ginn of Greer, SC, MADE MY DAY!!  

She introduced herself and shared with me that every morning, without fail, the first thing she does is read my blog.  OH MY!!!  Now, that's a lot of pressure.....and as I told her.....I was sure there were more worthy things to do!  However, I'm very, very flattered.....thank you Janet.  It's great to know I have friends out there enjoying a cup of morning coffee with me!


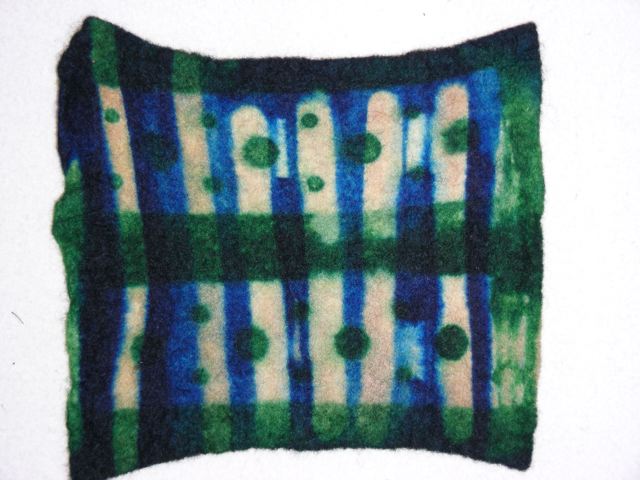
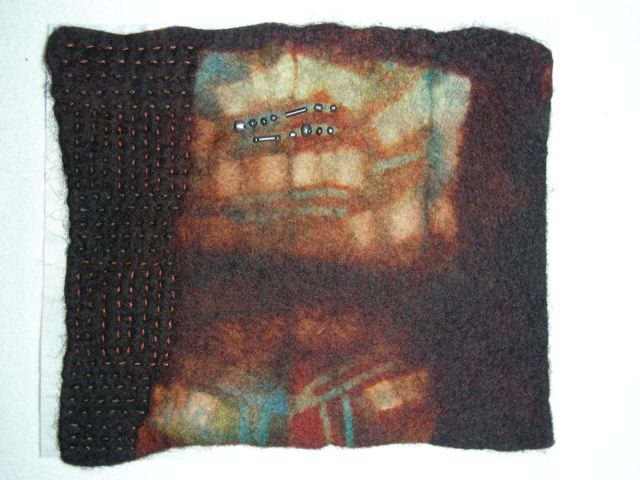
The following two quilts are on display at the Asheville Guild Quilt show.....much to my surprise they both earned ribbons. That too, 'made my day'!  This will be a great way to remember each of them since they are both going to new homes shortly!

2nd Place

Judges Award
(I've given out dozens of judge's awards over the years in my role as quilt show judge, but I've never received one....thank you to Scott Merkin who awarded this quilt with that honor!)

I took numerous photos yesterday of some of my favorite quilts in the show and will get them downloaded and hopefully post them for you to enjoy tomorrow.  

See you tomorrow Janet!!!

Friday, September 28, 2012

DOTS

All Done.....  Learning when to stop is difficult for a bead maniac like me.....but more is not always better. This piece needed only a few details to complement the resist dyed design.  So, I put my needle down, finished the backing, added a hanging device and now it's ready for a new home!

 DOTS  6" x 5" 
Resist dyed & felted wool, hand embroidered & beaded.
Available here  (and most of these little guys are selling quickly)

Detail

Thursday, September 27, 2012

STITCH BY STITCH

Evenings go swiftly when I have handwork to play with.....

 Simple hand embroidery using Lana, an acrylic & wool blend thread.
 .....and more stitching...
....Now the beading begins

You may want to click to enlarge the photo....yes this is beaded.  I'm not calling it finished yet.  I've added and removed that yellow bead several times....the idea of having a spot of color may just not work on such a tiny piece.  I'll play more later today and see how I feel.....  stay tuned...

Wednesday, September 26, 2012

HERE I GO AGAIN....

Yup.....I simply can't help myself.......I'm totally smitten with embellishing my resist dyed felted wool!

 As mentioned previously in my almost back to back to back posts about this type of project.....I begin by gathering the embellishment options.  It's very important to edit well when working on these tiny pieces.  This one measures a mere 6" x 5.5".....not much room to express oneself!
 Because I've hand felted and then dyed the wool, the shapes are often wonky. Frankly, that can add to the charm.  
 However, sometimes a little trimming can aid in keeping the eye on the design, rather than wandering out to the bunny ear edges.  Notice the difference between this one and the previous photo....and just how very little I actually trimmed away.
Before the beading commences, I like to add some texture and interest to the background with very simple embroidery stitches = nothing fancy here because it would distract from the already fairly busy pattern.  

There's no plan for the stitching or beading.....all too often I try a method and find it not to my liking, grrrr...then it's removed and another attempt is made.  Even when I try to be very thoughtful ahead of time, I'm not always successful....it truly pays to be patient and willing to have 'do-overs'....this isn't a race for me......getting it right in the end is what matters.  

I'll bet a lot of you feel the same way!  Keep watching....

Tuesday, September 25, 2012

SIMPLE PATCHWORK FUN

My machine has been unusually busy lately as I created this simple patchwork lap quilt.  During my reorganizing frenzy awhile back, a whole bunch of hand dyed fabrics were uncovered.  They were purchased years ago from a fabulous dyer who is no longer in business.  However, the last time I used the fabrics for a piece that would be washed, I realized most of the dyes were not stable....therefore I've put off working with them again.

But, after several Retayne baths....they no longer bleed.

 Sitting at the machine for long periods of time is not a favorite part of my sewing activities.....  So, naturally I design with quick and easy patchwork these days.
 Really....how much quicker could it get?
I began by making randomly sized blocks.....12.5" wide and a variety of heights.  The first two rows are organized here....it was then that I realized I was going to have to be a bit more thoughtful about the remaining two rows because I didn't have an endless supply of some of these colors!

 It's coming together...
 The last row required the most planning to distribute a pleasing color and placement of the blocks.
The still unnamed piece measures about 50" x 60".  It will be machine quilted using a grid design.  I'll post a photo later when it's complete.  Sometimes these quickies are good diversions for me....really one can't bead all the time...or can I???

One final thing....and it's a total whine, bad loser, poor sport comment.  The Packers got ROBBED last night!!!!

Monday, September 24, 2012

MONDAY NIGHT FOOTBALL

ARE YOU READY FOR FOOTBALL???  EVERYONE IN THIS FAMILY GETS INVOLVED.....

GO PACKERS......GOOOOOOOOO!!!

Saturday, September 22, 2012

MOCA

With another couple of hours of stitching and finishing....this week's project is now complete. As I mentioned previously, it's not a color scheme I've used more than twice when I was resist dyeing.....but will definitely do so in the future.  I love the earthy look and feel to it.  

Maybe that's because fall is about to invade us....we are already seeing snippets of yellow on the trees in the higher elevations.

As is my practice, the piece is already prepared for hanging, but done in a manner that would allow one to frame it if you prefer.  

Happily, my blogshop has had a lot of activity lately.....so if you were keeping an eye on one of the pieces posted, don't delay your decision too much longer!

                                                          MOCHA 7" X 6" © 2012
Available here
Artist resist dyed felted wool, hand embroidery, embellished with steel beads.

Detail

Friday, September 21, 2012

CONTENTMENT!

Oh....I'm such a happy camper when I have handwork to keep me busy at night.....my broken fingers still hurt of course, but I'm managing to use a needle anyway!

I found a package of real metal beads on sale in a craft store, probably at least 2 years ago. Though my first instinct was to marry this piece of resist dyed & felted wool with brass embellishments, a yearning to use the metal treasures couldn't be overlooked.

Working with these tiny felted designs has taken some getting used to.  This one is 6.5" wide x 5.5" tall. Editing is super important and difficult for someone like me who LOVES to add 'stuff'.

As you can see, it's still a work in progress...you can see how it began here and hopefully in a day or so, I'll be posting the finished piece.  So check back, won't you??

One final thing....I KNOW it can be difficult to figure out those crazy letters in the word recognition comment section......  I tried removing that requirement twice now.  Sorry, I've had to put it back on.  Just overnight last night I got 11 spam comments.  Don't these people have anything else to do with their time?  Clearly they are not a quilter!!!

Thursday, September 20, 2012

HAND STITCHING AGAIN!!!

Yippie.....I'm finally able to work without yelping....fingers are improving daily after my dramatic tumble!


 Naturally, I didn't want to start out on a big project and overdue the healing process.....which is really an excuse to add some designs to another small piece of resist dyed felted wool!  I wish I'd have worked in this color scheme more.  It's not one I'm accustomed to, but isn't that part of the fun and challenge?

The designs were the result of a 4 bath dye (separate colors for each 'dunking'). The felt was folded numerous times & secured with narrow wood slats and hair clips & strong rubber bands.
 Again, as is typical....I dig through the vast collection of embellishments, (okay I'm admitting I have a LOT of beads and trinkets).  The stitching seems to go more smoothly once I have a 'pallete' to work with.  However, it often takes me an hour plus to make those initial decisions!  Mainly, cause I really don't have a clue what I'm going to do until I pick up the needle.
The beginning.....some hand stitching has been added to the left side using variegated thread.  Before deciding whether or not I want to duplicate that same stitch pattern on the right, I'm going to begin adding some beads.   

Let's see what happens.......

Wednesday, September 19, 2012

QUILT HANGING HINTS

One of our fellow blog readers here wrote with an inquiry about purchasing one of my small resist dyed wall quilts listed on my blogshop.  Specifically she was interested in knowing how these little pieces are hung.

Perhaps others wonder too.  So here's some hanging tips for wool quilts.....

 A traditional cotton fabric sleeve is utilized on my larger woolfelt pieces.  I make my sleeve with a 1/4" ease to provide room for the hanging rod, making it less visible on the front.
These new small pieces of mine have taken some time to find the best method.  Generally they aren't as thick and due to the size, a dowel would simply be too heavy & thick.  

Also, since they are often irregular in shape a sleeve becomes problematic.  And finally, I need to allow for the possibility that the purchaser might wish to frame the piece.  I've decided not to frame at this end, except in rare occassions. It adds too much to the cost and difficulty of shipping.  Not to mention that the color of frame, style etc. are such personal decisions.

All my wool pieces are backed with either felted wool or bamboo/rayon felt.  The later is thinner and a good choice for the small pieces.  Corner triangles of felted wool are hand stitched to the back...after determining a 'plumb' line to allow the design to hang straight (taking the uneven edges into consideration.)

Notice the small metal rod used for the piece in the photo above.  This was one of my 'happy dance' ideas.  It's lightweight, easy to ship, and doesn't add bulk. If the new owner wishes to frame the piece....this rod is removed...but the triangles can remain.

And finally....also after a lot of experimenting.  I now fuse my label to the back.  I'm not a big fuser...preferring instead the look of hand work.  However, the seam allowance of turned fabric labels can sometimes give a slight impression on the front of the work....so now print my label on my Espon 520 Workhorse printer and fuse!


Here's a view of the front side of the piece.....  
"Yellow & Blue - Green"   6.5" x 6" available here.

 It's a real treat to 'see' where my pieces end up.  This quilt is owned by Linda Oberg who lives in the Metro Denver area. 
 I'm so flattered.....clearly she is a discerning collector!!!  Thank you Linda and Gwen for the photos!!

Tuesday, September 18, 2012

BEAD INSPIRATIONS

Check out Darra Williamson's blog today.....she's featured bead inspirations..... I'm flattered to be included.  

Darra is a talented quilter who is also an excellent editor.  I've been lucky enough to work with her through various publications for many years. Love this gal and you'll love the See How We Sew blog for its superior content.

Sedona Nights 3" x 5" by Darra Williamson

Sunday, September 16, 2012

WHILE MY FINGERS ARE HEALING

So.....I hope you all have logged in some good stitching time during my short absence.  I should be back on full throttle soon.....feeling better each day. (note the racing terminology)

"The husband" is a car fanatic and I'm often dragged to endure long days at hot, loud, and uncomfortable race tracks.  This weekend we visited one we've never attended before and were treated to lovely weather.

 This is the view of the Porsche Paddock at the Virginia International Racetrack. The PCA volunteers did a great job of sorting the cars as they came into the reserved parking lot by model, evenly spaced, front ends all lined up. It was pretty impressive.
Members of the Porsche Club of America have access to a hospitality tent that hosts many activities.  One that is always anticipated is 'tech talk' by Porsche representatives from Germany.

Of course I rarely understand what the heck the questions or answers refer to, but those that do really appreciate all the inside info.


This is how the day goes......loud cars going round and round.  Actually the location of this Porsche Club space was one of the best we've experienced anywhere.  It was close to the track and in view of numerous treacherous turns....lot's of action!  A Porsche came in 2nd in the GT class.  (Ya, I know TMI)

I'm sure this is as boring to you as it often is to me.....but kuddos go to VIR (Virginia International Racetrack) for NOT allowing tents and other canopies in some areas.  So often the grounds of race tracks are dotted with these creature comforts (which I TOTALLY understand) but they hamper the viewing badly for the bulk of the race goers.

In closing, and hopefully you'll forgive me for another possible boring subject.....the NFL suicide pool that I went out of last week on week #1 had a BIG upset this week.  38 participants went out today on just 1 pick.  They all selected New England to win....and surprisingly, they lost.  I don't know what the full tally of games will be....but I can say now near the end of week 2.....over half of us 66 are OUT.  That's what makes this specific pool so interesting......big ups and downs.

Thanks for listening.....


Friday, September 14, 2012

SEPT. PTA GATHERING

Our Sept. PTA meeting was held at my house on Thursday.....each car load that drove up questioned whether our house has moved?  No one remembers just how far out of Asheville I live!  But they all made the trip and we had a great day.

Show and tell will be abbreviated here because a number of pieces shared will be in the upcoming Asheville Quilt show (see side bar for details) so I'll keep the maker's work private for now.
 That certainly doesn't mean there wasn't amazing things to share.  Lynne has been VERY busy dyeing......  She had a huge stack of fractured 1/2 yard pieces for us to drool over.
 Judy Simmons shared some of the samples she's creating for a new workshop she'll be offering at the Mid-Atlantic Quilt Festival.  We are all looking forward to this event in Feb. 2013, because Judy, Linda Cantrell and I are all teaching...this should be big fun!!  We hope some of you will join our classes.
Georgia Bonesteel was being the ambitious one......we mostly eat, chat, eat, chat....rarey do any of us work on something....guess we don't have a very good attention span.
Our jack (I mean Jill) of all trades, Gen....who is accomplished at any sewing task.....shared this new piece with us.....  Awesome!
Barbara, another ambitious PTA member.......is an excellent knitter......I'm pretty sure this sock was hers.....or else it was our Queen of everything...Gen's.  Sorry girls.... being the hostess...I wasn't able to keep up with everything!
But, I do know Barbara was cranking these glass cozies out......
Georgia made this quilt as a wedding gift......signatures of guests and family members were on the back......

A fun day was had by all......

BTW -  PACKERS BEAT THE BEARS....PACKERS BEAT THE BEARS....yup, I am gloating.....

Thursday, September 13, 2012

CORAL GARDEN

It's been slow going with 1 busted finger and another that's bruised on my sewing hand.....but with so little beading still to go, I was able to complete this project.

 CORAL GARDEN 
12.5" X 8.5"
Artist hand-dyed felted wool, bead embellished
Available here
Detail

Wednesday, September 12, 2012

THE CULPRIT

I'm slowly recovering from my spill.  Sooty is sorry.....  All she wants is to be with her people.  

She'll sit at your feet anywhere....jumps in the car so you don't leave without her, and she'll carry her Frisbee around so you'll play with her.....


Tuesday, September 11, 2012

HALLOWEEN COSTUME

Since I need a bit of R & R for my body to recover from its dog induced spill on Sunday.....not much will be going on in the studio for a few days.

So, even though it's a bit early....let me share a project I recently completed for our new grandson.  He'll be 6 months old at Halloween and of course ready for a custom made costume by Grandma!

I made our son's (often elaborate) costumes for years when he was little so this task was welcome.  Raiden will be a bottle of hot sauce....assuming the parents will dress up....our son will be a burrito, wrapped in tin foil and DIL a taco.  What a picture that will be!!

We have the full & very confusing, difficult to use version of Photoshop.  Yes, I've purchased several Photoshop for Dummies books......I guess I need the 'dunce' versions instead.  

So after more hours that I'd like to admit.....and lots of rejects....I combined some graphics and text to create a label for the hot sauce bottle on white polished cotton fabric.  

The kids live in the Noe Valley area of San Francisco....thus the personalized reference here.

 Unfortunately, the text spacing didn't work for a diamond shape label, so back to the computer to start over.  But I got it finally!  

Using felted wool scraps, various pepper shapes are being auctioned as the label sits on the rectangle of red felt.
 Detail 
 Front of costume....simple neck opening and holes for arms.  My DIL thankfully reminded me of the need to be able to access diapers and the ability to strap Raiden into a car seat.....so the bottom is just left open.
Since I had a spare print from my first digital transfer, I put it on the back.  Initially I'd planned to gather the neck with a draw string but on second thought, I decided that might be a bit bulky and uncomfortable (fitting isn't easily accomplished half-way across the country).  My solution was to add two ties at the back neck...placed several inches apart.....when tied, it will pleat up to take up any extra slack.


And of course the bottle 'top' completes baby Raiden's first Halloween adventure.

Anyone else making costumes they'd like to share??