Sunday, April 29, 2012

DOGS!!!

It's not a surprise....this newly adopted rescue dog has literally taken over our household, not to mention our daily routine.

I'm still mad at her quite often as she definitely has a mind of her own which is intent on chewing up all rugs and various other interesting objects that tempt her.

But doesn't she look so innocent here?  We had a dog outing with some friend and their well behaved dog yesterday at Dupont State Forest.  It was a beautiful day and this popular water fall attraction destination was crowded.  It's a good thing we have some dog training scheduled for her because she did not cooperate on the leash well at all.


I rarely look at you-tube......really....I already spend more time at the computer than I should.  But 'the husband' found this clip, a follow up to one that was posted ages ago.  It's really worth watching if you love dogs.....and ya gotta wonder, how on earth did they get these dogs to behave so well.  Maybe there's hope for Sooty?!?

Saturday, April 28, 2012

LONG NEEDLE PINE COMPLETED

It's wonderful having readers who are willing to provide input when indecision hits me.  We are all in agreement....the pine cones should remain as they are and not further embellished with beads or threads.

Like Jane said in a private email to me.....that could be another quilt!  It's a recommendation I've often made to students in project classes, so I'll follow my own advice and thank you all for your contributions. 

 After what seemed like hours, shifting and rearranging various bead styles and bead patterns to add to the edge of the quilt.....I took a break and decided to wait until my evening hand sewing time to make the final decision.


So....I go to sit down in my 'space'....denim couch, bright light over my shoulder, coffee table to rest my feet, supplies at hand, big screen TV (with the program usually set to some car thing or other since I don't have control of the clicker)....and oh ya, now a big black dog trying to worm its way onto the couch.


It's then that I realize, nope.....the reason I couldn't decide on a bead pattern was because outlining with lots of beads wasn't right for this piece.  Instead of framing the design, it was going to overpower it.


In a flash I dashed up to my studio, grabbed some embroidery thread, a big eye needle, and within a few minutes was happily hand embroidering a blanket stitch along the edge.


 Although that decision was better....it seemed a bit unfinished.  Go figure.....yup, I added beads as you can see in this detail.


LONG NEEDLE PINE  9" x 12"

I'm accumulating quite a collection of work to donate to AAQI's Houston fall sale, this may be one of them....however if in the meantime, anyone is interested in purchasing it....visit here.  I have plenty of time and new ideas to make more for this worthy cause.

Friday, April 27, 2012

LONG NEEDLE PINE - WORK CONTINUES

This little wall quilt has been patiently waiting for my attention.....which it received over the last couple of evenings.


All the beading has now been completed.  I had intended to fill in the blank areas of the pine cones with either beads or embroidery threads, but after showing the piece to my fiber buddies.....all were in agreement -  Leave it alone.  Your thoughts??


In the meantime, I added a bit of texture to the background by embroidering a zillion French Knots. At first I worked with 4 strands of thread, but after about a dozen complete, I realized they were overpowering the design.  So I took them out and started again using two strands of embroidery floss, in different shades of green.


The next step will be to add a backing and try to come up with some sort of edging treatment. I shuffled beads around for about an hour this morning and finally put it aside.  I will passively think about it today as I work through my other tasks.

Thursday, April 26, 2012

FIBER JUNKIES PAINTING FUN

What fun!  The Fiber Junkies have spent several months experimenting with fabric paints.  In part, that got our members focused on just how much paint they've accumulated and the realization that it should be used up.

 So, for our meeting this month we came up with the idea of thinning the paint enough to allow it to be sprayed....thus we could transform fabrics we owned to give them another look.


We learned one thing.....the large spray bottles (seen above) don't work well.....way too often they squirted globs of paint, rather than a fine mist, no matter how we adjusted them.  What did work well were recycled butter spray bottles.  Go figure!


Here's a piece of fabric I brought which I never found a way to use because it was so spotty.
 And this is one half of it after I don't know how many layers of paint.  When the spray bottles spit large spots of paint, we restored to spreading it around using paint brushes.  And yes, we finger painted too which worked equally well.
Here's the other half of that fabric where I used different colors of paint.  We ALL fell in love with a metallic bronze paint that Kate brought.  It turned out to be our 'go-to' paint if we didn't like what we did on our first try.  The rule....if you don't like your first attempt.....use the bronze paint!
 Here's a peak at a pale green fabric I had.....a color I would probably never work with.  By the time I was working with this one, I was down and dirty with the painting.  So I started squirting various paint colors in a Styrofoam meat tray.....stirred them together and got this pretty green color.  This was one of my more successful pieces.


Our mild spring had turned cold so for the first few hours we worked in a closed garage (this is messy.....so outside or in a garage will be your best choice if you want to try this at home).  After lunch the sun came out and we moved into high gear.....filling drying racks and even restoring to drying the fabric on the driveway.

 This sheer moire started life as a kinda a dirty gray....
.....now it has a new life!

The same holds true for this very large scale print.....not my style but.....

 with a little paint......I can see a usable future for it.


This spray paint day was such fun.....and we are now developing ideas about other ways to use up all that paint....  I hope our play day will inspire you!


Wednesday, April 25, 2012

FIBER JUNKIES - APRIL MEETING

Today the Fiber Junkies met at Val's house for the purpose of changing some 'uglies' (fabrics) and not so uglies, into more usable fabrics......I'll share some before and after photos tomorrow.....

But first I'd like you to see several pieces that Val is currently working on.  They   will be displayed at the Southern Highland's Folk Art Center on the Blue Ridge Parkway in the fall.

Among Val's many talents, she's a skilled silk screen artist....

 Here's one of her deconstructed screen printed designs. I've personally found this type of fabric often has a lot of energy, making it difficult to find a visual focus.
 Val has found innovative methods to break up the designs.  For instance, she uses machine stitching, stamping, additional silk screen printing.
 Although, unfortunately my photo doesn't show the details she's added....you can see just how much interest her pieces provide for the viewer.
 This detail is from the last photo of this post......Val screen printed one of her fascinating drawings to create a focal point.
 .....and fused some leaves....appliqueing with contrasting thread.
....resulting in a piece that is stylish, with designs that are well integrated into the deconstructed print fabric.


I'm covered in paint and frankly pooped from standing most of the day pumping spray bottles of paint.....see ya tomorrow.

Tuesday, April 24, 2012

IN ORBIT

What a fun couple of days I had creating "In Orbit"......because we are!!  Any day now we will be welcoming our first grandchild into the world.  
This small quilt will hang in his nursery....I'm sure it's just one of many that will
be inspired by this addition to our family!

IN ORBIT  © 2012
20" X 17 1/2" 

Monday, April 23, 2012

NURSERY QUILT

Well....I was able to squeeze in some sewing yesterday afternoon after all....which of course made me a happy camper!

 The motifs and fabrics are coming together.

Some are fused and appliqued, others await a final decision....what fun to be creating such a lighthearted colorful piece!  


The Fiber Junkies had a BIG spray painting day planned today....however, we have a tad bit of snow on the ground, it's 32 degrees and the wind is blowing just like old man winter came back......so we've postponed it and instead, I'll  have some studio time this afternoon.  Hope to report back tomorrow with more progress.

Sunday, April 22, 2012

DOWN A DIFFERENT PATH

While I'm spending my evenings beading on the Pine Needle wall hanging, I've been busy during the day creating a wall hanging (ya, like I have my entire days free to play in my studio, NOT!)

This theme quilt is for a baby boy who will be joining our family very soon.  The nursery features space motifs.....from the rocket ship curtains, to a colorful mobile, and a modern overhead lighting system.

 In keeping with their color scheme......fabrics were pulled and auditioned on my design wall.
 Roughly, the design began to develop in my mind. I truly have no drawing skills, so I often must spend more time than I'd like, searching copyright-free websites to find motifs that I can tweak by tracing/enlarging/reducing for my purposes.  We all know that paper templates don't always translate well to fabric...but it's a start.
And you can see I'm creating a big mess as I fuse, cut, audition again, reject, then pull more fabric to repeat the process.  But.....this is a process, sometimes the steps go effortlessly, other times not.  For me...it's the end result that matters. I don't hurry any of the steps just to finish faster....I need the work to be one I'm proud of, no matter how long it takes.

Let's see how much progress I make today.  It's now past noon and I've already done a 90 min. walk, 3 loads of laundry, drove 25 mins. there and back to the grocery store, and played ball with the dog - who over-runs it each time....so the exercise process takes twice as long as I want it to!  There's another to-do list that needs to get fitted in sometime this afternoon as well....however, I WILL work as much as I can on this project and report back tomorrow.


Saturday, April 21, 2012

MARY'S QUILT TOUR ANNOUNCEMENT

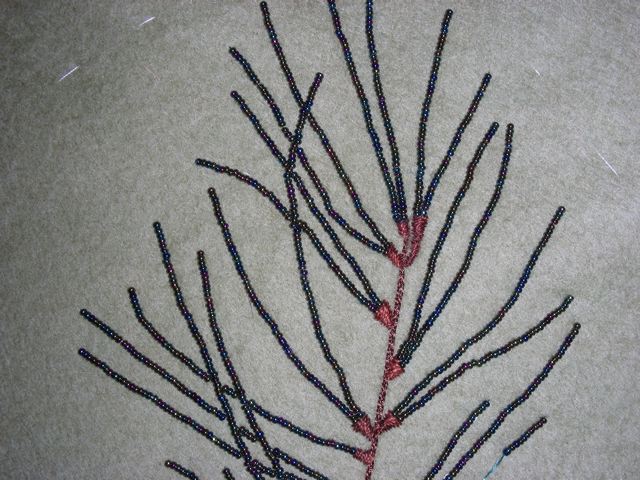
I'm pausing my reports on the Pine Needle piece....as soon as more significant progress is made, I'll share it again.

Instead....Today I want to announce that registration is open for my April 2-10, 2013 Charleston, SC & Savannah, GA Quilt Tour.  Two years ago I hosted a similar trip to the Asheville area and we knew immediately that we wanted to repeat this type of tour by exploring other historic/craft/art/foodie cities.....here in the good ole' USA.

Click on the link provided to learn all about the trip and consider signing up early. We design these tours for very small groups.....the better to get to know everyone, but that means space is limited!

We will begin in Charleston, SC......a city of living history and culture. One of the stops I'm most looking forward to is a visit to Charleston's Old Market. You'll marvel at this huge market where craftmen's display and sell their handmade wares.  It's blocks and blocks long and steps away from fabulous restaurants and coffee houses where you can rest your feet before you head back for more shopping.

Besides all the fabric and craft shopping we will be doing, we will also be touring Boone Hall.  This is the stunning view visitors experience upon entering the plantation as they pass through the world famous Avenue of Oaks. This working plantation has been growing and producing crops for 320 years!

Of course there will be so much more to see and do while we are in Charleston, including a luncheon with a local quilt on John's Island....the brochure has all the details.

After our Charleston experience, we will head to another Southern city that often tops traveler's 'to-do' list....Savannah, GA.  

One could spend days simply strolling the many delightfully beautiful squares in the historic district.  If you listen very hard....you may even hear the music of Johnny Mercer still hanging in the air or see Forest Gump sitting on a park bench!


Savannah is a wonderful user friendly place to visit.  A lot of history is packed into this area. An 'on'-off' trolley allows you to experience so many interesting places in a short period of time.

Here's an example:  This is the birthplace of Juliette Gorden Low, the founder of the Girl Scouts of America.

Oh....and did I mention food.......okay foodies.....listen up....  We have made special arrangement to have a group dinner at Paula Deen's restaurant.  You may know folks generally line up at 9:00 in the morning to get the chance to eat there....we won't have to do that!

I hope some of you may be interested in joining the fun of traveling with other quilters, learning and experiencing the history of our country, and oh ya....fabric shopping too. I'm looking forward to enjoying this special relaxing time with you.


Friday, April 20, 2012

PINE NEEDLES - MOVING ALONG

This project is slow going.....which is fine with me....but may be a bit uninspired for you folks.  Hang in there.....I'm working as fast as I can...yet still enjoying the process.


***and let me say...I wish they'd quit screwing around with bloggers format....I just feel comfortable and then they change the way it works.......geesh....who has time to keep up with all this techy stuff???

Thursday, April 19, 2012

PINE NEEDLES - PROGRESS CONTINUES

I took these photos last night before bedtime with poor lighting...this morning we are experiencing a second day of much needed rain and very dark skies ....so the quality and color will have to do for now..... 

 As I predicted....the end nubs (surely there is a correct word?) were screaming to be stitched. So I worked on those areas first.


 My friend Cindy Blackberg put me on to Valdani, size 12 embroidery thread, that I used. I love it!!  This super soft, easy to work with thread is made in Romania and comes in luscious variegated colors....available on Cindy's website. 
......the rest of the evening was spent adding more beads and more 'nubs'.  I'm enjoying the soothing process of having a project in my hands in the evening since TV watching usually revolves around any type of show that features engines, wheels, and things that blow up!


Of course during the day in my studio, I expand my mind by watching/listening (many times with my mouth wide open in total disbelief) to Bravo's many "Housewive's" shows....

Wednesday, April 18, 2012

PINE NEEDLES - CONTINUED

.......the preparation process continues....

 Now that the stabilizer is basted to the wrong side of the felted wool...for this project I'm taking a bit of a short cut.  Rather than bead the stems, I've chosen to machine stitch those lines using brown rayon thread in needle and bobbin, following the drawn lines as I sew from the wrong side.  


Likewise, the pine cones were stitched with black thread. 


 To transfer the design lines of the 'needles', my approach many times is to machine stitch them from the wrong side.  But, because I'm going to use really tiny beads for this project, I opted to hand baste the lines instead to make it easy to remove and assure a tidy appearance.
 The beading has begun......I'll baste more of the needle lines as I move along.  Frankly, I couldn't wait to see how this was going to look so only a small portion of the basting was sewn.
Detail....notice that the 'needle' lines do not meet the stem.  I'm planning to hand embroider a base for each of the needle units to fill that space.  Just guessing here....I probably can't wait to see how that looks either so perhaps tomorrow my photos will have that detail added to this small section.

Tuesday, April 17, 2012

LONG NEEDLE PINE

After finding lots of long needle pine needles scattered along our walkway last fall, I had fun making this quilt.

......and because I was stuck in the design process of my current project, an idea of how to use this subject again came to me. 

I'm not making much headway on my goal to donate several pieces to Alzheimer's Art Quilt Initiative big fund raiser in Houston in the fall....so it's time to get my fingers beading and revisit the pine needle theme.  By the way, this worthy cause has hit a huge milestone, it received the donation of the 10,000th Priority Quilt!! Be sure to click on the link provided to read all about it.

I've pulled fabric and beads.....keeping my theme of long needle pine needles in mind.

Next, I drew out a design on non-fusible Pellon lightweight interfacing....and tweaked some of the bead choices.


Using a black permanent marker, I traced the pencil markings for easier visibility on the reverse side.  The interfacing was then basted to the wrong side of a piece of felted wool which is 1+" larger than needed.

Notice the basting is being done along a marked rectangle ....which is 1/2" smaller on all four sides than the required 9" x 12" finished piece.  Both of these steps provide a margin of error that is useful when squaring the quilt after the beading is complete.

....stay tuned....

Sunday, April 15, 2012

WRAP UP OF CHAD'S CLASS

.....With permission from Chad....here's my final glowing report about her fabulous workshop.

Chad instructed us always to dye starting with lighter colors, then move to mediums, and finally the darks in the last dye pot.  Here's a pile of some of my felted pieces after being removed from their 3rd dip in the pot.  Although it looks like I used black for each, that's not correct.  These pieces are wet....thus appear darker than they are.  As I recall...we used either:   black, dark brown, dark red, or forest green.


I admired how Chad's frequent use of the color black as her final dye helped to create borders on her samples.  So for this piece.....I placed a resist over the turquoise and red sections....which allowed the black to frame the design.
 At the end of day 1....these were my FINISHED felted dyed pieces.  Yes....all done on day 1!!!
Day two we worked with larger pieces.  I was sort of getting the hang of what resist tools did what to the felt by then.  Of course, there were always surprises, but working with a bigger hunk of fabric certainly provided more opportunities to control the design.  


This is one of my favorites.....I'm a geometric kinda gal.....love stripes, squares, & plaids....well, okay I like polka dots too. Abstract designs are still difficult for me to work with but if you read this blog often....you know I continue to attempt to find success using that design format.
 On the left side you can see how the clothes pins cover almost every inch of this folded felt and what the entire piece looked like as it was removed from the dye pot.  I've removed the pins on the right side...there you can begin to see the results of the cloth pin resists.
Here's the completed, unfolded piece of felt.  It was dyed 3 times....first in grey, then in magenta, and finally in black.


I have no clue yet what I'll do with it......but isn't that the fun of one's fabric quest?  Whether you are shopping online, in a quilt shop, or creating your own....the design helps inspire and dictates the use.


I had so much fun taking this workshop and gained a lot of knowledge. I fully expect to join in another class sometime soon because frankly, it's tons easier then trying to create a dyeing studio of my own!!  And...ya got a master dyer/felter right there to help guide you.


My thanks to Chad Alice Hagan for allowing me to share her process.

Saturday, April 14, 2012

RESIST DYE WORKSHOP

Again with permission from Chad Alice Hagan, let me introduce you to the exciting technique of resist dyeing wool felt.  This two day workshop is held in her home studio in Asheville.....check here for upcoming classes.

Taking this workshop couldn't be easier because Chad supplies EVERYTHING.....seriously.....the hassles of finding the correct supplies are not a concern here.


First we began by felting our wool before we dye it. Wool on the left is how it appeared before I felted it.....notice how it has shrunk (right) after felting.


 After my arms had a good workout felting, we moved onto making a package of our felt.  This was done in a variety of folding methods.  Chad has tons of resist tools for students to use.  Here she's clamping book binder clips onto a felted piece. The theory is that the resist item will block the dye....which in turns provides interesting designs.
 The felt has now gone through one dye bath (the color yellow in this case.) The original resist binder clips were removed, the felt refolded and new resist items were added in preparation for dye bath # 2.
 We had a choice of 4 new colors for the 2nd dye pot.  We each had 14 pieces of felt to work with, which allowed everyone to experiment using new combinations of colors each time.
Here's the result after this piece was dyed first with yellow, then turquoise, then finally green.  It isn't necessary to resist dye a specific number of times.  I was satisfied with the design for some of my pieces after the 2nd dye pot treatment.  Some seemed to nag me to improve upon the design by repeating the process a 3rd time.


Seriously, this was like opening Christmas presents.....you simply never knew how the piece would turn out!  I'll share more photos of my 'presents' tomorrow.....you will definitely want to take this class!